If you create a standard E2B v2 USB drive with agFM, then you can usually secure UEFI64-boot from it by booting from the second (FAT32) partition.
However, some systems will not Secure UEFI64-boot from the second partition because it uses a Microsoft-signed grub2-based Kaspersky EFI boot file which has been blacklisted by Microsoft.
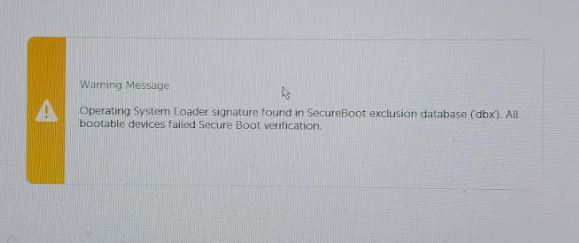

This means that many Windows 10 systems will have run a KB update which has added a DBx blacklist key entry into the UEFI firmware’s database, so that when you try to UEFI64-boot to the agFM partition, you may get some sort of security error:
However, the standard Windows and WinPE boot files are all signed by Microsoft, so we can Secure Boot to any Windows\WinPE OS that is present on the E2B USB drive.
We can therefore create a third Primary MBR partition on the E2B USB drive and format it as FAT32. Once that is done, we can simply copy over our favourite WinPE multi-tool and/or the contents of say a Windows 10 Install ISO onto that FAT32 partition and Secure-boot to it.
The instructions below will add these extra functions to a standard E2B+agFM USB drive (true Secure Boot support without using a signed shim):
- Secure UEFI64-boot to (Strelec) WinPE x64 – you can then run WinPE utilities including WinNTSetup which will allow you to install Windows from any of the Windows Installer ISOs which are present in the E2B USB drive.
- Secure UEFI64-boot directly to your favourite Windows Installer and run Setup.exe.
- Secure UEFI64-boot and run the Windows Memory Diagnostic
- Legacy boot to WinPE x86, x64 and other bootable payloads that are included on Partition 3 (e.g. HDD Regenerator, HDDaRTs, Ghost, Victoria, MHDD, HDA2, MemTest86, Memtest86+)
- Legacy boot directly to the Windows Installer on partition 3
How to create a Secure Boot Strelec partition 3
Note: before you start, you must disable your AntiVirus detection software because the files inside the Strelec ISO will cause it to delete or flag up dozens of files if you don’t!
Instead of adding Strelec (which will cause Windows to complain about viruses every time you connect it to a computer!), you may prefer to use a different WinPE such as HBCD_PE or Medicat or Bob Omb’s WinPE (see below).
- First make your E2B USB drive. Use the Make_E2B.exe utility and click on the Gear Wheel button.
Partition 1 must be NTFS and Partitions 2 and 3 must be FAT32.
Note that the maximum size of a FAT32 partition is 32GB.
If you have already made your E2B USB drive, then use a utility such as EaseUS Home Partition Master to move\resize the E2B partitions and re-format the 3rd partition as FAT32
Partition 3 will need to be at least 9GB (total of the Strelec ISO + your chosen Windows Install ISO). - Now download a WinPE multipurpose boot ISO, I used WinPE10_8_Sergei_Strelec_x86_x64_2021.01.05_English.iso.
Using 7Zip, extract the contents to the new 3rd FAT32 partition. You do not need to copy the [BOOT] folder if you see one. - You should now be able to UEFI-boot from the 3rd FAT32 partition and it will allow you to run the Strelec WinPE.
If you see two UEFI boot options in the BIOS Boot Selection menu, then select the second entry.
Some UEFI BIOSes may not list the 3rd partition. In this case you may need to temporarily rename the \EFI folder on Partition 2. - Once booted to the WinPE Desktop, click on the WInNTSetup Desktop icon to launch WinNTSetup.exe.
The three green traffic lights indicate that the boot partition is suitable for UEFI booting.
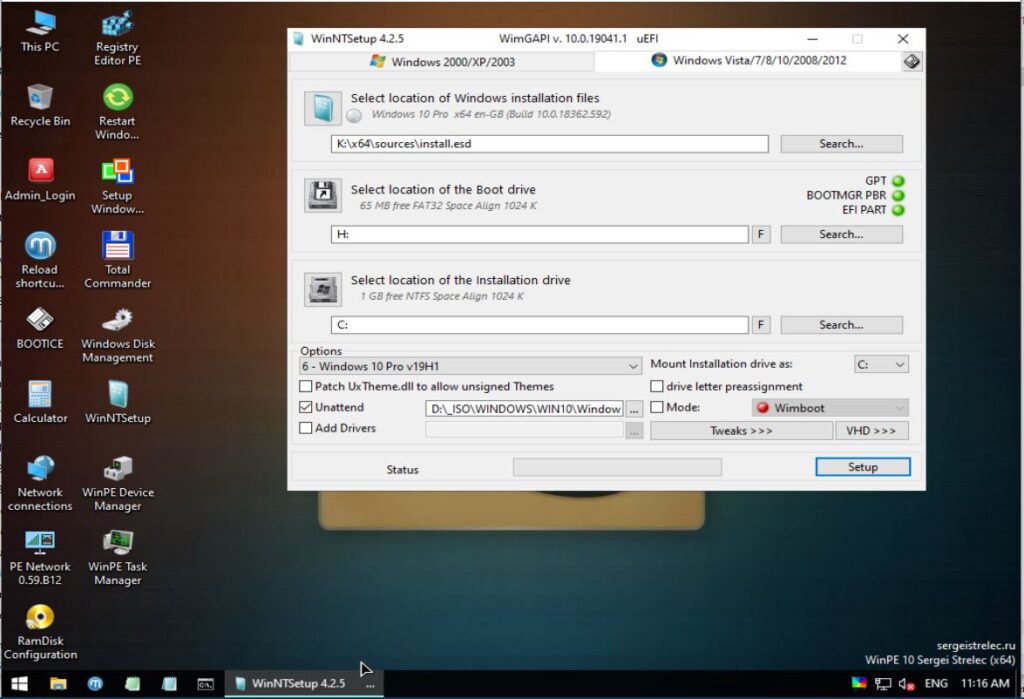
5. We can now browse to any Windows Install ISO in the \_ISO\WINDOWS folder on the E2B Partition 1 volume, right-click and ‘mount the image to ImDisk’ as a virtual DVD and then run Setup.exe from the new virtual DVD drive to install Windows from that ISO file.
Alternatively, we can use WinNTSetup to select any one of the .ISO files on the first E2B partition (e.g. from the \_ISO\WINDOWS\WIN10 folder) and also select an XML file from the same folder if required (see screenshot above). If your WinPE does not contain WinNTSetup, you can add it to the \_ISO\docs\E2B Utilities\WinNTSetup folder and run it from there.
WinNTSetup does not partition or format the target hard disk (even if it is specified in the XML file), so you must do this first. You can use the secret key combination Ctrl+Shift+D to pick a DiskPart unattend script (e.g. use one of the scripts in the folder \_ISO\docs\E2B Utilities\WinNTSetup\Tools\diskpart folder) or just manually run DiskPart from the WinPE command shell. Alternatively, Strelec contains various Hard Disk partition utilities such as Paragon Hard Disk Manager and EaseUS Partition Master.
You will need to create GPT partitions if you want a UEFI installation.
Tip: You can also UEFI-boot to the third partition using F3 in the agFM menu system.
Add a Windows Installer
You can also add ONE Windows Install ISO (the one you use the most) for Secure UEFI64-booting to. This can be derived from a Microsoft ISO or from an All-in-One ISO produced by a third party which could contain Win7/8/10, etc.
Instead of Windows Installer ISO files, you could add the files from a different WinPE (as long as it does not use the \SSTR folder).
- First check the size of the large Install.esd or Install.wim file which is inside the Windows Install ISO file that you have chosen to add.
The Install.* file must be 4GB or smaller. The file is usually in the \Sources folder (or \x64\sources).
If the Install file is greater than 4GB, then use the utility Split WinISO.exe (which is in the MPI Tool Kit) to ‘CONVERT’ the ISO and make a new ISO file containing smaller split wim files. - Copy the entire \Sources folder (or \x64\Sources folder) to the FAT32 Partition 3 of the E2B USB drive.
- Copy the file \setup.exe from the ISO to the root of Partition 3.
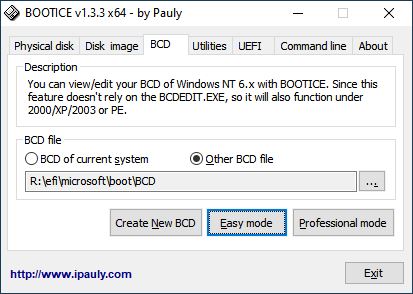
- Using BootIce.exe v1.3.3 (e.g. download it from majorgeeks.com or use the one in the \SSTR folder in Strelec), use the BCD tab to add a new entry into the existing Strelec BCD file:

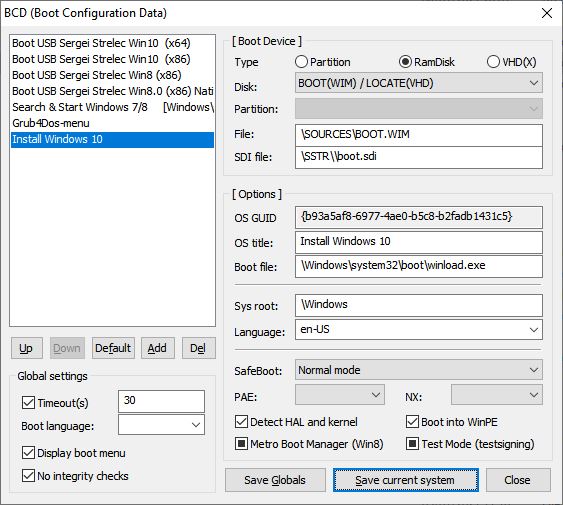
After clicking ‘Add‘ – ‘New WIM boot entry‘, change the File, SDI file and OS title fields to use the added Windows boot.wim file and the Strelec boot.sdi file.
IMPORTANT: Ensure the Boot file is correct for winload.efi not winload.exe (see screenshot).
Click on ‘Save current system‘.
4. You should now be able to Secure UEFI-boot from the 3rd Partition and select the Strelec WIn 10 entry or your new Windows Install files (e.g. ‘Windows 10 2021’).

Tip: If you want to ‘switch-in’ a .imgPTN or .imgPTN23 file, you can run \_ISO\SWITCH_E2B.exe from Strelec WinPE.
Legacy Boot to Strelec
If you want to also Legacy boot to the files on the third partition, you can add a .mnu file for the grub4dos E2B menu system and a .cfg file for the agFM grub2 menu system.
These two files can be created on the first NTFS partition in the E2B Main Menu (but they could go into any menu folder you like):
/_ISO/MAINMENU/Strelec on Ptn3.mnu
# grub4dos menu file to boot to bootmgr
iftitle [if exist (hd0,2)/bootmgr] Strelec (Partition 3)\nBoot to Windows\\WinPE\non Partition 3
 root (hd0,2)
 chainloader /bootmgr
 boot
/_ISO/MAINMENU/Strelec on Ptn3.cfg
#grub2 file to boot to bootmgr on partition 3
 if $MBR; then
     set root=(hd0,3)
     ntldr /bootmgr
     boot
 fi
 if $EFI64; then
     set root=(hd0,3)
     chainloader /EFI/BOOT/BOOTX64.efi
     boot
 fi
 echo ERROR: Not a 64-bit CPU
 sleep 3
Add a Legacy boot option to install Windows
To add a Legacy menu boot option to boot to your Windows Install boot.wim file, you will need to edit the \SSTR\BCD file using BootIce.exe in a similar way as before.
(If not using Strelec as your main WinPE, look for a \boot\BCD file and a \boot\boot.sdi file)
After clicking ‘Add‘ – ‘New WIM boot entry‘, change the File, SDI file and OS title fields to use the added Windows boot.wim file and the Strelec boot.sdi file.
Ensure the Boot file is correct and loads winload.exe (see screenshot).
Click on ‘Save current system‘ to save the new entry.
Tip: You may need to scroll down the Legacy bootmgr menu to see the new menu item.
Add other WinPEs
Bob Omb’s WInPE
You can add Bob Omb’s WinPE in a similar way:
- Use 7Zip to open the Bob Omb’s ISO or source file (e.g. Bob.Ombs.Modified.Win10PEx64.v4.8.ISO)
- Copy the \Programs folder to E2B Partition 3
- Copy the files \CdUSB.Y, pecmdExt.ini and \autorun.cmd to the root of Partition 3
- Create a new folder on the E2B Partition 3 drive named ‘\BobOmb’ and copy the file from \sources\boot.wim into it
- Now use BootIce as above to add new entries into the BCD to boot from the \BobOmb\boot.wim file
HBCD_PE
This can usually be added without conflicting with other Windows\WinPE files:
- Create a new folder on E2B Partition 3 named \HBCDPE
- Open the HBCDPE .iso using 7Zip and copy the \sources\boot.wim file to the new \HBCDPE folder
- Copy the file \HBCD_PE.ini to the root of the E2B Partition 3
- Now use BootIce as above to add new entries into the BCD files to boot from the \HBCDPE\boot.wim file
Medicat
This just adds the Win 10 WinPE files (it cannot be added if Bob Ombs has already been added):
- Create a new folder on E2B Partition 3 named \Medicat
- Open the Medicat \Boot_an_Operating_System\[UEFI]_Mini_Windows_10.iso using 7Zip and copy the \sources\boot.wim file to the new \Medicat folder on Partition 3
- Copy the files \CdUsb.Y, autorun.cmd, start.exe to the root of the E2B Partition 3
- Copy the folders \Portable Apps, \Programs and \System to the E2B Partition 3
- (optional) – the .wim files in the \Windows_Recovery folder can also be added into the new \HBCDPE folder on E2B Partition 3
- Now use BootIce as above to add new entries into the BCD files to boot from the \Medicat\boot.wim file (and Recovery wim files, if added)