Table of Contents
E2B Configuration file
The \_ISO\MyE2B.cfg configuration file
Tip: Use the \_ISO\E2B_Editor.exe Windows utility to make a MyE2B.cfg file from the Sample_MyE2B.cfg file.
The MyE2B.cfg configuration file can be used to change many of the E2B menu features.
The Sample_MyE2B.cfg file contains details of all the settings supported by E2B and is the main reference document.
Just copy the \_ISO\Sample_MyE2B.cfg to make a new \_ISO\MyE2B.cfg file and then open it in NotePad to see details of the many configuration options available (this file is updated whenever new features are added).
Using a MyE2B.cfg file you can change the position, size and colours of the menus, change the Main Menu heading, add global hotkeys, change the background and display mode, change the text font, change the keyboard country, suppress startup messages, disable some menu entries (e.g. F8,F9,F10, set default menu entry), beep the speaker when the menu loads, remove the menu numbers, add generic hotkeys and lots more!
For a demonstration of the power of a MyE2B.cfg file, copy the MyE2B.cfg file from the \_ISO\docs\Templates\Jolene folder to the \_ISO folder and boot E2B.
Another example – ‘Aliums’ MyE2B.cfg file (with most comment lines removed for clarity)
!BAT
set FONT=()/_ISO/docs/fonts/antique.uni.gz
#set script font and show background ASAP - don't list files on screen
call Fn.70 3 ;; set redir=> nul
set HEADING=\x20              EASY2BOOT V1 - MAIN MENU  (%VER%)                       \x20
set HCOLOUR=0106
set FCOLOUR=0102
set GMODE=800
set MYWBMP=/_ISO/docs/Templates/Jolene/jolene800.bmp.gz
color normal=light-magenta/black  highlight=light-red/dark-grey  helptext=yellow/black  standard=light-cyan/black  border=green/black
# menu position
set topstart=2
set rstart=29
set noitems=19
set menuw=62
set bdwidth=1
set tophelp=26
# Help footer text bottom position
set HBTM=3600
# menu password
set pwd=easy2boot
# keyboard type
set KBD=KBD_QWERTY_UK.g4b
A selection of other settings (there are many more!):
#  display the file extensions when listing payload files in the menu
set EXTOFF=
# use the grub4dos USB driver and grub4dos 0.4.6a (fixes 'bad BIOSes') - may hang on some systems - can instead hold down SHIFT key as E2B boots or use UTILITIES menu
set GRUB_USB=Y
# do not number menu entries
set AUTONUM=0x0000
# use a GFXBoot menu file for the menu (file must be in \_ISO folder)
set GFX=message
# use portuguese language for menus
if "%LANG%"=="" set LANG=PORTU_BRAZIL
# use a different font (ASCII and English only)
set FONT=()/_ISO/docs/Fonts/terminus.uni.gz
# Don't display the F1 Main menu entry
set NOF1=1
# beep the loudspeaker when the Main menu has loaded (valid values = 1, 2 or 3)
set beep=3
# don't prompt the user when a .imgPTN is selected, just switch partitions immediately
set AUTOCSM=1
# reduce file enumeration and QRUN messages (use SCROLL LOCK = ON to see messages for QRUN)
set redir=1
Setting your own preferences using MyE2B.cfg
\_ISO\Sample_MyE2B.cfg contains many configuration settings – rename or copy this file to MyE2B.cfg and edit it in NotePad to make your \_ISO\MyE2B.cfg file.
MyE2B.cfg files are actually grub4dos batch files and must start with !BAT on the first line.
Because MyE2B.cfg is NOT contained in the Easy2Boot download, it will not be overwritten if you later update your Easy2Boot installation with a newer version of E2B.
WARNING: Do NOT edit the contents of \_ISO\e2b\grub\MENU.lst or the \_ISO\e2b\grub\E2B.cfg files (or any other E2B file)!
Using a 1024×768 E2B menu
By default, E2B uses 800x600x24-bit colour graphics mode. I recommend you only use 800×600 for E2B (set GMODE=800). Although, most computers support 1024×768, some (e.g. early netbooks) do not. You can use 1024×768 but also specify an alternate 800×600 configuration file for those systems which do not support 1024×768 – see here for more details.
Main Menu heading and menu settings
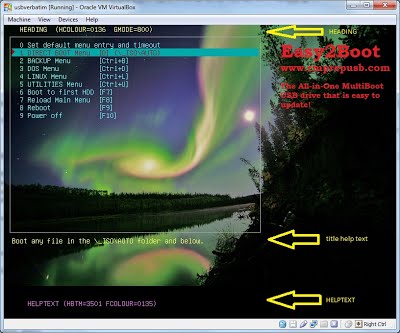
The ‘title help text‘ is the individual menu item help text – it changes for each menu item.
The menu entries can come from a .mnu file or from a .txt file or the payload filename.
The title help text position is set by ‘tophelp‘ in MyE2B.cfg.
The help text for the Sub-Menus and F7 and F8 come from the \_ISO\MAINMENU\xxxxxx.mnu files which uses $$STRxxxx strings.

The border is always drawn outside of the menu, e.g. if rstart=2 then the border vertical is in column 0 and an arrow pointer is in column 1 and the menu text starts in column 2. Allow 1 line for the horizontal border lines. rstart=0 and rstart=1 are equivalent.
If set GMODE=800 (800×600) = 100 characters x 37.5 lines (0-99 x 0-36) , if set GMODE=1024 = 1024×786=128×48 lines (0-127 x 0-47).
16-pixel high fonts (default):
800×600 = 100 characters (0-99) by 37 lines (0-36)
1024×768 = 128 characters (0-127) by 48 lines (0-47)
24-pixel high fonts (set FONTH=24):
800×600 = 66 characters (0-65) by 25 lines (0-24)
1024×768 = 85 characters (0-84) by 32 lines (0-31)
Use the \_ISO\E2B_Editor.exe utility, or… 1. Copy the \_ISO\Sample_MyE2B.cfg file to \_ISO\MyE2B.cfg (see also \_ISO\docs\MyThemes for a selection of pre-configured examples).
2. Edit the \_ISO\MyE2B.cfg – this new MyE2B.cfg file will be called by Easy2Boot as it is a grub4dos batch file. (optional) – Save the file using NotePad in UTF-8 format for full character-set non-ASCII language support. You can use the QEMU button in RMPrepUSB to test your menu (or double-click on \QEMU_MENU_TEST.cmd), but it is quite slow – I recommend testing the menu appearance by using Oracle VM Virtual Box as in Tutorial 4 so that you can quickly test any changes to your menu system.
Tip: Use Ctrl+Shift+F11 to run QEMU in RMPrepUSB – this allows you to edit the MyE2B.cfg file and save the changes and then reboot E2B inside QEMU, without needing to quit QEMU first.Note: After editing a file on a USB drive, you may find that the VM does not write the file until about 30 seconds later due to delayed writes by Windows! If the change appears not to have worked, close down the VM and try again after 30 seconds.
If you have any problems, simply rename the \_ISO\MyE2B.cfg file to something else so that Easy2Boot will use the standard settings.
- Tip: If you don’t want the ‘Install any XP ISO using WinPE’ menu item in the Windows XP menu, delete the \ _ISO\Windows\XP\WINPE_INST.TAG file (or rename it)
If you wish, you can rename any of the \_ISO\MAINMENU\*.mnu files to another name (ending in .mnu) and then make changes to them (so any subsequent version update will not overwrite your .mnu files and you will only need to delete the standard E2B .mnu files that you don’t want). If you later update Easy2Boot with a newer version – you may need to also check for changes and then update your MyE2B.cfg file by comparing it with the newer version of Sample_E2B.cfg.
Tip: Try the example Blue Menu MyE2B.cfg file that is included with the download (in \_ISO\E2B\docs\Templates\Blue folder) – just copy the MyE2B.cfg file to the \_ISO folder.
Changing the MAIN menu heading
The Main Menu heading can be changed by setting the HEADING variable in the MyE2B.cfg file.
set HEADING=\x20 EASY2BOOT V1 – MAIN MENU
can be changed to
set HEADING=\x20 STEVE’s (sehr güt!) MAIN MENU
Tip 1 : \x20 is the code for a space character which can be used at the start of the line to shift the Main Menu heading position to the right.
Tip 2 : Using NotePad you can save the MyE2B.cfg file as UTF-8 unicode. You can then add text ( Main menu heading, etc.) using the character set of your language (e.g. chinese glyphs, etc. ) – this does not work in text-mode menus however (i.e. if you use set GFX=none).
set HEADING=\x20 (重启) € á¡ü test UTF-8
The position of all the menu headings can be changed by defining the HEADPOS variable in MyE2B.cfg, (0000 is the top left corner, the HEADING position in the example below is set using 0203 which is at the 3rd line down from the top of the display and starting in the 4th column).
set HEADPOS=0203
set CENTREHD=1
will center all menu headings automatically.
E2B automatically calculates the menu position offset from the rstart value that you have set in the MyE2B.cfg file. If you wish to change the calculated amount of padding before each menu heading, set the HPAD variable to the number of spaces that you want inserted before each menu heading. See the Sample_E2B.cfg file for details.Tip: To centre menu headings on an 800 pixel/100 character wide display, use HEADPOS=YY00 and:
set HPAD=\x20\x20
set CENTREHD=98
The rstart value that you use may add a slight offset.
Change the other menu headings
All other menu headings and many E2B messages can be changed by making a new STRINGS.txt language file.
Menu entry help text
The position of each menu entry help text (usually displayed just underneath the menu box) is set by the tophelp variable.
# use tophelp = topstart + noitems for menu help text just under menu box – for 640×480 noitems=18 tophelp=20 – for 800×600 noitems=24 tophelp=26
#set /a tophelp=%topstart% + %noitems% > nul
# use tophelp = topstart + noitems for menu help text just under menu box – for 640×480 noitems=18 tophelp=20 for 800×600 noitems=24 tophelp=26
set /a tophelp=%topstart% + %noitems% > nul
Note: E2B v1.97+ supports use of the hstart and hwidth variables in My_E2B.cfg to change the menu help text start position and width. See Sample_MyE2B.cfg file for details and here.
If you want to hide the menu title help text, set tophelp to a large value just beyond the end of the screen (e.g. tophelp=47 for a 47 line screen – displayed lines are 0-46).
Change the Footer Help text
The very bottom help Footer text can also be changed (displayed on most menus):
set HELPTEXT=HDD0 [F7] Back [F8] Reboot [F9] Power Off [F10] www.easy2boot.com
# use \x20 for no text at the bottom of the first menu – e.g. set HELPTEXT=\x20
# at the start of a line is used to comment out the whole line so that it is ignored.
The position of the bottom ‘footer’ help message HELPTEXT is set by HBTM.
If you want to use multiple lines for the HELPTEXT, you may need to add spaces after the \n (new line) characters, e.g
set HMTM=3307
set HELPTEXT=My company is ACME plc\n\n       HDD0 [F7] Back [F8] Reboot [F9] Power Off [F10] www.acme.com
Changing the background/wallpaper image
The default background image is located at \_ISO\E2B\grub\Background.bmp.gz – this is a 800×600 24-bit colour image. Do NOT change this file.
To use your own image, copy your own mybackground.bmp file to the \_ISO folder (you can compress a .bmp to a .bmp.gz file using 7Zip and by selecting gzip as the compression type – this greatly reduces the file size but the filename must be ‘mybackground.bmp’). E2B will automatically use the file if MYWBMP is not defined in a MyE2B.cfg file. Alternatively, rename the \_ISO\Sample_MyE2B.cfg file to \_ISO\MyE2B.cfg and change the following entries to set MYWBMP to the path of the file you want to use as the wallpaper:
# set graphics mode - use 640, or 800 or 1024 - or specify full mode - e.g. 800 600 24 = 800x600 x 24-bit colour
set GMODE=800
set MYWBMP=/_ISO/mynewbackground.bmp
IMPORTANT: Use forward-slash / instead of \ in folder paths. grub4dos is like linux and uses / instead of \. E2B will look for and use the file if it can be found, otherwise it will use the default background. Note: The file extension is not relevant – you can have an LZMA compressed bitmap called fred.zzz if you wish!
If you wish to use your own bitmap (e.g. 640×480 or 800×600 or 1024×768) please ensure that the .bmp size is exactly correct (e.g. 800×600 and not 800×599 or 799×600).
You should always set GMODE to match the display size in your MyE2B.cfg file e.g. set GMODE=1024 768
The menu size and help text position will need to be changed too. I strongly recommend you do not use higher than 800×600, because not all systems can support higher resolutions (e.g. early netbooks). Some non-4:3 aspect ratio display notebooks do not support 1024×768.
Tip: Choose a bitmap that has a clear area at the bottom so that help text is easily visible. Avoid a multi-coloured picture (e.g. lots of different bright colours and dark blacks) as it will be difficult to choose text colours that will stand out against all of the colours in your picture! Another idea is to use a bitmap editor and draw a filled rectangle over the picture so that the menu can be displayed within the rectangle. A clear area for the menu help text underneath the menu is also a good idea. You can also add your name or company name or company logo to the bitmap itself. See the Gallery for ideas. You can use the settings in MyE2B.cfg to change the menu position and the menu size, text and border colours. You can, of course, make a plain single colour 800×600 bitmap for the background (or use set MYWBMP=0xFF3322 to specify background colour of FF=red, 33=green, 22=blue).
32-bit or 64-bit hex colour values must be greater than 0xFF – for pure red colours (1-FF) add a small amount of blue – e.g. 0x1FF instead of 0xFF or 0x102 instead of 0x02.
Tip: If the menu text area is 400×400 (say), you can prepare a 400×400 graphic box and use the STAMP feature to overwrite it onto the wallpaper.
set GMODE=800
set MYWBMP=/_ISO/wallpaper.bmp
set STAMP1=0x00=180=160 /_ISO/blank400.bmp
JPEG files
E2B v1.72+ uses grub4dos 0.4.6a 2015-08 or later which supports .jpg files. Convert a .bmp file to a .jpg file using MSPaint and save it as \_ISO\MyBackground.bmp (or MyBackground.jpg) or specify the filename in your MyE2B.cfg file (e.g. ‘set MYWBMP=/_ISO/MyNew.jpg’).
Note: ‘Progressive’ .jpg files are not supported – if you find a .jpg file does not work work, use MSPaint to load it, and then re-save it.
Dealing with multiple resolutions
You may find that some systems don’t support 800×600 hi-colour graphics modes (or don’t support the resolution that you want to use). In that case the E2B menu may not display correctly. Instead of fixing the graphics mode in the MyE2B.cfg file to a lower resolution, you can add code into the MyE2B.cfg file to automatically choose between a selection of background images. The example below finds the highest possible resolution and sets the appropriate background image, menu size and position (this is already included on Sample_MyE2B.cfg which you can uncomment to use).
# 3 possible backgrounds - mybg640.bmp.gz, mybg800.bmp.gz and mybg1024.bmp.gz
# If any one mybgxxx.bmp.gz file is not present then it won't be used
# allow vbeprobe list all modes to memory
debug 1 && vbeprobe > (md)0x220+5 && debug off
# look for 640, 800 and 1024 modes and set highest one available
cat --locate="640 x 480"  (md)0x220+5 > nul && if exist /_ISO/mybg640.bmp.gz  set GMODE=640 && set MYWBMP=/_ISO/mybg640.bmp.gz  && echo 640x480 found
cat --locate="800 x 600"  (md)0x220+5 > nul && if exist /_ISO/mybg800.bmp.gz  set GMODE=800 && set MYWBMP=/_ISO/mybg800.bmp.gz  && echo 800x600 found
cat --locate="1024 x 768" (md)0x220+5 > nul && if exist /_ISO/mybg1024.bmp.gz set GMODE=1024 && set MYWBMP=/_ISO/mybg1024.bmp.gz && echo 1024x768 found
# change menu size and position depending on resolution
if "%GMODE%"=="640"  set noitems=18 && set tophelp=20 && set rstart=3 && set menuw=62 && set HBTM=2800
if "%GMODE%"=="800"  set noitems=24 && set tophelp=26 && set rstart=3 && set menuw=62 && set HBTM=3501
if "%GMODE%"=="1024" set noitems=30 && set tophelp=32 && set rstart=3 && set menuw=62 && set HBTM=4601
Another alternative is to have say three separate MyE2B.cfg files (MyE2B_640.cfg, MyE2B_800.cfg and MyE2B_1024.cfg) and use the appropriate one. \_ISO\MyE2B.cfg
!BAT
# 3 possible MyE2B.cfg files
# allow vbeprobe list all modes to memory
debug 1 && vbeprobe > (md)0x220+5 && debug off
# look for 640, 800 and 1024 modes and set highest one available
set GMODE=640
cat --locate="800 x 600" (md)0x220+5 > nul && set GMODE=800
cat --locate="1024 x 768" (md)0x220+5 > nul && set GMODE=1024
if "%GMODE%"=="640" call /_ISO/MyE2B_640.cfg
if "%GMODE%"=="800" call /_ISO/MyE2B_800.cfg
if "%GMODE%"=="1024" call /_ISO/MyE2B_1024.cfg
goto :EOF
Removing the background image or using text mode
If you do not want a fancy graphics picture (which may take a second or two to load) but prefer to use the standard grub4dos text mode (640×480) – edit your MyE2B.cfg file as follows: set GFX=none You can set the colours in the usual way but when in text mode the background (2nd) colour is also used (not transparent). Specify a light grey menu background using the following menu as MyE2B.cfg. See the Text Minimal theme folder in the \_ISO\docs\Templates folder.HCOLOUR sets the background as black and the text as dark red in this example:
MyE2B.cfg
!BAT
# enable GFX mode to suppress graphicsmode
set GFX=none
# we have 25 lines per screen and 80 characters across
# set colour for heading
set HCOLOUR=0104
# set colour for footer
set FCOLOUR=0104
# set text colours

color normal=light-magenta/light-gray  highlight=light-red/cyan  helptext=yellow/black  standard=light-cyan/black  border=red/black
# if GFX=NONE then may be in 640x400 = 80 x 25 lines (sometimes 80 x 30 with some BIOSes)
set noitems=17
set tophelp=19
set HBTM=2400
set HELPTEXT=Here is help text
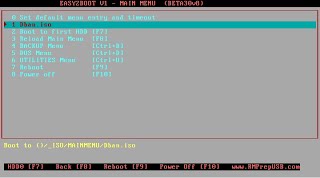
You can use hex RGB colours (0xrrggbb) for HCOLOUR and FCOLOUR – e.g. 0xFF0000 for red or 0x00FF00 for green or 0x550022 for a dull red+blue colour. Note that the headings must exactly fit across the screen and be padded with the correct number of spaces – otherwise they may be too short or may spill over onto the next line. The Main Menu heading is set in the \_ISO\MyE2B.cfg file. The other menu headings are determined by the STRINGS.txt ‘language’ file that is used. Only the BIOS font can be used in text mode – so non-English (non-ASCII) languages are not supported in text mode because non-ASCII character fonts cannot be displayed in text mode. You cannot use the alternative fonts available in E2B when in text mode.
Change the Keyboard Layout
Standard grub4dos supports the US QWERTY keyboard layout. If you need to enter text using the keyboard (e.g. password entry), you may need to change the keyboard layout mapping. To do this, simply make a MyE2B.cfg file (see above) and specify one of the KBD_xxx.g4b files in the \_ISO\E2B\grub folder. e.g. set KBD=KBD_QWERTY_UK.g4b
You can also use the E2B_Editor.exe utility to change the keyboard type in the MyE2B.cfg file.
Specifying the Main menu order and/or the menu items
Main menu order
The order that ISO and other payload files and .mnu files are shown in the menu, is determined by E2B alphabetically sorting the payload and .mnu files and folders.
Note: For the menu entries, all payload files and .mnu files will be listed alphabetically (not case-sensitive). All you need to do is rename your ISO files, e.g. $1fred.iso, $2doris.iso, $3debian.iso, etc..
Use a .txt file of the same name to change the menu entries.
The order of the Sub-Menus and a few other menu entries in the Main Menu is pre-set in the \_ISO\MAINMENU\ZZSubMenuAll.mnu file.
If you wish to change it, rename the file (e.g. ZZSubMenuAllSteve.mnu) and then edit it using NotePad to change the order.
Note that if you update E2B in the future, you will need to delete the new ZZSubMenuAll.mnu file.
The name of the .mnu file will determine the order of the menu entries in the Main Menu (e.g. use $$$SubMenuALL.mnu to list the menu entries first in the Main Menu). If you have any .mnu files, these will be listed alphabetically depending on the name of the .mnu file itself (not the payload file or title which is used inside the .mnu file). e.g. If you have Ubuntu.mnu it will therefore be listed after dplite.mnu. To change the order and put Ubuntu first, simply rename ubuntu.mnu to $ubuntu.mnu. Note that both files and folders will be searched alphabetically. If you have: \_ISO\Mainmenu\Utility\PassPass.mnu\_ISO\Mainmenu\Ubuntu.mnu
the menu entries will thus be ordered as:
Ubuntu
PassPass
Note that the menu entry for PassPass will be listed after the menu entry for Ubuntu because ‘.\Ubuntu.mnu’ alphabetically precedes ‘.\Utility’. If you want PassPass to be listed before Ubuntu, rename Ubuntu.mnu to ZUbuntu.mnu. If you have a lot of ISO files and you don’t want to change the filenames and you want to fix their order in the menu, then put them in sub-folders under \_ISO\AUTO with a .txt file for each one, e.g.: \_ISO\AUTO\A\ubuntu_x64.iso\_ISO\AUTO\A\ubuntu_x64.txt\_ISO\AUTO\B\acronis.iso\_ISO\AUTO\B\acronis.txt
Note: Using folders for payload files without .mnu files as above, only works in the special \_ISO\AUTO folder.
If you later want to add an entry in-between these two, create a \_ISO\AUTO\A1\ folder. The entries will be listed in alphabetical order of both the files and folders.
If you do not want to change the ISO filenames but want to change their order in the Main menu (or one of the other sub-menus), then you will need to use .mnu files for each one and place them all in a sub-folder – e.g. \_ISO\MAINMENU\MNU.
The menu entries will be listed alphabetically according to the filenames of the .mnu files (tip: use Window Explorer – View – Group by name to list the folders alphabetically with the files). The .mnu files should be of the following format:
\_ISO\MAINMENU\MNU\AAA_Ubuntu64.mnu
title Ubuntu ISO\n Help text
/%grub%/qrun.g4 $HOME$/Ubuntu-x64.iso
You can also change the name of the sub-menu folder or create new 3rd level folders. See my blog here for details.
SubMenus
You can add a .mnu file to create a new submenu entry. The file names is not important and it just determine the order that they appear in the menus (alphabetically sorted). They must end in .mnu however. You can edit the ZZSubMenuAll.mnu file (not recommended!) but be sure to rename it, otherwise if you update E2B with a later version, the file will be overwritten. You can move .mnu files into sub-folders (e.g. \_ISO\MAINMENU\$$A\fred.mnu).
Note: The !!CONFIG folder is used for pre-configuring a menu (e.g. password entry or loading a different wallpaper, these must be enumerated first) – do not add any .mnu files to this folder that contain ‘title’ or ‘iftitle’ lines because these may stop other configuration files that are in the same folder from working.
Change text colours and border colours
To change the menu text colour and the colour of the border, edit the color command line in your \_ISO\MyE2B.cfg file (see Sample_MyE2B.cfg for details).
You can specify the colours in TEXT/BACKGROUND pairs (the opposite of the old method!) and uses black for a transparent background: e.g.color normal=light-cyan/black highlight=red/cyan helptext=yellow/black standard=light-cyan/black border=light-gray/black
#Note that the highlight and standard (console) text have a background and foreground colour setting – though you can have a transparent background for the highlighted text if you wish.
I recommend you always use RGGBB hex values.You can also use a full 24-bit colour value 0xrrggbb – e.g. color border=0xFF3377 (be aware that using 0xrrggbb always sets a black\transparent background). Values must be > 0xff. e.g.
color normal=0x777700
color highlight=0xFFFF00
color helptext=0xFFFFFF
color standard=0x994c00
color border=0xFF0000
Note: This only works in graphics mode (not text mode). For ‘highlight’ and ‘standard’, you can also specify a background colour – e.g. set highlight=0x00FFFFFF00777700.
You can also change the colour of the Menu Headings by changing the line in MyE2B.cfg… set HCOLOUR=0103
OR
set HCOLOUR=0x2244CC in the \_ISO\MyE2B.cfg file (read the text in \_ISO\Sample_MyE2B.cfg for an explanation of what the 4 digit numbers mean).
FCOLOUR changes the bottom footer help text colour.
Change the menu box size and position
To change the position of the menu and it’s size, look at the menusetting parameters in \_ISO\MyE2B.cfg. Default values are already set up in E2B.cfg for a standard 800×600 menu.
# word-spacing   line-spacing   border-width   top-help    number-of-items-in-menu   top-start    menu-width     right-start-pos-of-menu

set wdspace=n     ;; # sets the spacing between letters - do not change from 'n' = normal - changes number of characters per row!
set lnspace=n     ;; # sets the spacing between lines 0-? - do not change from 'n' = normal - changes number of lines per screen!
set topstart=2    ;; # sets the top start position of the menu (lines down from the top of screen)
set rstart=3      ;; # sets the right-hand edge start position of the menu
set noitems=18    ;; # sets the number of items there will be in the menu window
set menuw=62      ;; # sets the character width of the menu window
set bdwidth=1     ;; # sets the width of the border line that sorrounds the menu window 0-4 (use 0 if no border required)
set tophelp=20    ;; # sets the position of the menu item help text
To remove the border completely, set the border width to 0 (set bdwidth=0). To remove the menu help text, use a large number (e.g. 70) for tophelp. HBTM is used to change the position of the bottom helptext that is used in all menus. To remove it use:
set HBTM=4700 To change the bottom helptext change the HELPTEXT in\_ISO\MyE2B.cfg (or just use \x20 to remove it completely), two examples are:
set HELPTEXT=Please select an item using the cursor keys or press a number key
or
set HELPTEXT=\x20
Note: A few menus have their own pre-set help text. This text comes from files in the \_ISO\e2b\grub\ENG folder. Do NOT change any files in this folder. Instead see the ‘Changing the Language’ section below.
Tip: To check that you have left 5 lines clear below the menu, set a timeout of 10 seconds – the countdown message will appear in line 5 under the menu.
These commands can also be used in a MyE2B.cfg file (E2B v1.A0+) to change the appearance of the menu text alignment and the menu pointer:
- setmenu –left-align
- setmenu –middle-align
- setmenu –right-align
- setmenu –triangle-on
- setmenu –triangle-off
Menu entry spacing
You can add more space between each menu entry by using a MyE2B.cfg entry such as:
set lnspace=8 The spacing between each character can also be increased using wdspace (e.g. set wdspace=3). It is best not to change lnspace or wdspace because it changes the number of rows and columns – e.g. lnspace=8 reduces screen to only 25 lines! Some E2B menus and help screens (e.g. F1 help menu), etc. are made to fit a standard 100×37 character screen – if you change these values, the screen may look a mess!
Remove grub4dos and E2B startup messages (redir and redirp)
Note: Later versions of E2B will work with any value being set for redir and redirp (e.g. set redir=1). Earlier versions of E2B required you to set it to the string ‘> nul’ instead of 1.
As E2B runs, it displays progress messages and lists the files that it adds to each menu (see here for an example of what you might see as E2B runs).
E2B allows you to suppress the E2B menu file enumeration and other non-essential messages by setting any value for the redir variable. To do this add this line to your \_ISO\MyE2B.cfg file:
set redir=1
If you also want to suppress the early E2B startup messages and most other user messages (not recommended as they may be useful on systems with bad BIOSes) then add a redirp line too:
set redirp=1
I strongly recommend you do not use redir or redirp until you have your E2B USB drive fully tested and working with all payloads! If you set redirp it will suppress helpful user messages, hints and tips. For instance, if you try to run an ISO file, E2B may suggest a better file extension to use instead of .iso – so when testing any new payload, you should not set redir or redirp or you will not see these messages. Once all payloads are working, you can set the redirp variable if you wish.
See the \_ISO\Sample_MyE2B.cfg file on the E2B drive for examples. You can hide the (initial) cursor by adding a call Fn.5 line to the top of your MyE2B.cfg
# set cursor off the screen so no text or cursor is seen for a while (cursor set to column 0  row 128!)
call Fn.5 0 128
You can use the examples in the Sample_MyE2B.cfg file to change the behaviour on startup, for instance to just have a blank screen with no text messages, right up until the Main menu is displayed use this in your MyE2B.cfg file:
call Fn.70 0 ;; clear ;; call Fn.5 0 128 ;; set redirp=> nul ;; set redir=> nul NOSUG (no suggest) (v1.78+)
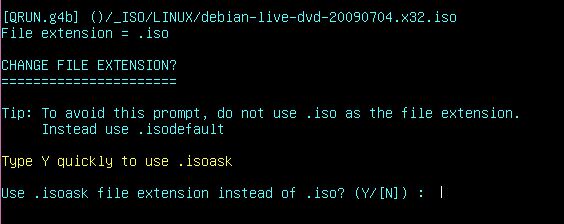
QRUN.g4b is responsible for executing a payload file based on it’s file extension. It will suggest an alternative file extension (based on the file name) and prompt you to accept or reject the alternative file extension suggestion. in (v1.78+) you can use set NOSUG=1 in the \_ISO\MyE2B.cfg file to suppress the file extension suggestion messages output by QRUN.g4b and prevent the pause in ISOBOOT. This is preferable to setting redir or redirp or using the .isodefault file extension for .iso files, because it acts on all file extensions (not just .iso files) but does not suppress other E2B messages.
Silent startup
You can blank out the grub4dos boot/startup messages to make your Easy2Boot USB drive look more professional when it boots: E2B v1.62+ – the lines below are suitable for grub4dos 0.4.6 only (which is used by e2b). Example lines are in \_ISO\Sample_MyE2B.cfg:
# Silent MBR boot of stage 1.5 grub4dos (works for both 0.4.5c and 0.4.6) - a reboot is required for it to take effect.
if exist /_ISO/docs/PatchMyMBR call /_ISO/docs/PatchMyMBR > nul
# Silent startup of grub4dos - no diagnostic/info messages (only works for 0.4.6a) - permanently changes /grldr files (use \_ISO\docs\patchme for patch if not using 0.4.6)
cat --locate=\x02 --replace=\x00 --skip=0x2073 --length=1 /grldr > nul
if exist /%grub%/grldr_046 cat --locate=\x02 --replace=\x00 --skip=0x2073 --length=1 /%grub%/grldr_046 > nul
This patches grub4dos to start up using the ‘debug msg=0’ debug level and thus suppresses most startup boot messages. Tip: once E2B has booted and has run these lines, you can comment out that line in the MyE2B.cfg file to reduce the boot time, because it only needs to be run once.
As an alternative for grub4dos 0.4.5c or if you want to also remove the grub4dos version that is displayed at the top for the console, please do the following:
1. Boot up the Easy2Boot USB flash drive on a real system (not a VM or under QEMU unless writes work or the patch may not take effect!)
2. Press SHIFT+C to get to the grub4dos console – if nothing happens press SHIFT+P and enter the password (e.g. easy2boot – or easz2boot on a German or QWERTZ keyboard), then press SHIFT+C (older versions or E2B don’t require the SHIFT key to be used).
3. At the grub4dos console. type /_ISO/docs/patchme – this will patch the flash drive boot sectors and the grldr file on the E2B USB drive. You can also choose to remove the GRUB4DOS version header which is briefly displayed when a new menu is loaded and when you go to the console command shell (though if you do you won’t be able to see what version of grub4dos you are using!).
4. Hit a key to reboot when prompted.
Note that if you re-install grub4dos to the USB drive or update or overwrite the grldr file, you will need to run patchme or PatchMyMBR again.
Remove the ‘Change file extension’ hint [QRUN.g4b]
The QRUN.g4b batch file may suggest an alternative file extension for your payload (or it may suggest you use .isoask instead of .iso).
- If you have set NOSUG=1, it will never suggest any alternate file extension
- If you have set redirp in your \_ISO\MyE2B.cfg then it will never suggest any alternative file extension for .iso files
- If you have only set redir only in your \_ISO\MyE2B.cfg file then it will not auto-suggest .isoask for any .iso file
- If you rename the file extension from .iso to .isodefault or .isodef then it will not auto-suggest for that iso file
I strongly recommend that you do not use redir or redirp until you have all your payloads working correctly!
See this page for more information about QRUN suggestion configuration. e.g.
# use default timeout of 3 seconds, but if user does not press a key, always use the file extension suggested by E2B (if not .isoask), valid range = 991 to 999
set TSUG=993
Remove messages and/or prompt when switching to .imgPTN image files
E2B v1.54 and later only If you add set AUTOCSM=1 to the \_ISO\MyE2B.cfg file, all .imgPTN types will have the user prompt suppressed.
# .imgPTN AUTO-RUN - if any .imgPTNxxx family is selected, switch partitions and display CSM menu with no user prompt
set AUTOCSM=1
Instead, you can add ‘AUTO’ to each file extension – e.g. A file extension of .imgPTNAUTO will also cause the partition to be swapped without prompting the user. See blog here for more details OR you can set both “redir” and “redirp” in your MyE2B.cfg file. If only redir is set in MyE2B.cfg, then when you select a .imgPTN menu entry, you will only be asked if you want to switch to that image but without any of the extra informational text displayed.
Changing the Language
Easy2Boot is written in (UK) English. To translate the English text to your own language or use a different language file – see here for details. You could even have multiple language support and allow the user to select which language they prefer – see my blog for more details. For .mnu files, you can change the text in a new STRINGS.txt file – I strongly suggest you do not edit the standard E2B .mnu files. Instead make a new copy of the .mnu file with a different name and edit that – so that if you update E2B with a newer version, they will not be overwritten and you will simply need to delete the standard E2B .mnu files again. For non-ASCII characters, save your .mnu file as a UTF-8 file (using Windows NotePad) such as…
title Chinese reboot (重启)
reboot

title Chinese halt (关机)
halt
Tip: An easy way to translate the files to your own language is to use WinMerge as follows:
1. Install WinMerge onto your Windows system (there are a selection of languages in the View – Language menu)2. Copy the Easy2Boot files twice to two identical folders, for example: C:\Temp\_ISO\e2b\grub\ENG\STRINGS.txt and C:\Temp\_ISO\e2b\grub\SPANISH\STRINGS.txt3. In Windows Explorer, select both files – right-click and select WinMerge to open them in WinMerge for comparison4. Change the View options to show all files (tick all view options including identical files)
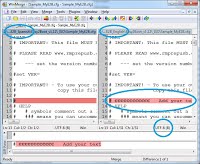
You can now edit the words in the ‘Spanish’ pane whilst keeping the ‘English’ file unchanged. Click the small cross in the top right to save changes and go back to the main file/folder view. Now you can see which files you have already changed.
FONTS – Change the font (graphics mode only)
The standard BIOS font is 16-pixels high. E2B loads a unifont font file which is 16-pixel high and supports European, Chinese and other language glyphs by default.
You can change the font used for the menu and console text by setting the FONT variable in the \_ISO\MyE2B.cfg file (rename the Sample_MyE2B.cfg file to MyE2B.cfg).
E2B normally uses a fixed-size 16×8 or 16×16 dot matrix for each character – unifont.hex.gz font file which uses 16-pixel high fonts and includes most languages). See my blog for details. This does not work if the GFX variable is set (using GFXBoot menu of text mode).
The Aliums Theme in \_ISO\docs\Sample E2B Templates\Aliums demonstrates using an Antique font for the menus.Various alternate font files for just the standard English ASCII characters 32-127 are available in the \_ISO\docs\Fonts folder.
If you want to use the BIOS font for normal ASCII characters but also want to load the unifont font (for chinese characters or the £ sign, etc.) then use ‘set BIOSFONT=1’ in your MyE2B.cfg file.
24-pixel high fonts (v1.78+)
E2B v1.78+ can support 24-pixel high fonts (24×12 and 24×24) by using the FONT and FONTH variables (see Sample_MyE2B.cfg file for details). There is an example MyE2B.cfg file in the \_ISO\docs\Templates\LargeFont folder.
There are a selection of fonts in the \_ISO\docs\Fonts folder (file extension .f24).
Tip: Use 1024×768 resolution for more space.
If you just set the font height using ‘set FONTH=24’ then E2B will use a default large font and support Simplified Chinese (sft.f24+developerbold.f24).
sft.f24 and yxt.f24 support simplified and traditional Chinese+English, lt*.f24 fonts only support English+ some European glyphs, developer and terminal have more language support (e.g. Russian).
If you want to load a different 24 pixel high font, use ‘set FONTH=24’ and ‘set FONT=/_ISO/docs/Fonts/terminal.f24’ in the MyE2B.cfg file.
The font file must be match the format for the FONTH setting (i.e. you cannot use a 16-high font with set FONTH=24). If FONTH is not specified, E2B will use 16-pixel high fonts.
Note that the display will have less characters per line and less lines per screen when in 24-high font mode.
# 16 high fonts: 800×600 = 100 characters (0-99) by 37 lines (0-36), 1024×768 = 128 characters (0-127) by 48 lines (0-47)
# 24 pixel high: , 800×600 = 66 characters (0-65) by 25 lines (0-24), 1024×768 = 85 characters (0-84) by 32 lines (0-31)
Viewing all the fonts
If you want to see what all these fonts look like when used with your E2B menu, add the file $FontTest.mnu to the \_ISO\MAINMENU folder. You can then test them all and see which one you like best!
Alternatively, you can run the grub4dos ShowFonts.g4b batch file from the grub4dos command line to display a sample line in each font. The Windows batch file MakeShowFonts.cmd generates the file ShowFonts.g4b from all the fonts that are present in the same folder as MakeShowFonts.cmd. If you make your own fonts, add them to this folder and run MakeShowFonts from Windows to generate a new ShowFonts.g4b file.
You can switch to a different 24-high pixel font by using the Change_Font24.mnu file (your menu should already be using 24-pixel high fonts by using the set FONTH=24 setting).
Making new fonts
Font numbers 00-1F are normally non-printed symbols, 0020-007F are standard ASCII English characters, 0080-00FF should be the Extended ASCII Latin1 accented characters, 0100-FFFF are used for other glyphs.Note that Latin1 fonts should be used for 0080-00FF (check that font 00FC is the German umlaut u symbol ü).
You can make your own 16-high font file as follows:
1. Use the RasterFontEditor.exe program to load a font file – see here for the program and where to obtain extra font files. e.g. In RasterFontEditor, use File – Import From TTF – select a non-TrueType font from the list (scroll up)
2. Save the font using File – Save Font As… Text Files (*.txt) – .txt is the HEX format we need.
3. Drag and drop the .txt font file onto Wonko’s Fonttxt2uni.cmd file (extracted from Font_Bitmap.7z) – this will make a .uni font file
4. Try the font out in Easy2Boot (e.g. load the E2B main menu, go to the command prompt, type font and then type font /myfont.uni to load your new font and press ESC to get back to the E2B menu)
5. Edit the file in Notepad and delete all lines for characters 0000-001F and 007F-00FF. Also delete any blank lines if the data is just a long line of 000000000’s.
6. If you wish you can use 7Zip to compress the .uni file using GZip to a .uni.gz file
You can also make your own 24-high font files by finding and converting a .BDF file in 24×12 dot format to the correct hex file format (see Alternate Downloads – Other Files – MAKE_FONT24).
Note: Check that the correct character set ‘code page’ is used for the fonts, Characters 0000-007F should be the CodePage 437, 0080-00FF should be Latin1 (though 0080-00BF can safely be omitted).
Menu password protection
Note: the default password to gain access to grub4dos is ‘easy2boot’. This is set by the E2B.cfg file. When in an E2B menu, press P (or SHIFT+p) and you will be prompted for the password. If you have a German or QWERTZ keyboard, the default password will be ‘easz2boot’ unless you define the correct keyboard in the MyE2B.cfg file.
If no password was set or after the correct password has been entered, a user can edit any of the Easy2Boot menu entries by pressing ‘e’ (or SHIFT+e) or they could reach the grub4dos command line by pressing ‘c’ (or SHIFT+c).
If a user presses ‘e’ or ‘c’ by accident, they might not understand what has happened or know how to get back to the menu again and you may not want them to access the USB drive in this way, so a default password is set to prevent this. The AUTOMENU feature (enabled by default) requires the user to press the SHIFT key as well as the letter key.
You can set or change or remove the password as follows:
1. Copy the \_ISO\Sample_MyE2B.cfg to \_ISO\MyE2B.cfg
2. Change the password line in \_ISO\MyE2B.cfg – base it on one of the three examples below:
# this will set a password of easy2boot (encrypted so the used won’t know what it is!)
set pwd=–md5 $1$1$okAQ3AJUdhqf3TVrwKvJP1
# this will set a password in plain text
set pwd=fred
# this will remove the password
set pwd=
3. Save the \_ISO\MyE2B.cfg file.
Attention: If you are using a non-USA keyboard, you may need to define the type of keyboard that you are using in the MyE2B.cfg file, otherwise it may not work as expected! Note that:
set pwd=--md5 $1$1$okAQ3AJUdhqf3TVrwKvJP1
will set a password of ‘easy2boot’ and will prevent the user from accidentally getting access to the menu editor or the grub4dos command prompt. If you want to use a different password, then you can either use a plain, unencrypted password, e.g. set pwd=mypwd or you can use an MD5 hashed password so that if the user looks at the MyE2B.cfg file, he will not know what the password is (in this example it is ‘mypwd’), e.g. set pwd=–md5 $1$4$tsiiC/23IOf0pifS.6ttc.
To find the MD5 password for any word, you can download the Windows md5crypt program from here and generate your MD5 hash code. Run the md5crypt.exe program, type in a password (e.g. mypwd) and then cut and paste the md5 hash into your \_ISO\MyE2B.cfg file.
Note that the value of pwd should start with –md5 (two minus signs followed by md5 and then a space).
Set a Master Password to prevent unauthorised use of E2B
You can set a master password by uncommenting a few lines in the MyE2B.cfg file, e.g.:
:mpwd
if not exist DONEMENU clear && echo && echo
if not exist DONEMENU && password fred || echo -e \x20WRONG PASSWORD! && goto :mpwd
if not exist DONEMENU echo
OR (use an encrypted password and reboot if the user gets it wrong):
if not exist DONEMENU clear && echo && echo
if not exist DONEMENU password --md5 $1$4$tsiiC/23IOf0pifS.6ttc.  || echo -e \x20WRONG PASSWORD! && reboot
if not exist DONEMENU echo
This prevents Easy2Boot from running unless the user knows the master password.The variable DONEMENU is set by E2B when the Main menu is loaded.To find the MD5 password for any word, you can download the Windows md5crypt program from here and generate your MD5 hash code. An improved version which changes the screen resolution and font (needed for non-English characters) before prompting the user, is shown below:
# --- MASTER PASSWORD ---
if exist DONEMENU goto :pok
# call a keyboard translation file here if not using an English keyboard us use numbers for the password
# the next 2 lines are optional - it just changes the font immediately but can cause a delay whilst it loads
graphicsmode -1 640 > nul || graphicsmode -1 800 > nul
font ()/%grub%/unifont.hex.gz
:mpwd
#If you want to set a Master password for Easy2Boot to prevent anyone from using it on first boot
#(e.g. 'fred') edit the lines below (you can use password --md5 xxxxxxxx format if you wish)
clear && echo && echo ENTER E2B MASTER PASSWORD
password fred && goto :pok
echo && set /a /p:2 ask=WRONG PASSWORD!
goto :mpwd
:pok
if not exist DONEMENU echo
If you wish, you can display a background wallpaper just for the Master Password user input (i.e. before the Main Menu background is displayed) – see the Sample_MyE2B.cfg file for details.
See also the ‘Password and Security’ page (also see ‘Guest Menu Mode’ at the bottom of that page).
Payload password protection for payload files
You can have password protection for individual payload files by simply adding “pwd” to the end of the file extension – e.g. Ubuntu14.isopwd or Win81Install.imgPTNpwd. The password used is the same as the Menu/Shell password (pwd, default = easy2boot) but if the variable menupwd is set in the MyE2B.cfg file, then that will be used instead. See the Sample_MyE2B.cfg file for more details and here.
# payload file extensions ending in "pwd" will ask for a password before they will run
# If menupwd is defined, then that will be the required password
# If menupwd is not set then the pwd will be used (if set)
# e.g. if file = Ubuntu14.1.isopwd or Win7Install.imgPTNpwd  and menupwd=fred then you must enter fred before  the payload will run
#      if both menupwd and pwd are not set, then no password will be prompted for
# Can use md5 encrypted password or plain text...
### set menupwd=--md5 $1$fzr3$gtBm4hqXA1CohTSpMsuxG1
set menupwd=fred
Monthly PIN code
You can configure the MyE2B.cfg file so that a 4-digit PIN code is requested from the user before the E2B Main menu is displayed. A different PIN code is required every month. See my blog article and Security page for more details.
Expiry Date
Change the 20151230 date below to alter the expiry date and change the message or use reboot instead of halt. In \_ISO\MyE2B.cfg…
if 20151230<=%@date:~0,4%%%@date:~5,2%%%@date:~8,2% pause –wait=3 THIS SOFTWARE HAS EXPIRED! && halt
See the Security page for more details.
Beep the loudspeaker
When the Main Menu loads, you can make E2B beep to signal that it is ready. This is useful if the menu takes a long time to load as it will tell you when it is ready. 1, 2 or 3 beeps only are supported. The computer must have an internal speaker fitted (many notebooks don’t!). To the MyE2B.cfg file add:
set beep=3 See the Security page for more details. You can also play tunes through the speaker.
Global Hotkeys
You can define global hotkeys in your MyE2B.cfg file. See the Sample_MyE2B.cfg file for examples. These hotkeys do not use a menu entry and so are invisible to the user. If you want the user to know what they are, add text to the HELPTEXT variable or to your background bitmap. The hotkeys that you define will be active for all the menus. See \_ISO\docs\Sample E2B Templates\TextMinimal\MyE2B.cfg for an example. Note for Advanced Tweakers only!: Any global hotkey that is set, will exist for ALL menus and you cannot change or remove a hotkey command unless you add a new hotkey command to the top of a menu .hdr or .lst file so that it is executed when that menu loads or add a .mnu file that is loaded first (e.g. starts with $$$ so it is added before other payload and .mnu files)
For Example:. If you wanted CTRL+F9 to automatically run Ubuntu when you are in the LINUX menu, but did not want the menu entry to appear in the menu, 1. Create a \_ISO\LINUX\Linux\$$$HotkeyUbuntu.mnu file with this single line: (bd)/%grub%/hotkey [Ctrl+F9] “(bd)/%grub%/qrun.g4b $HOME$/MyUbuntu.iso” > nul 2. Add your MyUbuntu.iso file to \_ISO\LINUX\Linux folder Note that once the Linux menu is loaded, the Ctrl+F9 hotkey will now work in every menu unless you redfine the hotkey or clear it. For instance, if you added (bd)/%grub%/hotkey [Ctrl+F9] > nul to the top of \_ISO\MAINMENU\!!CONFIG\$$1.mnu, then when the Main menu is loaded the Ctrl+F9 hotkey would always be cleared.
Adding a FASTLOAD Refresh hotkey
If you have enabled FASTLOAD, the F8 key will only reload the cache from the MAIN menu. To add a hotkey which will work in all menus, in your MyE2B.cfg file add (v1.14 and later):
#set hotkey Ctrl+R to refresh fastload menu cache
()/%grub%/hotkey [Ctrl+R] "clear && echo REFRESH > /FASTLOAD.YES && configfile /%grub%/menu.lst" > nul
#suppress FASTLOAD Main menu entry (optional)
set NOFLMENU=1
If you press CTRL+R in any menu, it will reload the Main menu and re-enumerate all payload files and make a new cache of the Main menu.
Prevent the menu items from being automatically numbered
If you don’t want the Main menu items to be automatically numbered, use set AUTONUM=0x0000
Remove or change the ‘Boot to first HDD [F7]’ menu entry
The Main menu entry is caused by the \_ISO\MAINMENU\ZZSubMenuAll.mnu file.To remove the entry from all menus use set NOF7HD=0 in the MyE2B.cfg file.
Remove or change the ‘Reload Main Menu [F8]’ menu entry
For the Main menu, this entry is caused by the \_ISO\MAINMENU\ZZSubMenuAll.mnu file.To remove the entry from all menus, use set NOF8B=0 in your MyE2B.cfg file. Note: You can add your own ‘Back to Main Menu’ into any menu by adding a Reload.mnu file into the \_ISO\xxx folder. To load the Main Menu quickly, use the cached version of the Main menu which is held in memory at (md)0xa000 (2nd example):
title Reload Main Menu \n Reload the Main Menu
configfile /menu.lst

title Reload Main Menu (Quick) \n Reload the Main Menu from memory
configfile (md)0xa000+0xA0
Remove the ‘Reboot [F9]’ menu entry and function
Use set NOF9R=1 in your MyE2B.cfg file (v1.11 and later). Change the HELPTEXT setting in MyE2B.cfg too.
Remove the ‘Power Off [F10]’ menu entry and function
Use set NOF10H=1 in your MyE2B.cfg file (v1.11 and later). Change the HELPTEXT setting in MyE2B.cfg too.
Add blank lines as separators to a menu
Menu entries are alphabetically sorted. To add a blank line (separator) in the Main menu between say Acronis.iso and Backtrack5.iso, for instance, create a file at \_ISO\MAINMENU\AZSeparator.mnu:
title \n
root ()
You can have as many of these files as you like, but note that each menu item will be counted by grub4dos, so when you set a default menu item (using menu 0) then you must also count these blank lines even though they are not numbered.
If you want a blank line immediately after menu 0 (‘Set default menu entry and timeout’) then use a filename of say $$$separator.mnu so it will be the first file enumerated by E2B.
Tip: If you want all the menu items to be spaced apart, use set lnspace=8 (adjust menu size as required) in your \_ISO\MyE2B.cfg file.
You can find some example .mnu files in the \_ISO\docs\Sample mnu files\E2B Menus folder – e.g. A_BlankMenuEntry.mnu.
Remove the ‘Set default menu entry and timeout‘ Main menu entry
In your \_ISO\MyE2B.cfg add:
set DEFMENU=0
If you remove the Main menu ‘Set default’ menu entry, the default Main menu entry will be set as 1 (i.e. the second menu item, as menu entries are numbered from 0). To set a different Main Menu default entry, create a file \_ISO\menu_defaults.txt containing the text:
default 0
timeout -1
debug 0
where default specifies the menu number, timeout specifies the timeout in seconds (-1 = no tiimeout) before the select menu item is activated and debug 0 prevents grub4dos informational messages during menu execution and the menu entry number from being displayed at the top right of the screen (you can use 1=normal or 2=verbose instead if you like).
Remove the ► Arrow menu marker
You can remove the menu arrow pointer ► symbol using (in MyE2B.cfg) – use 0 or 219
write 0x8308 0 > nul
Display filenames in menus without their file extension
Use
set EXTOFF=1
to cause E2B to display filenames in the menus without their file extensions.
Or use
set EXTOFF=
to cause the menu items to display the full filename with extension.
You can change the filenames so that the menu entry looks better (e.g. ‘Install Windows 8.1 64-bit from ISO.iso’), but the menu help text cannot be changed unless you use a .txt file for each payload file. Always test a filename with no spaces or special characters first to check it works.
Only show the Windows Install menu
If you just want to use the Windows Install menu as the first menu that the user sees, then:
1. Make a new file \_ISO\MAINMENU\$$$JumpToWinMenu.mnu
- echo Loading Windows Menu…
- configfile (bd)/%grub%/MenuWinInstall.lst > nul
2. To \_ISO\MyE2B.cfg add:
- !BAT
- set NOF8B=0
- set DEFMENU=0
AUTOMENU – initial letter jump feature
V1.65 and later versions of E2B have a menu auto-select feature. If you press a letter key, it will jump to the menu entry that starts with that letter. Press it again and it will jump to the next menu entry, etc.If you want to use the grub4dos built-in special keys (e,c,b and p) then you must press the SHIFT key first – for instance, press SHIFT+P to enter the grub4dos menu password (default=easy2boot).
If you want to disable the initial letter jump feature and be able to use lower-case e,c,b and p keys, use:
set AUTOMENU=OFF
in the \_ISO\MyE2B.cfg file. Note: If some menu items start with a number, the AUTOMENU feature can interfere with the menu-number-jump feature (e.g. normally typing 1 and then 2 will jump to menu item #12, but this won’t work if you have an ISO named ‘2WinPE.iso’ for instance). If you turn off AUTOMENU then the menu-number-jump feature should always work as expected.
Add a new folder entry (new sub-menu) to the Main Menu
The following instructions can be used to make any number of additional sub-menu entries in the Main menu (e.g. Diagnostics Menu, Special Menu, MSDart Menu, etc.).
Easy2Boot has several sub-menu folders already pre-defined (e.g. ANTIVIRUS, BACKUP, DOS, etc).
Let us say you have some ISOs which you often use to make a backup, and you also have an ISO (ping.iso) which you use to make an automated backup, but it requires some special commands, and hence it requires a .mnu folder. And let us suppose that you want all of these in a folder called SPECIAL and want a menu entry in the Main menu called SPECIAL for this folder . e.g.
Files:
- \_ISO\MAINMENU\ZZSubMenuSpecial.mnu (see below)
- \_ISO\SPECIAL\clonezilla.iso
- \_ISO\SPECIAL\pmagic.iso
- \_ISO\SPECIAL\Linux\ping.iso
- \_ISO\SPECIAL\Linux\ping.mnu
New! Use the \_ISO\docs\E2B Utilities\E2B SUBMENU Maker.cmd script to automatically make a new sub-menu instead of the manual method below.
1. Cut and paste the text below into a new text file – e.g. \_ISO\MAINMENU\ZZSubMenuSpecial.mnu
2. Edit the ZZSubMenuSpecial.mnu file in NotePad and change the first few lines to your own text and own folder name, e.g. change this…
iftitle [if "%GFX%"=="" && ls (bd)/_ISO/SPECIAL/ > (md)0x9F00+1 && checkrange 1:-1 read 0x13E0000 > nul] SPECIAL Menu\n My Special Menu
set MFOLDER=/_ISO/SPECIAL
#MFOLDER must be the full folder path starting with /set HDG=\x20                     SPECIAL Menu                          \x20
#HDG is the top heading for the menu
(bd)/%grub%/SubMenu.g4b
boot
Note: The first title/iftitle line can define a hotkey e.g. ^Ctrl+S and the [Ctrl+S] text indicates to the user that there is a hotkey assigned to this menu entry. You can add and change these two parts of text if you want to use a hotkey for your menu item. Note that GFXBoot Menus do not support hotkeys. See the \_ISO\MAINMENU\ZZSubMenuAll.mnu file for examples.
4. Create a new folder at \_ISO\SPECIAL
5. Now place your ISO files, etc. in this folder. If you have .mnu files you can place these in the same folder or any sub-folder that you make. For instance, if you want to use an Ubuntu.mnu file and Ubuntu.ISO file, place both of these in \_ISO\SPECIAL\MNU folder (if the .mnu file is expecting the ISO to be in %MFOLDER%\MNU or $HOME$).
You can repeat these instructions for any other folder you want to create.
If the heading at the top of the menu is not aligned correctly, make sure it is padded with enough spaces in the HDG variable. You can also have sub-sub-menus (see the UTILITIES_MEMTEST folder for an example). For instance, copy your ZZSubMenuSpecial.mnu file to your \_ISO\SPECIAL folder and rename it to ZZSubMenuSPECIAL_USEFUL.mnu and edit it as follows:
iftitle [ls (bd)/_ISO/SPECIAL_USEFUL/  > (md)0x9F00+1 && checkrange 1:-1 read 0x13E0000 > nul] ^U SPECIAL USEFUL TOOLS Menu [U]\n My useful backup tools
set MFOLDER=/_ISO/SPECIAL_USEFUL
#MFOLDER must be the full folder path starting with /
set HDG=\x20                     SPECIAL USEFUL Menu                          \x20
#HDG is the top heading for the menu
(bd)/%grub%/SubMenu.g4bboot
Now create a folder call \_ISO\SPECIAL_USEFUL and put any ISO files or .mnu files under there. Do NOT create sub-folders for sub-menus under the \_ISO\SPECIAL folder! Your SPECIAL menu will now have a new menu entry in it called SPECIAL USEFUL TOOLS Menu with a hotkey of U. You can use another .mnu file to add a menu entry to go back to the previous menu – see \_ISO\UTILITIES_MEMTEST\ZZBackTo_Utils.mnu for an example.
Adding new ‘Install Windows xxx from ISO’ menu entries to the Main menu
If you want to add a Main menu entry to install a specific Windows Vista\7\8 ISO directly from the Main menu (e.g. to save having to go to the Windows menu and then the Windows 7 menu), you can add a .mnu file to the \_ISO\MAINMENU folder. Use the \_ISO\docs\Sample mnu files\$$AddWin2Main.mnu file as a template and change the Win7/Win8 entries or add to them as required.
You can add or delete entries or make small .mnu files for each Windows ISO. You can also specify an XML file instead of the user needing to choose one.
Menu entries will be arranged alphabetically according to their filenames, so change the name to ZZZZZZ.mnu if you want it added last in the Main menu. You can also add a hotkey for each one by adding it to the title line (search this page for ‘hotkey’).
$$AddWin2Main.mnu also contains entries for XP install ISO menu entries and the XP PE install menu entry. You can delete any menu entries that you don’t want.
If you want to have individual Main menu entries for each of your XP Install ISOs, e.g. XP Home 32-bit and XP Pro 32-bit, use the XP_Inst_from_MainMenu.mnu sample menu in the docs\Sample mnu files folder, copy it to \_ISO\MAINMENU and change ‘XPISO’ entry to match your ISO filename.
To prevent a Windows XP/Vista/7/8 sub-sub-menu from loading the Windows Install sub-menu, use this setting in your MyE2B.cfg file (v1.14 and later):
# NOWMENU causes a Windows Install sub-sub menu to return back to the Main menu rather than return to the Windows Install menu
set NOWMENU=1
Removing the DOS and UTILITIES Main menu entries
Empty folders will not be listed in the Main menu, so just ensure that the folders (e.g. \_ISO\DOS, \_ISO\BACKUP and \_ISO\UTILITIES) are completely empty of any files or folders.
Want more?
Checkout the \_ISO\Sample_MyE2B.cfg file in the latest version for more tweaks!
TroubleShooting MyE2B.cfg
The \_ISO\MyE2B.cfg file is a grub4dos batch file.
If it contains errors (e.g. syntax errors, failing commands, etc.), it may ignore the errors or it may abort the batch file at the ‘bad’ line and not run any of the following lines in the MyE2B.cfg file. You may not see any error message displayed before the Main Menu is loaded.
The easiest way to debug the MyE2B.cfg file is to add ‘pause’ lines at various intervals.
Start by adding these commands immediately after the first line which should be !BAT
errorcheck on – stops execution if error
debug 2 – turns on debug messages
debug msg=2 – increased debug messages
now add pause commands at various intervals throughout the file to display your variables
pause FRED=*%FRED%* DORIS=*%DORIS%* – pauses and displays the variables FRED and DORIS
set s – will display all variables beginning with lowercase s
set S – will display all variables beginning with uppercase S
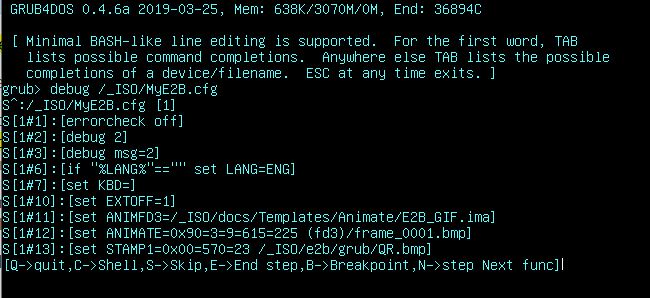
A second way to check for errors is to use the grub4dos debug command.
1. At the Main Menu, type SHIFT+p and enter the password (e.g. easy2boot) then press SHIFT+c to get to the grub4dos command prompt.
2. At the grub4dos command prompt type debug /_ISO/MyE2B.cfg
3. Press [ENTER] key to execute the file one line at a time.
Tip: The variable DONEMENU will be set when the Main menu is loaded. if your MyE2B.cfg file tests for DONEMENU, you may need to clear this variable to simulate MyE2B.cfg running for the first time, type set DONEMENU= on the command line before running debug to clear the variable.