Table of Contents
E2B Menu Editor
The Windows utility \_ISO\E2B_Editor.exe, will help you to design a custom E2B menu with your own wallpaper.
- First, copy an uncompressed 800×600 (or 1024×768) pixel .bmp or .jpg wallpaper file onto your E2B USB drive in or under the \_ISO folder (e.g. \_ISO\Special_800x600.bmp). .bmp or .jpg files should not be larger than approx. 3MB – grub4dos may crash if the files are tool arge or not in the correct format! Load and re-save using MS Paint.
- Always run E2B_Editor.exe directly from the \_ISO folder on the E2B USB drive.
- If you don’t have a .cfg file, load the \_ISO\Sample_MyE2B.cfg file directly from the E2B USB drive.
- Note: E2B_Editor.exe does not display animations or display STAMPS with transparency, or the correct E2B version number or the correct value of some other special variables (e.g. %SIZE_HD1%). E2B can display transparent .bmp files – but the Editor cannot.
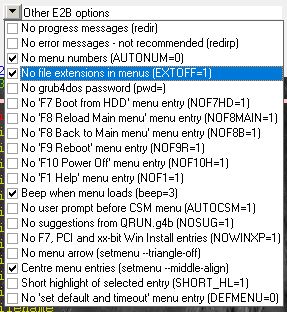
- The E2B menus will display the filename extensions unless Other E2B options – No file extensions in menus (EXTOFF=1) is ticked.
- To design a 1024×768 sized menu, load a 1024×768 .bmp or .jpg first. Use ‘set GMODE=1024’ in the MyE2B.cfg file.
- You can also use the editor to design the CSM Menu for .imgPTN files (save file as \MyCSM.cfg).
Note: The Easy2Boot menu will only use the new configuration file if it is saved as \_ISO\MyE2B.cfg.
The .imgPTN CSM menu will only use the settings if it is saved as \MyCSM.cfg onto the partition of that image (i.e after the image is switched-in).

E2B_Editor.exe (‘E2Bed’) requirements
- A Windows system
- Display/Monitor size – a 1152 x 768 pixels or larger monitor is required (if the vertical height is less than 900 pixels – e.g. 768, then E2Bed will use a borderless version of the GUI). 1024×768 will (just\almost) fit and E2Bed will be usable, small notebooks with 800×600 displays are not suitable to run the editor GUI!
- For the wallpaper graphics file, you will need a 800×600 or 1024×768 24-bit .bmp bitmap file or a non-progressive .jpg file – the editor cannot use compressed .gz files even though the E2B menu system can. Some .jpg progressive format wallpapers can be found here (note: Load into MS Paint and re-save as non-progressive .jpg to use them).
Tip: 800×600 (4:3) is best – because not all systems support 1024×768, e.g. most early netbooks.
Copy the wallpaper file to the E2B USB drive\_ISO folder (or any sub-folder). You can use the \_ISO\Sample_MyBackground.jpg file provided as a test. - E2B_Editor must be run from a writeable drive because it creates temporary files on the same drive.
- E2B_Editor should be run from the \_ISO folder on the E2B USB drive – otherwise you will not get the Language and Keyboard boxes populated correctly. The .cfg, .bmp, .jpg and \_ISO\e2b\grub folders should not be marked as ‘System’ or ‘Hidden’, so that the Editor (Windows) can find them on the USB drive.
- E2Bed will accept either ASCII or UTF-8 .cfg files and will create UTF-8 .cfg files.
- Configuration files may only work with the latest version of E2B\grub4dos.
- If you have a low-res display (e.g. 1024×768) ensure your Windows Display DPI setting is set to the Normal setting (96 DPI), otherwise it may not fit on the display and the menu will be out of proportion.
- E2B_Editor does not load a \_ISO\MAINMENU.jpg or MAINMENU.bmp file if one is present (even though it will be loaded by the E2B menu system after the default wallpaper is loaded).
If testing E2B using QEMU or VBOX+VMUB, quit E2B_Editor.exe first, because the VM may make the files on the USB drive inaccessible which will cause E2Bed to display an error.
Non-English characters
E2Bed does not support Chinese/Japanese/Persian glyphs – you must edit the .cfg file afterwards using a text editor if you want non-ASCII characters to be saved in the .cfg file for the Main menu heading or footer text.
Partition Image files (.imgPTN)
E2Bed can be used to create a \MyCSM.cfg configuration file for use with the CSM Menu found in .imgPTN files (MPI v0.067+).
See the section below for more details.
Using the E2B_Editor (E2Bed)
When you first run the E2B_Editor (aka. E2Bed) it will ask you to:
- Select a .cfg file (e.g. Sample_MyE2B.cfg or MyE2B.cfg, or \Sample_MyCSM.cfg if accessing a .imgPTN image on the USB drive).
Normally, you will have aready made a \_ISO\MyE2B.cfg file by copying the \_ISO\Sample_MyE2B.cfg file – however, if you do not have a .cfg file, just select the \_ISO\Sample_MyE2B.cfg file and a new file will be written when saved (either as New_MyE2B.cfg, or MyE2B.cfg if one does not already exist).
- Select a wallpaper background .bmp or .jpg file (if not specified in the MyE2B.cfg file)
N.B. THE FILE SHOULD BE LOADED DIRECTLY FROM THE E2B USB DRIVE (otherwise the path in the MyE2B.cfg file will be wrong when you save it!)
E2Bed will parse the specified .cfg file for the menu parameters and the Language and Keyboard settings. By default, ENG will be set as the language.
No keyboard type will be selected/highlighted (unless a keyboard type is specified in the .cfg file). The default keyboard setting is ‘none’ = KBD_QWERTY_USA = English USA. Note that Passwords, letter hotkeys, etc. may not work correctly if the wrong keyboard scan code translation file is selected. E2Bed will then populate two listboxes with the languages folders and the keyboard translation KEY_xxxx.g4b files in the X:\_ISO\e2b\grub\ folder (where X: is the same drive as the .cfg file). If you are not running E2Bed from a drive with a \_ISO folder in the root, then it won’t be able to populate these listboxes.
Wallpaper files
E2Bed will look for a ‘set MYWBMP=xxxx’ text entry in the chosen .cfg file and attempt to load the bitmap that is specified. If no file is specified or if the file specified cannot be found, then E2Bed will look for a \_ISO\MyBackground.bmp file (uncompressed). If this cannot be found, then the user will be prompted to select a wallpaper bitmap file.
E2Bed cannot load a compressed file.
You can load a .jpg file into E2Bed. Note that Progressive jpg files (e.g. SOF2) will load in E2Bed but will not work when you boot to E2B – try re-saving the .jpg using MSPaint if it does not load correctly in E2B.
Note: Only E2B v1.72+ versions and only grub4dos 0.4.6a 2015-08-05 and later versions support .jpg files – so switching to an older version of grub4dos may not load the .jpg file – after testing, you can compress .bmp files using the LZMA encoder tool (see below) if you wish, to reduce their size and increase load speed of the E2B first menu.
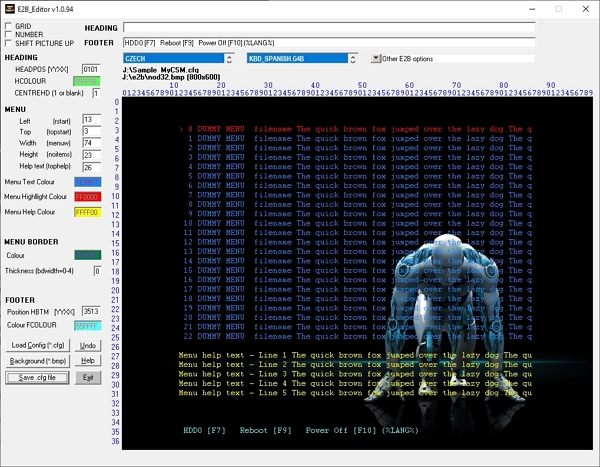
Controls
Once you have the E2B_Editor GUI displayed, you can use the E2Bed controls, as follows:
GRID – superimposes a grid over the image
NUMBER – numbers the x and y axes over the image
SHIFT PICTURE UP – shifts up the image window so that it will fit on a low resolution display (e.g. 1360 x 768) – in this mode the HEADING, HELPTEXT, language and keyboard fields will be hidden.
HEADING – this is the text that will be set for the Main Menu heading..
You can use the %@DATE%, %day%, %month%, %year%, %@TIME%,%VER%, %B64%, %SIZE_E2B% and %SIZE_HD1% variables in the text. \xnn can be used for any ASCII character, \Xnnnn can be used for any Unicode character (e.g. \X00DC for Ü). \n for new line (do not use with CENTREHD) or adjust the position using HEADPOS instead (affects all menu headings) – use a single preceding \x20 string instead of a space characters if you want spaces at the start. %LANG% can be used in the HEADING, but the LANG variable must be set before the ‘set HEADING=’ line in the MyE2B.cfg file. To remove the heading use: set HEADING=\x20. %MEMSIZE% will give the number of MB in the system, %BITNESS% will return either 32 or 64 depending on CPU type (E2B v1.B2+).
FOOTER HELPTEXT – this is the footer help text that is normally displayed at the bottom of each menu (e.g. Reboot [F9] Power Off [F10]) – but it can be used to display text anywhere on the screen.
You can use the %@DATE%, %@TIME%, %day%, %month%,%year%,%VER%, %B64%,%SIZE_E2B%, %SIZE_HD1%and %^LANG% variables in the text. Do not use leading spaces as they will be ignored by E2B (but not by the editor). \xnn can be used for any ASCII character, \Xnnnn can be used for any Unicode character (e.g. \X00DC for Ü). \n can be used to start a new line. %MEMSIZE% will give the number of MB in the system, %BITNESS% will return either 32 or 64 depending on CPU type (E2B v1.B2+).
MENU – these parameters control the position, size and colour of the menu entries
BORDER – these parameters control the colour of the border and the thickness (0-4) of the border
HEADING – these parameters control the position and colour of all menu headings.
CENTREHD = 1 will cause all menu headings to be centred over each menu.
Note: E2B will set the X value of HEADPOS to 00 if CENTREHD is set, so use a HEADPOS of YY00 if using CENTREHD=1-4.
FOOTER HELPTEXT – these parameters control the position and colour of the footer HELPTEXT text – normally at the bottom of the display but can be anywhere on the screen or even off-screen.
Language listbox – highlight the language that you want E2B to be displayed in (languages folders must be present on the same drive as E2Bed)
Keyboard listbox – highlight the keyboard scancode conversion file that you want E2B to use (KBD_xxxx files must be present on the same drive as E2Bed)
Other E2B Options – you can select or deselect various advanced configuration options here
(config file path) – click on this to edit or view the current .cfg file in Notepad
(image file path) – click on this text to launch the .bmp file (view\edit) – depends on Windows file association for .bmp on your system
Load Config (*.cfg) – this button will allow you to load a E2B .cfg file (a new bitmap may also be loaded if it is specified in the .cfg file)
Load Bitmap (*.bmp) – this button will allow you to change the wallpaper bitmap without changing the menu parameters – .jpg files can also be loaded.
Save .cfg file – this button will always create a temporary file (MyE2B.tmp) in the same folder as E2Bed. You will then be asked if you want to update the existing (or new) .cfg file. If you answer ‘No’ then E2Bed will open the MyE2B.tmp file for you in Notepad. If you answer ‘Yes’ then E2Bed will:
- Backup the old .cfg file into a MyE2B.bak file
- Overwrite the old .cfg file with the new values (or make a new file)
- Copy all lines that occur after the line containing ‘– ADVANCED MENU SETTINGS —‘ to the .cfg file. If the special line does not exist, you will be warned.
- Open the updated .cfg file in Notepad for you to view and edit if required.
Undo (CTRL+Z) – Restores the most recent menu xy position change. If you accidentally clicked on the bitmap window and thus moved\resized the menu, this will restore the previous values! It only has a memory depth of only 1 change though – think of it as an ‘Oops’ button!
Notes
Draw a menu box with the mouse
You can use the mouse to draw a menu. Note that the menu border (if enabled) will be drawn around the outside of the menu area that you draw with the mouse.
The Undo button (Ctrl-Z) will restore the previous menu size and position.
24-bit colours (e.g. FF00FF)
These must be 6 hexadecimal numbers (0-9, A-F where A=10 decimal, B=11 decimal, etc.), the first two hex characters are the Red value, followed by the Green value and then the Blue value (i.e. RRGGBB). Hex value 00 would mean no colour, FF would mean full colour, 80 would mean half-full colour.
000000 is therefore Black. FFFFFF is White, 808080 is mid-grey, FF0000 is Red, 00FF00 is Green, 0000FF is Blue, 00FFFF is Cyan, FFFF00 is Yellow and so on.
Any value between 000001 and 0000FF will automatically have a Green 01 value added by E2Bed (e.g. 000003 will become 000103), because 24-bit colour values must be greater than 0000FF in order to work correctly with the grub4dos color command.
Background colour for highlight menu entry
When in graphics mode (i.e. E2B is displaying a bitmap), all grub4dos text will have a transparent background so that the picture can be seen underneath the text.
However, the menu highlight text (selected menu item = highlight) and the console text (standard), can display a background colour – e.g.
color highlight=0xFF0000 < this is overridden by the next line
color highlight=cyan/red < foreground/background pair will display the cyan highlighted menu entry with a red solid bar background behind it.
However,
color highlight=cyan/red < this is overridden by the next line
color highlight=0xFF0000
will display a red (RGB = FF0000) highlighted menu entry with a transparent background (because the background colour is 000000 (0xFF0000 == 0x0000000000FF0000).
You can use a 64-bit value to set both the highlight background colour and the text colour:
color highlight=0x0022222200FFFF00 < yellow 00FFFF00 + background will be 00222222 (v. dark grey/black) – see screenshot below:

Tip: Instead of 32-bit colour pairs, you can set a hexadecimal foreground/background pair using an 8-bit value of 255 (0xFF) or less, e.g. color highlight=0x1c will set a light-red text (c) on a blue (1) background.
Note: E2Bed does NOT display a background highlight colour. It always uses a transparent background in graphics mode.
The background colour of the highlight bar in E2B usually extends across the full width of the menu (see above). To reduce the highlighted area to just the length of the menu text use the Option setting ‘set SHORT_HL=1’…
 # set a short highlight bar (the default is a long highlight bar)
# If you define a highlight background colour (not transparent), make the highlight bar only as long as the text
set SHORT_HL=1
Centre the menu entries
# centre the menu entries inside the menu area (and centre help text under menu) - requires grub4dos 0.4.6a 2018-07 or later
setmenu --middle-align
Tip: Set the menu width as wide as possible, so that longer menu entries are not cut off.
You may also want to set the ‘Other E2B Options’ – set AUTONUM=0 and add a grub4dos command to turn off the menu pointer (arrow symbol):
set AUTONUM=0
setmenu --triangle-off
See the \_ISO\Sample_MyE2B.cfg file for more details of the configuration settings possible.
All the HEADING, FOOTER and menu help text can be removed by setting the row position to be past the last line of the menu – e.g. 4700.
set tophelp=47
set HEADPOS=4700
set HBTM=4700
See here for more info on centred menus.
4-digit colours – HCOLOUR and FCOLOUR (e.g. 0103)
Note: Later versions of E2B_Editor do not use 4-digit colours.
These must be in the format of ABCD where:
A = 0 or 1 where 1 = blink – E2Bed only allows 0 (Note: It won’t blink if using a VM/QEMU).
B = 0 or 1 where 1 = bright/intensity on bit
C = 0-7 background colour (E2Bed only allows 0 = transparent)
D = 0-7 foreground colour
If you click on one of these fields, E2Bed will allow you to choose from 16 colours and will automatically enter the correct value.
Note that Black (0) is treated as ‘transparent’ by E2B if defined as a background colour.
Tip: If you want some text hidden (e.g. menu help text), then you can use one of the following methods:
- Use a rectangle in your bitmap background that is the same colour as your text, so that the text cannot be seen against that area of the background.
– or – - Specify the start position for that text to be outside of the display area – e.g. setting tophelp=37 for a 800×600 bitmap, will place the menu help text off-screen.
Colour name   [bIBF]   Hex RGB (0xRRGGBB)
              [b=blink, I=Intensity, B=background colour, F=Foreground colour]
black         [0000]   0x000000
blue          [0001]   0x0001AA
green         [0002]   0x00AA00
cyan          [0003]   0x00AAAA
red           [0004]   0xAA0000
magenta       [0005]   0xAA00AA
brown         [0006]   0xAA5500
dark-gray     [0007]   0xAAAAAA
light-gray    [0100]   0x555555
light-blue    [0101]   0x5555FF
light-green   [0102]   0x55FF55
light-cyan    [0103]   0x55FFFF
light-red     [0104]   0xFF5555
light-magenta [0105]   0xFF55FF
yellow        [0106]   0xFFFF55
white         [0107]   0xFFFFFF
4-digit positions – HEADPOS and HBTM (e.g. 3201)
These must be in the form YYXX, e.g. 3201 will draw the text starting at 32 lines down and 1 character across (0 is first line\character).
Note: I suggest that HEADPOS normally ends with XX=00 (e.g. 0100) because E2B will pad out the headings assuming they start at offset 0.
HEADPOS will affect the Main menu and all Sub-Menu headings.
CENTREHD=1 for centering all menu headings, assumes the HEADPOS XX position is 00.
HBTM (Help Bottom) is an absolute YYXX position for the FOOTER menu text and is not padded out by E2B in any way. It can be used to place help text anywhere on the display.
Advanced Menu Settings
E2Bed will look for a special line of text in the source .cfg file – it must contain the string “– ADVANCED MENU”, e.g.
# ----------- ADVANCED MENU SETTINGS ------
all lines below this line will be copied by E2Bed to the new .cfg file if you update it using the Editor.
Any E2B settings that are already supported by E2Bed will be commented out by E2Bed before the lines are copied to the new .cfg file.
If you have any special settings, e.g. font or hotkeys, etc. then place them below this special line and they will be preserved when copied over to the new .cfg file.
The Sample_MyE2B.cfg file already contains this special line.
Note: E2B_Editor ignores the hstart and hwidth variables if they are present in the MyE2B.cfg file. If you have defined these variables, ensure they have been defined below the ADVANCED MENU SETTINGS section of the MyE2B.cfg file.
E2B Options (pwd, EXTOFF, AUTONUM, etc.)
Note: Most of these option checkboxes do not cause the E2B_Editor display to change, but they will add entries to the .cfg file and thus you will see the effect when you boot to the E2B menu. However, the AUTONUM and EXTOFF settings will affect the menu that is displayed by the E2B_Editor.
If you want to disable the grub4dos menu password (pwd) then you must tick the no password checkbox before saving the .cfg file.
To override any pwd setting with your own password, place your ‘set pwd=mynewpwd‘ line below the — ADVANCED MENU SETTINGS — line.
AUTONUM=0 causes the menu numbering down the left-hand side of the menu to be suppressed/removed.
The checkbox will be automatically ticked if your .cfg file contains ‘set AUTONUM=0’ or ‘set AUTONUM=0x0000’.
I recommend that you do not tick the redir or redirp boxes unless you are an experienced E2B user and have tested all the E2B ISO’s, etc. These options will suppress useful user tips, information and warning messages which may help you to fix problems with some ‘special’ payload files.
Updating display of date and time
You can add a constantly updating current date and time which will update every second by adding a ‘string’ to the menu display.
The example below displays the date and time, 71 is the X co-ordinate, 0 is Y co-ordinate, 0xffffff is 0xRRGGBB colour…
# Display Date and Time on every menu (max. 16 --string commands, use 'setmenu --string=' to clear all strings)
# Can add own string with special replacement code strings of dd MM MMM yyyy hh HH mm ss AP
 setmenu --string=i5=71=0=0xffffff="date&time=[dd-MMM-yyyy  hh:mm:ss AP]"

Displaying File Extensions in the Menus (EXTOFF)
If you have no \_ISO\MyE2B.cfg file, E2B will only display the file names in the menus and will not display the file extensions.
However, when you run E2B_Editor, the default will be to show file extensions in the menu (unless you load a .cfg file that has EXTOFF=1).
If you want E2B to show the filenames without their extensions, tick the Other E2B options – EXTOFF=1 checkbox.
Note: The .cfg file may contain more than one ‘set’ command of the same type:
set EXTOFF=
(some lines here)
set EXTOFF=1
The last setting will always be the one to take affect (so no file extensions will be show in the E2B menu, in this example).
Note: As with most variables you must use EXTOFF= to clear the variable if you want to see the file extensions in the menu. Make sure there is no space or other character after the = sign.
Windows form GUI
E2Bed will use either a normal Windows form with the usual top border and min/max/exit icons or a borderless form if your display does not have enough resolution for a 1024×768 bitmap.
The borderless Windows GUI form cannot be moved (it will be located at 0,0 which is the top-left of the display).
You cannot resize or maximise the form.
Use the ‘SHIFT PICTURE UP’ checkbox to move the bitmap to the top of the screen if you don’t have a large enough display.
Tip: If you cannot see the Exit button (e.g. on a 800×600 display) – press ALT+X to Exit E2Bed.
Compress the wallpaper bitmap
Once you have the .cfg file working, you can compress the .bmp file to a .gz file (e.g. using 7Zip) or, even better, use LZMA for even greater compression.
To compress a file using LZMA, just drag-and-drop the .bmp file onto the \_ISO\docs\E2B Utilities\LZMA\LZMA_ENCODE.cmd file. It will compress the orginal file but not change it’s filename. A backup will be made of the original file which you can choose to delete.
If you wish, you can even compress the .cfg file using the same LZMA_ENCODE.cmd script file!
E2B will accept standard (non-progressive) JPEG files which are usually much smaller than .bmp or .bmp.gz files. You can use MSPaint to convert a .bmp file to a .JPG file.
For best image quality, I suggest you always work with .bmp files in your graphics editor. Once you have finished all editing of the .bmp file, you can convert it to a .jpg file using MSPaint- Save As – JPEG. Note that even though E2B will automatically decompress gzip and LZMA-encoded files, the E2B_Editor can only work with uncompressed files.
Testing
E2B_Editor.exe can be used to design the menu layout, but it does not display Animations, STAMPS with transparency, direct text overwriting, lines or boxes.
- STAMPS are displayed but must be in .bmp or .jpg format (note that the old E2B stamp file “\_ISO\e2b\grub\E2BPlate.bmp” was compressed and so did not work in the Editor – the newer v2.10+ version is actually a jpeg file and does work).
- Transparent STAMP .bmp files cannot be displayed by the Editor. If you want to see where the STAMPS will appear on the menu, use MS Paint to save a non-transparent .bmp file or .jpg and test with that. Then change the MyE2B.cfg file to use your transparent versions.
- The editor does not display the correct E2B version or display the correct value of some grub4dos variables.
- The x-position of the menu heading may also not be quite correct if centred.
- The editor only displays left-aligned or centred menu entries.
To test that your MyE2B.cfg file is working as you desire, you can run \QEMU_MENU_TEST (run as admin).cmd from the E2B USB drive. This will emulate booting from a virtual machine and you can see what the menu system will look like. Of course, you can also boot from a real system.
Tip: A faster way to check the menu system is to use Virtual Box + VMUB – see here for details.
If you define the LANG variable before you define the HEADING variable in your MyE2B.cfg file, then you can use %LANG% variable in your HEADING.
if "%LANG%"=="" set LANG=ENG
set HEADING=MYHEADING (%LANG%)
Various variables are only available within MyE2B.cfg (e.g. %MEMSIZE% or %VER% or %B64%). If you want to check what variables are available and what values they have, add the line:
set ;; pause
to the end of your MyE2B.cfg file or just before the line that does not seem to be working.
Using the E2B_Editor without needing a USB drive
To work fully, the E2B_Editor needs to be run from the \_ISO folder on the root of any drive which has the E2B download files on it .
You can copy the whole _ISO folder from the download to the root of one of your system drives (e.g. D:\_ISO) or you can ‘map’ a virtual drive as follows:
1. Use the WindowsKey+R key chord to open a Run box and type cmd, then type for example, subst Z: C:\temp\Easy2Boot if your extracted Easy2Boot files have been copied to the C:\temp\Easy2Boot. folder
2. Now go to Z:\_ISO in Windows Explorer.
3. Copy your .bmp (or .jpg) files to the Z:\_ISO folder (or anywhere you like under Z:\_ISO).
4. Run E2B_Editor. Check that you now have the Language and Keyboard boxes populated correctly.
Note: The Z: drive will be lost if you reboot your system, but the files will still be in C:\temp\Easy2Boot.
Test different .cfg files (multiple Themes/Skins)
You can easily test the various .cfg themes which are already included in E2B.
See the \_ISO\docs\mythemes folder and read the ReadMe.txt file for instructions.
This allows you to easily test many different configurations without needing to reboot each time. It works because E2B will copy the contents of any .cfg file into the \_ISO\MyE2B.cfg file and then reload the E2B menu system.
- Copy the $Default E2B Menu.cfg file to the \_ISO folder and rename it as MyE2B.cfg (this file will be overwritten when a .cfg file is selected in the E2B menu system).
- Then add the $Change_Theme.mnu file to the Main Menu which will allow you to choose any .cfg file.
You can add more .cfg files to the \_ISO\docs\mythemes folder or edit the .mnu file to get .cfg files from a different folder.
Note: PimpMyDrive.cmd will add the Change_Theme mnu file and set up a blank MyE2B.cfg for you.
If you have a large enough MyE2B.cfg file, you can simply copy different .cfg files into any menu folder (e.g. \_ISO\MAINMENU) and then select them from the E2B menu. E2B will replace the \_ISO\MyE2B.cfg file with the contents of the selected .cfg file and reload the E2B menu so you can change the current ‘theme’. Changes are permanent because the MyE2B.cfg file is overwritten – so save a copy of your version first!
Multiple wallpapers
You can have a different background for each (or any) of the menus – see here for details.
Configuring the CSM menu (for .imgPTN files)
When you switch in a .imgPTN file, you will see the standard ‘CSM’ Legacy menu, but it can be changed as shown below…

Use E2B_Editor.exe to configure a \MyCSM.cfg file to change your .imgPTN menu as follows:
- Use \_ISO\SWITCH_E2B.exe or the E2B boot menu to select a recently-made .imgPTN file
- Once the .imgPTN file has been ‘switched-in’ you should see a new partition on the E2B USB drive which contains an \e2b folder on Partition 1 (check that there is no \_ISO folder visible).
All subsequent operations are on Partition 1 (the new image): - Copy your background 800×600 or 1024×768 .bmp or .jpg wallpaper file to the \e2b folder (the one on Partition 1 – NOT partition 2).
- Run E2B_Editor.exe (either from the Easy2Boot download folder or from the MPI Tool Kit folder or from a previously copied version).
- Load the \Sample_MyCSM.cfg file from the E2B USB drive (or the \MyCSM.cfg file if there is one).
- Set the Menu and Menu Border parameters, load a new background image from the \e2b folder, set the language and keyboard type.
IMPORTANT: The HEADING field should be cleared of all characters.
Note: Only some of the Options will work in the CSM menu - Click on ‘Save .cfg file‘ – ensure the file is saved or renamed to \MyCSM.cfg (not MyE2B.cfg)
- Boot from the USB drive (you can use VBox+VMUB) and check that the Menu looks OK
Now to ensure that all future .imgPTN files that you make using the MPI Tool Kit will use your new theme…
- Copy the MyCSM.cfg file to the MPI Tool Kit’s .\CUSTOM folder so that it will be used for all future .imgPTN files. Check the set HEADING= line is blank (or delete it) – otherwise all your .imgPTN files will have the same menu heading!
- The wallpaper file should also be copied to the .\CUSTOM\e2b folder so that it will be copied to the \e2b folder in the final .imgPTN file.

Note: If you update to a newer version of the MPI Tool Kit, you will need to add these files in again.
Some variables, animation and STAMPs are not supported in the CSM menu.