Fedora can use a persistence file but it must be on a FAT (or ext) partition. We therefore need to use a .imgPTN file so that we can create a FAT32 volume.
1. Download your Fedora Live ISO file – I used Fedora-Workstation-Live-x86_64-33-1.2.iso.
2. Install the MPI Tool Kit onto your Windows system
3. Drag-and-Drop the ISO onto the MPI_FAT32 Desktop shortcut.
When prompted for a size, you must add the amount of space you want to use for persistence – e.g. add 500MB to the suggested size. (Max 4GB)
Do not add more than 4GB as we cannot create a file >4GB for the persistence file.
4. Copy the resultant .imgPTN file to your E2B USB drive (e.g. \_ISO\LINUX\Fedora-Workstation-Live-x86_64-25-1.3.imgPTN).
Rename the file extension to .imgPTN23 if you have agFM on your E2B USB drive.
5. Run the \_ISO\SWITCH_E2B.exe utility and double-click on the .imgPTN file to switch in the new Fedora partition as partition #1.
Check in Explorer that you can now see a \LiveOS folder on the USB drive.
6. Edit the \menu.lst to add in the following lines to the bottom of the file…
title FEDORA with persistence (/fedora.img)\nBoot to Fedora with persistence
uuid () > nul
set UUID=%?%
echo UUID=%UUID%
if not exist /fedora.img echo WARNING: Changes will not be remembered unless a /fedora.img ext file is created! && pause
kernel /syslinux/vmlinuz root=live:UUID=%UUID% rd.live.overlay=/dev/disk/by-uuid/%UUID%:/fedora.img rd.live.dir=/LiveOS rootfstype=auto rw rd.live.image quiet splash rhgb rd.luks=0 rd.md=0 rd.dm=0 xdriver=vesa nomodeset selinux=0 vga=791
initrd /syslinux/initrd.img
boot
Tip: add vga=ask after nomodeset if you cannot see a Desktop and try a different graphics mode.
7. Run a recent version of RMPrepUSB.exe, select the USB drive and click on the Create Ext2\3\4 button, then use the following settings:
Ext Filename: fedora.img (all lower case)
Volume Name: LIVE (anything you like here!)
Size: YYY (where YYY is the remaining amount of free space in the FAT32 partition – use Explorer to tell you how much free space there is)
Ext type:ext3 (ext3 is more resilient than ext2 – you can use ext4 if you wish but it may run Fedora slightly slower than ext3)
The file must be made contiguous after creation by running \MAKE_THIS_DRIVE_CONTIGUOUS.cmd from the USB drive.
Use a persistence file size of at least 1GB (700MB is not enough and can cause boot/display/lockup issues!) I recommend 2-4GB.
8. Now boot on a real system in MBR mode and check it works. If you change the Desktop wallpaper, the change should be persistent.
Note: Try on a real system if it fails to work on a Virtual Machine.

As it boots, look out for any messages about ‘unable to find persistent overlay’ about 3-10 seconds into the boot process (see piccy). See section below for 2020/2021 versions of Fedora.
For a verbose boot, change quiet to noquiet and splash to nosplash to see more progress messages. If you have early boot display issues, change vga=791 to vga=ask.
xdriver=vesa nomodeset are included for reliability reasons – you can try omitting them.
If it was working OK, but then stops booting to the Desktop, delete and re-create the persistence file as it may have become corrupted.
To remove the ‘Try or Install’ app which runs on start up, use the command sudo rm /usr/share/anaconda/gnome/fedora-welcome to remove the welcome file.
Persistence for later versions of Fedora
For booting from VENTOY with a live Fedora ISO with persistence see here.
Later versions (e.g. 33) require there to be some empty directories in the persistence file before it will be recognised as a valid persistence file:
- Legacy-boot to the .imgPTN23 image using the new ‘Fedora with persistence’ menu entry (ignore warning about unable to find persistence overlay)
- Activities – Show Applications – Disks
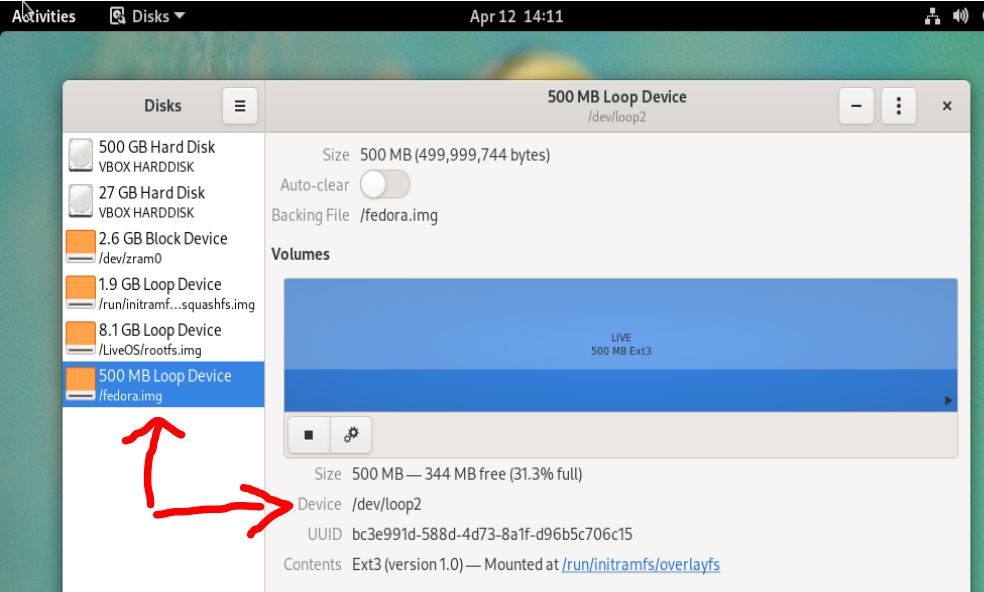
Look for the fedora.img file (in my case it was /dev/loop2 – see screenshot below) - At the Desktop, open a Terminal console (Activities – (Search) – ‘terminal’)
- In the terminal console type
mount
look for the same loop device. In my case is was mounted as /run/initramfs/overlayfs - Type
cd /run/initramfs/overlayfs/ (or whatever your mount point was)
(you can type ls to ensure it is empty except for lost+found) - Type these commands to make two new directories on the loop device:
sudo mkdir overlayfs
sudo chcon –reference=/. overlayfs
sudo mkdir ovlwork
Now reboot (using the Restart menu) and boot to Fedora+Persistence again.

Ref: github source here.
For later versions, add selinux=0 vga=791 to the kernel parameters.
UEFI-booting
If you also want to UEFI-boot with persistence, we need to also edit the grub.cfg menu
This assumes the volume name (label) of the .imgPTN file is ‘EASY2BOOT’
1. Add the following 4 lines so that they are the first menuentry in the \EFI\BOOT\grub.cfg file:
menuentry 'Start Fedora-Workstation-Live Persistent' --class fedora --class gnu-linux --class gnu --class os {
 linuxefi /images/pxeboot/vmlinuz root=live:LABEL=EASY2BOOT rd.live.overlay=LABEL=EASY2BOOT:/fedora.img rd.live.dir=/LiveOS rw rd.live.image quiet selinux=0 nomodeset
 initrdefi /images/pxeboot/initrd.img
}
2. Change the set default=”1″ line to set default=”0″
Optional: Change the set timeout=60 line to 5 to change the timeout to 5 seconds
Add the splash parameter after the quiet parameter if you want to see the splash screen instead of boot messages.
Add nomodeset if you experience display/boot issues.
Here is an example:
set default="0"

function load_video {
  insmod efi_gop
  insmod efi_uga
  insmod video_bochs
  insmod video_cirrus
  insmod all_video
}

load_video
set gfxpayload=keep
insmod gzio
insmod part_gpt
insmod ext2

set timeout=5
### END /etc/grub.d/00_header ###

#search --no-floppy --set=root -l 'Fedora-WS-Live-25-1-3'

menuentry 'Start Fedora-Workstation-Live Persistent' --class fedora --class gnu-linux --class gnu --class os {
 linuxefi /images/pxeboot/vmlinuz root=live:LABEL=EASY2BOOT rd.live.overlay=LABEL=EASY2BOOT:/fedora.img rd.live.dir=/LiveOS rw rd.live.image quiet splash selinux=0 nomodeset
 initrdefi /images/pxeboot/initrd.img
}

### BEGIN /etc/grub.d/10_linux ###
menuentry 'Start Fedora-Workstation-Live 33' --class fedora --class gnu-linux --class gnu --class os {
 linuxefi /images/pxeboot/vmlinuz root=live:LABEL=EASY2BOOT rd.live.image quiet
 initrdefi /images/pxeboot/initrd.img
}

menuentry 'Test this media & start Fedora-Workstation-Live 33' --class fedora --class gnu-linux --class gnu --class os {
 linuxefi /images/pxeboot/vmlinuz root=live:LABEL=EASY2BOOT rd.live.image rd.live.check quiet
 initrdefi /images/pxeboot/initrd.img
}
submenu 'Troubleshooting -->' {
 menuentry 'Start Fedora-Workstation-Live 33 in basic graphics mode' --class fedora --class gnu-linux --class gnu --class os {
  linuxefi /images/pxeboot/vmlinuz root=live:LABEL=EASY2BOOT rd.live.image nomodeset quiet
  initrdefi /images/pxeboot/initrd.img
 }
}
For later versions, add selinux=0 to the kernel parameters.
Hello,
thank you for your great Easy2Boot!
With Fedora 36 (Fedora-Workstation-Live-x86_64-36-1.5.iso ) the error “unable to find a persistent overlay; using a temporary one” persists.
I use only Linux, I don’t have Windows. From inside Fedora, the folder “/run/initramfs/overlayfs/” does not refer to the overlay, but to the root of the usb stick.
However, with Linux Mint 21, I mounted the overlay file and I ran the commands you suggested to add the two folders:
# mkdir ./fedorapersistence
# mount -o loop,rw /media/francesco/EASY2BOOT/LiveOS/overlay-LIVE-899A-ECEC ./fedorapersistence
# cd fedorapersistence/
# mkdir overlayfs
# mkdir ovlwork
Note that “overlay-LIVE-899A-ECEC” was originally the file extracted from “/media/francesco/EASY2BOOT/_ISO/docs/Linux Persistence Files/persistence_ext4_1GB_casper-rw.dat.7z” and then renamed.
I omitted the following command because it is syntactically invalid, it gives an error:
# chcon –reference=/. overlayfs
I tested Fedora-Workstation-Live-x86_64-36-1.5.iso and the instructions worked OK for me.
You will get an error on first boot, but you shouldn’t get it after running the mkdir chcon commands and rebooting.
For later Fedora distros you need to add selinux=0 to disable the security, Then it will prompt you to set up a user account on first boot.
Mint ISOs can be booted with persistence using _.isopersist.iso file extension and adding a -rw file – see https://easy2boot.xyz/create-your-website-with-blocks/add-payload-files/linux-payloads/ubuntu-based-iso-persistence-isopersist/
Your answer was helpful to me. In my case, the problem was not the creation of the two folders, “overlayfs” and “ovlwork,” but the fact that the name of the persistence file was wrong, i.e., different from “fedora.img”. Also, the kernel parameters needed to be corrected. I adapted them to my case.
So, I thank you.
It was a complex task to repurpose your instructions to a Linux environment without “MPI Tool Kit” (which, if I am not mistaken, is only for Windows). However, I figured out how to do it.
In general, I guess that your blog is mainly for Windows users. However, Easy2Boot is an excellent tool even for those who, like me, use only Linux.