Table of Contents
Add WindowsToGo images
To run WindowsToGo, you will need a fast USB 3.0 drive – I highly recommend the SanDisk Extreme or Extreme Pro flash drives or even better use a fast USB 3.0 HDD or SSD. Beware of some other ‘fast‘ flash drives such as the Lexar P20, etc. – they can take over one hour to boot WinToGo!
You can install WinToGo onto a USB drive as a ‘flat-file’ install (using a .imgPTN partition image file) or just copy over a VHD or VHDx file which contains WindowsToGo (recommended).
MBR-booting: if UEFI-booting is not required (or not supported), you need only create one large NTFS .imgPTN partition and use this as both the boot and system partitions or alternatively you can create a VHD file which will support both Legacy and UEFI-booting.
UEFI-booting: agFM can boot from a VHD or VHDx file as can Ventoy for Easy2Boot (with an additional plug-in file added) or you can use a Partition Image file for a ‘flat-file’ install..
Note that Windows To Go may create a large pagefil.sys file on the root of your USB drive which you can safely delete after shutting down Windows To Go.
Easy VHD option – use WinToUSB
You can use the free WinToUSB Windows program which creates and installs Windows onto a VHD file on any spare USB drive, so if you have a spare USB drive the process is quite simple:
- Run WinToUSB – select MBR for legacy booting (or GPT if you are going to boot it on a UEFI computer) – select your Win10 ISO – choose Home (or Pro if you have the full version of WinToUSB which you have to pay for) – adjust the size of the VHD file as required (e.g. 30GB) – install Windows onto the USB drive. Since most modern PCs use UEFI64, you should install a 64-bit version of Windows.
- Boot from the USB drive using a real computer (not a VM) and fully complete the Windows installation (reboot to WindowsToGo at least 6 times!).
- Now copy the WinToUSB.VHD file to your E2B USB drive, e.g. \_ISO\WIN folder – you can rename the file as required.
- You can now Legacy boot using E2B, agFM or Ventoy or you can UEFI-boot to the VHD using agFM or Ventoy (Ventoy requires you to add a plug-in file).
For more instructions on how to create Windows 7/8/10 VHDs easily, see below or read my blog posts here and here.
Note that Windows 8.1/10 will not boot from a Removable USB drive unless you create a .VHD file, however new Windows 10 1607 and later builds are now capable of booting from ‘flat files’ on a removable drive too.
Note 1: E2B can directly MBR-boot from fixed-type .VHD Windows 7/8/10 OS files – agFM can also Legacy and UEFI boot from a Windows VHD file. Just copy the Windows VHD\VHDX files to one of the E2B menu folders such as \_ISO\MAINMENU or \_ISO\WIN and boot (the file does not even need to be contiguous). The VHD/VHDX must contain a fully installed and rebooted (several times) copy of Windows – if you boot from a ‘fresh’ VHD that contains a new Setup install or Sysprep’ed OS (e.g. as made by WinNTSetup or ImageX), the setup process on the first boot will report an error because of the lack of boot files or a boot partition.
Note 2: Direct Legacy\MBR booting from a VHD in E2B requires a Windows 8.1 version of bootmgr (or similar) in \_ISO\e2b\grub\DPMS\NTBOOT.MOD folder (the Windows 10 bootmgr gives a BSOD 0xc00000bb bad BCD error!). See here for more details.
Note 3: If you already have a WinToGo .imgPTN file (or any disk partition with WinToGo), you can copy it into a .VHD file – see this blog post for details.
VHD + WinNTSetup
This method also requires a fast USB 3 disk (e.g. Sandisk Extreme Pro or HDD or SSD). If it does not contain the correct partitions, it will need to be wiped and reformatted.
The MBR and PBR will be overwritten with bootmgr boot code if using a Legacy partitioned drive.
The process requires you to boot from the USB drive using a real system – if your system only supports UEFI booting, you will need a USB disk with GPT partitions.
The example below assumes you have a Legacy\MBR\CSM BIOS PC.
The VHD produced will both Legacy and UEFI64-boot from your Easy2Boot USB drive once completed.
1. Partition and format the USB drive
Use RMPrepUSB to make blank MBR-partitioned WinPE – NTFS USB drive.
(if you only have a UEFI64 system with no Legacy support, create a GPT USB drive containing an EFI\ESD partition and a large NTFS partition. You can use Windows or EaseUS Home Partition Master or gparted)
2. WinntSetup
- Download and install WinNTSetup

If they are amber or red, you must fix the issue first.
2. Type CTRL+SHIFT+V to invoke the VHD menu and create a VHD on USB drive – you can use a Dynamic VHD or a Fixed Size VHD.
A dynamic VHD will start off smaller, but you may find it will gradually use up all the space on your E2B USB drive – so for E2B use, I recommend a Fixed VHD.

3. Wait for format to complete (it can take a while!)
4. Set Boot file location to the USB’s drive letter
5. Set Installation drive letter to Z (VHD drive just created)
6. Select a Windows ISO x64 (top field)
7. Select a Windows Edition in Options menu – e.g. Pro
8. (optional) Use Tweaks button and change settings if desired
9. Make sure location of Boot drive is set to the USB drive letter and click the Setup button
10. Ensure Boot code set to ALL
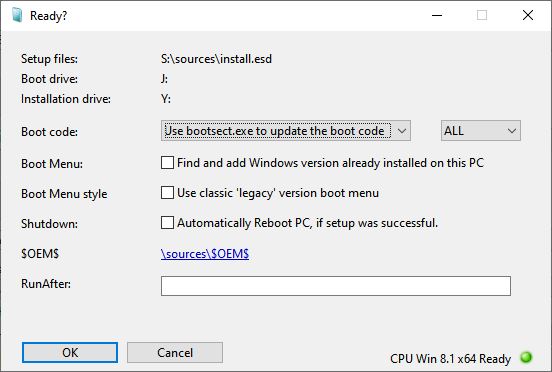
11. Click OK

12. When finished do NOT click reboot.
13. Now detach the VHD (use the VHD button and select the VHD file on the USB drive)
14. Safely Eject the USB drive
Complete Setup on a REAL SYSTEM
- Boot from the USB drive on a REAL SYSTEM (v. important).
- Complete setup of Windows fully (Starting services – Getting devices ready – (reboot) – Hi – This might take several minutes – wait for driver detection/installation once Desktop is reached)
- After several reboots, check for Windows Updates, etc.
- Reboot several times using SHIFT+Shutdown
Copy VHD to E2B drive
- Now copy the VHD to your E2B USB drive. You can rename it if you wish.
- It should both Legacy and UEFI64-boot.
Other methods
How to create a VHD using just an E2B drive Fixed-disk type (not a flash drive)
Once the VHD is made, it should be capable of both MBR\Legacy and UEFI booting (use 64-bit Windows ISO for UEFI64 systems – most computers use UEFI64).
1. Make sure the E2B USB HDD drive is in the normal E2B Menu mode (not in CSM Menu mode) and you can see the \_ISO and other folders. An NTFS-formatted E2B drive will be required (not FAT32-formatted).
If your E2B USB drive is the Removable type, WinToUSB will want to format it, so use a spare NTFS USB drive (fast flash drive or USB HDD), then later on just copy the VHD to your E2B USB drive (as in Step 6). If you have E2B on a USB HDD, WinToUSB will not try to format the USB drive.
2. Run WinToUSB, select a Win7 Ultimate or Enterprise ISO or Win8/8.1/10 ISO and then specify a VHD on the target drive (e.g. VHD=20GB). Win10 is highly recommended – older versions may have problems!
Note: If the USB drive is a Removable type of Flash drive, WinToUSB will want to format it! Do NOT let it format the E2B drive!

3. When WinToUSB has completed, boot from the E2B USB drive – it should boot to Windows immediately (i.e. no E2B menu, no grub4dos). You must use a real system for this boot stage.
4. Complete the final Windows OOBE Setup Stage as normal using a real system – you must do this before you copy or move the .VHD file and try to boot to it using E2B or agFM or Ventoy.
5. If you installed to an E2B USB HDD, you must now re-install grub4dos to both the MBR and PBR of the E2B USB drive again using RMPrepUSB so that it will boot to grub4dos again.
- RMPrepUSB – Install grub4dos – Yes=MBR (do not update \grldr)
- RMPrepUSB – Install grub4dos – No=PBR (do not update \grldr)
6. Move the large \WinToUSB.VHD file that was made by WinToUSB to the E2B \_ISO\MAINMENU folder (or \_ISO\WIN) and rename it as required – e.g. Win7UltToGo.VHD or Win8_Pro_64.VHD (the file does not need to be contiguous).
Note: E2B needs the Win 8.1 file bootmgr in the \_ISO\e2b\grub\DPMS\NTBOOT.MOD folder on the Easy2Boot USB drive. Do not use the Windows 10 version of bootmgr (10-07-2015 395,268 bytes) as this gives a BSOD 0xc00000bb error! This file may have already been copied by the MAKE_E2B_USB_DRIVE (run as admin).cmd script when you first made the E2B drive. E2B will warn you if it is missing or if it is an incompatible version. If bootmgr cannot be found in the \_ISO\e2b\grub\DPMS\NTBOOT.MOD folder then \bootmgr in the root of the E2B drive will be used (if present). Alternatively, use agFM or Ventoy to boot to the VHD.
7. Now delete the Windows boot files – Delete the \boot and \EFI folders from the E2B USB drive and the \bootmgr file (if present). If you don’t remove the boot files or don’t move the VHD file, WinToUSB will refuse to add another OS if you run WinToUSB again to make another VHD.
E2B Partition Image flat-file (MBR+UEFI booting)
This will make a 64-bit WinToGo system from a 64-bit Windows Install ISO that will boot on both UEFI and MBR 64-bit systems.
If you use a 32-bit Windows UEFI source ISO (e.g. Windows 8.1 or 10 32-bit) then it will be bootable on 32-bit UEFI (rare!) and 32/64-bit MBR systems.You will need to pay for the retail version of WinToUSB if you do not want to wipe the USB drive.
Tip: If using Win10 1703 or later, you can use a Removable E2B USB drive and WinNTSetup.
1. Make an empty folder on your Windows system – e.g. c:\temp\EMPTY
2. Run MakePartImage and make a 150MB FAT32 WinToGo.imgPTN file using the C:\temp\EMPTY\ folder as the source. Drag-and-drop the empty folder onto the MPI_FAT32 Windows Desktop shortcut.
3. Again drag-and-drop the empty folder onto the MPI_NTFS Windows Desktop shortcut to make a larger (e.g. 15000MB) NTFS WinToGo file (with no file extension).
4. Copy the two files to \_ISO\MAINMENU and rename them as you require (no file extension for the smaller file) – the file names MUST be identical.
- WinToGo.imgPTN (small 150MB file)
- WinToGo (large file – e.g. 30GB)
5. Use \_ISO\SWITCH_E2B.exe to switch partitions, this may also re-order the partitions if required.
6. You should now see two partitions in Windows Explorer (if not unplug and re-connect the E2B USB drive).
7. Run WinToUSB (https://www.easyuefi.com/wintousb/)
- Select a 64-bit Windows Install ISO as the source (Win10 recommended) – the free version of WinToUSB only allows Home\Core (not Pro).
- Select the small ptn as the system volume The system partition is the primary partition that is used as the active EFI System boot partition
- Select the large ptn as the boot volume The Boot partition is the partition where Windows is installed. It includes a Windows directory.
Confusing isn’t it! The ‘boot volume’ has the Windows Operating System files and the ‘system volume’ is the one the BIOS boots to! That’s Microsoft for you! Wait until it has finished installing and quit WinToUSB. If you prefer, you can use WinNTSetup instead (mount the ISO first and select the \sources\install.wim file in WinNTSetup).
- Select a 64-bit Windows \sources\Install.wim file from a mounted ISO as the source (Win8/8..1/10 recommended) – I tested with Win8.1 Enterprise Evaluation version.
- Select the small partition for the system partition
- Select the large partition for the boot partition
- Use the ‘ALL’ option (default) when prompted in the next step
You can skip the next step if you used WinNTSetup.
8. (only required if you used WinToUSB) – Open a Windows Administrator console and type (where G: is the 2nd large USB drive partition and E: is the first small partition)
G:\Windows\System32\bcdboot g:\windows /s E: /f ALL /v
It should report ‘Boot files successfully created.’
Note: This requires the Win8 or later version of bcdboot.exe. If installing Win7ToGo, you can get the correct version of bcdboot using GetWAIKTools. (untested!)
9. Reinstall grub4dos to the MBR using RMPrepUSB – Install grub4dos (YES=MBR) as WinToUSB\WinNTSetup will have removed the grub4dos MBR code.
Do not copy grldr, if prompted.
(Do NOT install grub4dos to the PBR).
10. Tidy up (optional) – delete the folders\files listed below from the 2nd large partition ONLY (the partition with the \Windows and \Users folder on it):
- \e2b folder
- \Clover folder
- \boot6
- \boot7
- \menu.lst
- \grldr
- \PBR.BIN
- \CUSTOM.txt
- \autorun.inf
- \autorun.ico
- \EFI folder
Now boot it from a REAL SYSTEM (either UEFI or MBR system boot) to set up Windows. DO NOT BOOT (this one time) FROM A VIRTUAL MACHINE! If the system is an MBR system, you can use Clover to boot it in UEFI-mode if you wish, or just boot it in MBR mode natively (use the ‘Boot Windows on 3rd partition’ menu entry).
Once you have finished with WinToGo, you can restore the E2B partitions by booting in MBR mode and selecting Menu entry 0 from the CSM grub4dos menu or by running the \e2b\RestoreE2B.cmd or \e2b\SWITCH_E2B.exe file from the E2B drive itself as usual.
You can add as many more WinToGo OS’s to the E2B USB HDD in the same way.
Tip: If you have problems booting try swapping over file extensions (. <> .imgptn) for the two files. Use SWITCH_E2B and ensure the start values of each partition are in ascending order (if not it won’t UEFI-boot).
Note: If using Win7ToGo, use a USB 2.0 port as Win7 does not support booting from USB 3.0 ports or modern chipsets. For best results and USB 3.0 support, Win 8.1 or 10 is recommended as Win7 was not designed to be run from USB.
If you move or copy the .imgPTN file (even on the same drive), it will no longer boot to Windows because the Disk Signature will be different. To fix this, you will need to run BootIce or bcdboot again to correct the BCD(s). Note that this also means that you cannot just copy the .imgPTN file to another E2B USB drive and expect it to work.
E2B USB Removable Flash drive – Win7/10 only (MBR+UEFI – not for Win8.1)
This method does not use a VHD. It can be used for Win7 or Win10 1607 or later versions. This will allow you to MBR and UEFI-boot WindowsToGo.
Windows 8.1/and older Win10’s will not boot from a Removable USB drive unless you use a .VHD file.
Win7ToGo is not really suitable to run from a flash drive because it needs some tweaking (disable paging, etc.). Use Win10 for better results.
1. Make an new empty folder on your Windows system – e.g. c:\temp\EMPTY
2. Make a large OS partition image (e.g. 15000MB) NTFS WinNTFS.imgPTN – drag-and-drop the C:\temp\EMPTY folder icon onto the MakePartImage Desktop shortcut and answer the prompts using the empty folder as the Source, e.g.
- Y (FAT32)
- 15000 (Size of image)
- C:\temp\WinNTFS.imgPTN (OUTPUT FILENAME)
- WinToGo (VOLUME NAME)
- WindowsToGo (CSM menu title)
- Y (to continue)
3a. Download and extract the EFI_TOGO_v2 zip file and extract it to the C:\temp\EMPTY folder – you should now have a C:\temp\EMPTY\EFI folder with more files and folders under it.
EFI_TOGO is taken from the UEFI To Go project by P Batard (author of Rufus). This will allow you to UEFI-boot directly from the 32-bit or 64-bit UEFI system firmware.
As an alternative, you can use the files in the E2B_UEFI_BOOT_ADDON download which will boot to rEFInd. You can find these files in the Alternate Downloads pages here.
3b. Make a small FAT32 WinFAT.imgPTN file using the C:\temp\EMPTY\ folder as the source. Just drag-and-drop the C:\temp\EMPTY folder onto the MPI tool MPI_FAT32 Desktop shortcut.
4. Copy the two .imgPTN files to \_ISO\MAINMENU and rename them as you require (no file extension for the small FAT32 file) – both file names MUST be identical.
- WinFAT.imgPTN –> WinToGo (FAT32)
- WinNTFS.imgPTN –> WinToGo.imgPTN (NTFS)
5. Boot to the E2B USB drive (either use RMPrepUSB – QEMU or VBox or other VM or real system)
6. Select WinToGo.imgPTN and switch to E2B CSM menu and then quit the VM.
You should now see just the NTFS empty partition in Windows Explorer (if not unplug and re-connect the E2B USB drive).
7. Run WinToUSB (https://www.easyuefi.com/wintousb/)
- Select a 64-bit Windows Install ISO as the source (Win8 x64 recommended)
- Select the same ptn as system ptn and boot ptn
Wait until it has finished installing and quit WinToUSB.
If you prefer, you can use WinNTSetup instead (mount the ISO first and select the \sources\install.wim file in WinNTSetup).
- Select a 64-bit Windows \sources\Install.wim file from a mounted ISO as the source (Win8/10 recommended, but not 8.1 if using a Removable USB drive!)
- Select the same USB ptn as system ptn and boot ptn
- Use the ‘ALL’ option (default) – select ‘Do Not update the boot code’ from the drop-down list.
You can skip the next step if you used WinNTSetup.
8. Open a Windows Administrator console and type (where G: is the 2nd large USB drive partition and E: is the first small partition)
G:\Windows\System32\bcdboot g:\windows /s E: /f ALL /v
It should report ‘Boot files successfully created.’
Note: This requires the Win8 or later version of bcdboot.exe. If installing Win7ToGo, you can get the correct version of bcdboot using GetWAIKTools. (untested!)
9. Reinstall grub4dos to the MBR using RMPrepUSB – Install grub4dos (YES=MBR) as WinToUSB\WinNTSetup will have removed the grub4dos MBR code.
Do NOT install grub4dos to the PBR! Now boot it from a REAL SYSTEM (either UEFI or MBR system boot) to set up Windows.
If the system is an MBR system, you can use Clover to boot it in UEFI-mode if you wish, or just boot it in MBR mode natively or UEFI-boot using the system firmware boot option. Once you have finished with WinToGo, you can restore the E2B partitions by booting in MBR mode and selecting Menu entry 0 from the CSM grub4dos menu or by running the \e2b\RestoreE2B.cmd file from the E2B drive itself as usual.
You can add as many more WinToGo OS’s to E2B in the same way. Note: If using Win7ToGo, use a USB 2.0 port as Win7 does not support booting from USB 3.0 ports.
If you move or copy the .imgPTN file (even on the same drive), it will no longer boot to Windows because the Disk Signature will be different. To fix this, you will need to run BootIce or bcdboot again to correct the BCD(s). Note that this also means that you cannot just copy the .imgPTN file to another E2B USB drive and expect it to work.
Rufus & WinToGo
The latest version of Rufus has a WindowsToGo feature which will automatically format and make a USB WinToGo flash drive from a Windows Install ISO.
If you have made a Rufus WinToGo MBR+UEFI flash drive, you can use the contents of the NTFS partition as the Source to make a large NTFS .imgPTN file and follow steps 3a and 3b above to make the other FAT32 partition image file.
Note: If you have a Removable E2B USB flash drive, Win8.1 will not boot (see below).
Boot WinToGo using a VHD (recommended for Win8.1/10 + a Removable USB)
See here for how to make and boot using a VHD (MBR booting). You can boot Windows 8.1/10 from a Removable USB drive using this method (or a USB hard disk).
As an alternative, you could just have an E2B USB HDD containing lots of VHD’s and just a FAT32 .imgPTN23 file for each different version.
e.g.
E2B Partition 1 – containing E2B files with WinToGo8.imgPTN23, WinToGo8.1.imgPTN23, Win7ToGo.imgPTN23, etc.
E2B Partition 2 – containing many vhds, e.g. \Win8.vhd, \Win8.1.vhd, etc.
Then load the .imgPTN23 file to get to CSM mode, configure the BCD(s) to point to the vhd file on the 2nd partition
Tip: If you have a 64-bit WinToGo .imgPTN file, add ’64’ to the end of the file extension and it will only appear in the E2B menu if you are running on a 64-bit system – e.g. Win81ToGo.imgPTN64.
You can also directly MBR-boot from a WindowsToGo .VHD or VHDX file with E2B v1.69+. The VHD must contain a fully pre-installed version of Windows (i.e. it should not run Setup on first boot or it will fail).
WinToGo UEFI booting from a Removable E2B USB drive
For Win8.1 and 10, this is tricky but can be done using a VHD.
For MBR+UEFI booting of Windows To Go from a Removable drive, you can adapt the method described here. You will need to create two .imgPTN files first (e.g. 300MB FAT32 Win.imgPTN and 20GB NTFS Win) and then switch to CSM mode first.
Activation
WindowsToGo is a full installation of Windows and will require activation if you want to use it regularly. When you activate a normal Windows OS and enter a Product Key, the hardware signature is registered with Microsoft and added to the OS itself. Once activated, if you boot the same OS on a different system, it will not be activated.
For this reason, you should use a volume licence version of Windows (e.g. Windows 8 Enterprise version) if you need an activated copy of WindowsToGo or use a Trial Enterprise version (90 day) and then re-install it again when it expires. A volume licence version of Windows is not hardware-locked.
Tip: Once you have prepared the .imgPTN files, make a copy of them before you boot them for the first time. When the 90 day trial period ends, just replace the .imgPTN file with a copy of the original.
If you name the .imgPTN as .imgPTNaLBA23 the 2nd partition of your E2B drive will not be removed and so will remain accessible. You can therefore keep all your portable Windows applications, drivers and documents on the 2nd partition.
If you boot to Windows 10 To Go Home/Pro on a system that had previously contained an activated Windows 10 Home/Pro OS, then it should ‘phone home’ and automatically activate provided that the Edition is the same as the one that was previously activated.
Deleting WindowsToGo files
Windows may not let you delete some of the WindowsToGo files even if you have Admin rights (usually because you are not the Owner).
I recommend installing Take Ownership and also LockHunter.
Using these two Windows utilities, you can change the Ownership rights or find out what process is locking a file or folder or drive and kill it.
Copying WindowsToGo files
Windows will not allow you to easily copy a complete WindowsToGo installation as files to another folder or drive (e.g. using Xcopy or Explorer).
Windows will lock some of the WinToGo system files and it will also interpret any symbolic links (e.g. when it sees the ‘My Documents’ hard link in the WinToGo drive, it will start trying to copy all of your C: drive’s Documents too!).
A nice way to copy all the WindowsToGo files to a different destination is to use Olof’s strarc utility.
1. Switch to the .imgPTN file using \_ISO\SWITCH_E2B.exe – my E2B USB drive was now drive D: (16GB) and had the full WinToGo installation on it as flat-files (\Windows, \Program Files, etc.).
2. Delete any unwanted files (e.g. \hyberfil.sys, pagefile.sys, etc.) .
3. Create and attach a fixed VHD using Windows Disk Management console (diskmgmt.msc) – this gave me a virtual 16GB Q: drive.
4. Download strarc and extract it.
5. From an Admin Windows cmd shell, we copy all files on D: to Q: using:
strarc.exe -cjd:d:\ | strarc -xd:q:\
Note: you can safely ignore any error messages about the \System Volume Information folder.
Be sure to use the vertical bar | key as shown (Shift+\)
Olof recommends this so that some files are also excluded:
strarc -c -j -e:"\System Volume Information,\Temp\,\Temporary Internet Files\,\Cache\,.tmp,pagefile.sys,hiberfil.sys,\$NtUninstall" -d:d:\ | strarc -xd:q:\
To ignore messages about 8.3 filename compatibility (I didn’t see any) , use -s:8.
I first formatted Q: so it was empty of all files.
6. Detach the Q: drive in the Disk Management console and copy the VHD file to \_ISO\MAINMENU on my E2B USB drive and boot it!
If some files are locked or held open by Windows, you can try using a Volume Shadow Copy Service (VSS) utility such as ShadowSpawn to make a virtual copy and then run strarc using the new virtual drive as the source. You can also try U-Recover to create a shadow copy of a drive.
See here for how to make the WinToGo files on a USB drive (or inside a .imgPTN file) into a .VHD file.