Table of Contents
Windows 8/10/11 Install ISOs
E2B eBooks are now available (including a complete course on making a multiboot USB drive and an eBook on Installing Windows).
- You can add any number of Microsoft OEM/System Builder/Volume Licence Windows install ISO files and .imgPTN* files to the correct folders under \_ISO\Windows\(correct sub-folder) and name them as you wish.
- You can rename the ISOs and use spaces in the ISO filenames to make them look better in the menu if you wish (or add a .txt file – see below).
- Files ending in .iso64 will only be listed in the menu if a 64-bit CPU is present (.iso32 is also supported) (E2B v1.94+).
- .imgPTN files will work from most menu folders (except \_ISO\WINDOWS\XP).
NOTE: Windows ISO files do not need to be fully contiguous (i.e. non-contiguous Windows ISO files will usually work OK). Windows Install ISOs may cause E2B to use the WIMBOOT method. If you skip the WIMBOOT option, then you will need to use a Removable USB E2B flash drive or add a Helper USB Flash drive or convert the ISO to a .imgPTN file.
- Always use unmodified Microsoft Windows Install ISOs – if you use a modified ISO, it may not work. In this case, convert the ISO to a .imgPTN file using MakePartImage or try Ventoy for Easy2Boot.
- To UEFI-boot and install Windows with UEFI and install to GPT partitioned drives, you can UEFI-boot to agFM or Ventoy and select the ISO file or convert the ISO to a FAT32 .imgPTN file.
- Do NOT set the BIOS to boot from the USB drive as the first boot device. Always use the special BIOS Boot Selection pop-up key (e.g. F8, F12, ESC) to boot from the E2B drive.
Repairing Windows by booting from an ISO
When Legacy booting from E2B, Windows setup may not offer the Repair option if you select an XML file.
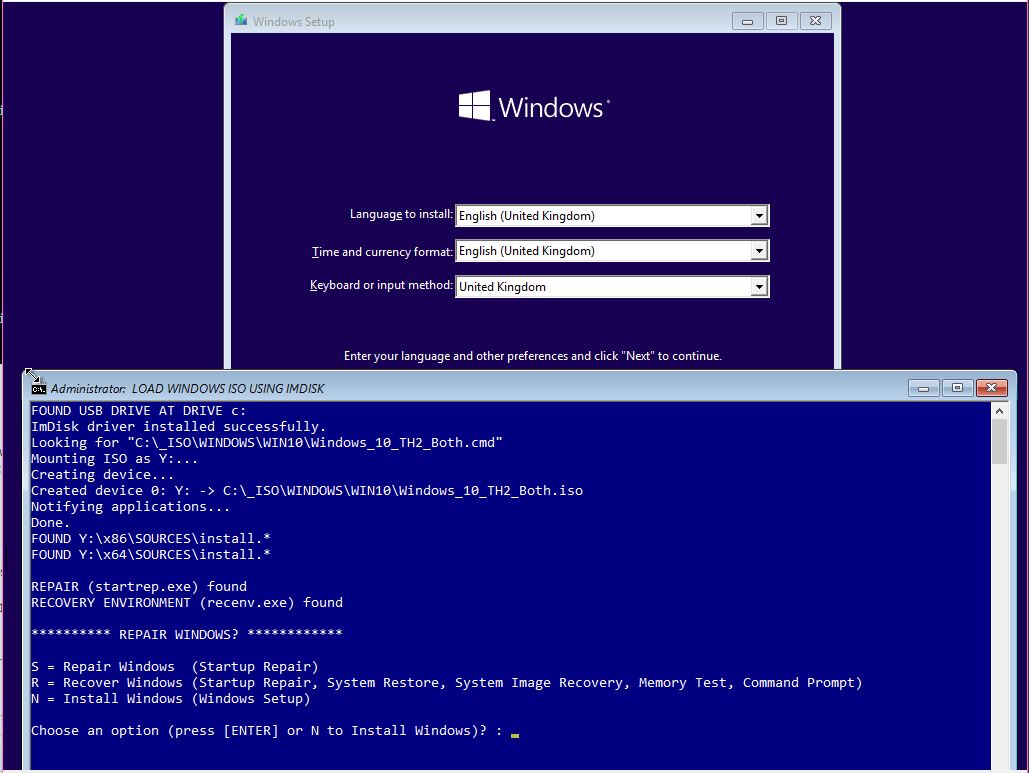
If you want to REPAIR an existing Windows 8/10 system, when you select a Windows 8/10 ISO, press any key quickly within 4 seconds, when prompted…

Once it boots to Windows Setup, you can choose the ‘Repair\Setup’ option (but you cannot install Windows).
This option can also be used to boot to a Windows ISO without needing to specify an XML file (using WIMBOOT).
Tip: You can suppress this prompt by adding set NOREPAIR=1 to the end of your \_ISO\MyE2B.cfg file (E2B v1.A8+).
Note that when booting from USB or ISO or DVD, there is no ‘Repair: Advanced Options – Startup Settings’ icon, or ‘Reset this PC’ icon in the ‘Troubleshoot’ menu.
Tip: Add a ‘Boot to Windows Recovery’ menu entry to E2B – You can try booting to the Recovery.wim file on the hard disk by copying the “\_ISO\docs\Sample mnu files\Windows\Boot_Recovery_WIM.mnu” file to the \_ISO\MAINMENU folder and using that menu entry instead.
If you want to install Windows 8/10/2016, simply wait 4 seconds for the repair prompt to timeout and then you can choose an XML file or Product Key and install Windows (E2B v1.86+).
Select an XML file
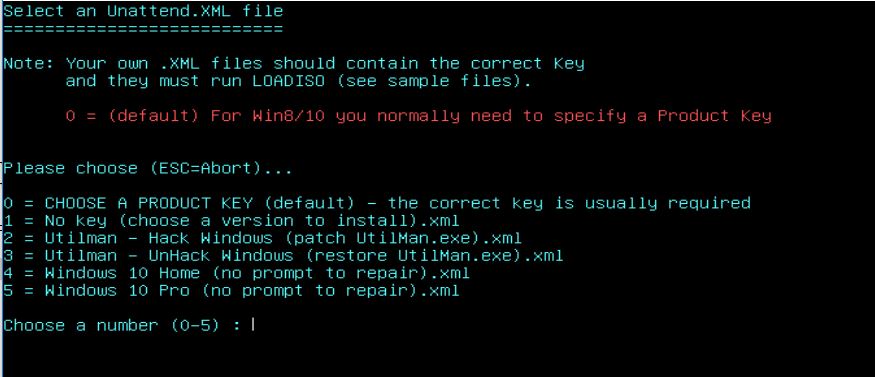
You will be prompted to choose from a list of XML files or you can use the E2B default XML file and then specify a generic install Product Key or your own Product Key.
Use 0 – CHOOSE A PRODUCT KEY if you want to pick a .KEY file or specify your own product key . This will then allow you to choose which Edition you want to install (Home, Pro, Ultimate, etc.).
At least one .KEY file must be present in the folder.
The Product Keys in the E2B XML files are generic installation keys – they will not activate. You can enter your own Product Key after Windows has been installed.
Tip: If you want to know what your current Windows Product Key is then run \_ISO\docs\E2B Utilities\GetWindowsProductKey.vbs.
You can add your own .key files and .xml files to the menu folder and they will automatically be listed in the choice menu. You can add XML files or .KEY files with your own activation keys. You can delete any of the .key and .xml files that you don’t want to be listed in the menu.
- ‘No key’ – this option may list all the versions in an ISO and allow you to pick one of them – however – depending on the ISO, it may not work!
- ‘Utilman’ – these options allow you to hack into a non-BitLocker Windows system as ‘Admin’
- ‘Windows 10 Home’ – will select Windows Home from the ISO (automatically)
- ‘Windows 10 Pro’ – will select Windows Professional from the ISO (automatically)
.XML\.KEY selection
- If a Default.xml file exists in the same folder (not case sensitive) it will be automatically selected. (E2B v1.B0+)
- If only one XML file exists in the same folder, it will be automatically selected.
- If all .XML files are deleted and only one .KEY file exists, it will be automatically selected.
- If no .XML files or .KEY files are present, the menu will abort.
Tip: If you use a ‘no key’ XML file as the Default.xml file, Setup will prompt you for all the Editions. If you have an OEM computer however, it may automatically use the embedded Product Key that it was first registered with. To avoid this, specify the Edition that you want to install by using the correct Product Key. For example, if you have a Dell PC which came with Windows 10 Home/Basic Edition, Setup may always install the Home\Basic Edition unless you specify a Windows 10 Professional Product Key.
Windows 8/10/11 Product Key requirements
When installing Windows 8/10 from an Install DVD, it will usually request a Product Key from the user. You can remove the requirement for a product key during Installation from a CD\DVD by editing the contents. See here for details.
Windows Setup will obtain information about which Edition or version of Windows to install from the \Sources\EI.cfg file (if present). However, when using E2B to install from an .ISO file, Setup will use the \AutoUnattend.xml file that is created by E2B and Setup will ignore the EI.cfg file. Most Windows Install ISOs contain an Install.wim/Install.esd file which contains more than one image. Setup needs to know which image to install and so Win8/10 usually needs the Product Key to be specified in the XML file.
To install the correct SKU of Windows using an XML file, there are two methods:
- For an automated install, ensure you specify the correct Image Number in the XML file (usually 1=Pro and 2=Home for standard Microsoft ISOs – but not always!)
- Ensure the Product Key in the XML file matches the version you want to install – you can use a generic installation key but it must be for the correct Edition (Home/Pro/Ultimate/Enterprise, etc.)
If using E2B with a Windows Install .ISO and Autounattend.xml file (E2B on a Removable USB flash drive), the Product Key must be specified in the AutoUnattend.xml file. E2B will thus ask you to choose a product key and then E2B will write the key into the AutoUnattend.xml file. You can use a ‘generic’ install key (it cannot be activated) and then change the key later.
Many Windows 8\10 ISOs will not install unless a Product Key is specified in the AutoUnattend.xml file first. For this reason, E2B will ask you to choose the correct Product Key for the version of Windows that you want to install. This is the main difference between installing Vista/Win7 and Win8/SVR2012/10 ISOs. You can try the ‘no key’ XML file first, to see if it works. You may find it easier to convert the ISO file to a .imgPTN file. This will allow you to both MBR and UEFI-boot and you will not need a ‘Helper’ Flash drive or an XML file. You can add .imgPTN files to any of the \_ISO\WINDOWS\xxxx folders (except for the XP folder) or any of the standard E2B folders.
At the start of Windows 10 in July 2015, a clean reinstallation of Windows 10 was only possible if the users first performed the free upgrade to Windows 10 within Windows 7 / Windows 8. This has changed since the autumn 2015 update for Windows 10 (from Windows 10 version 1511). Since then you can completely reinstall your PC with Windows 10 and Setup also accepts valid Windows 7 or Windows 8 product keys. Windows 11 accepts the same keys as Win10.
If you are booting Easy2Boot from a USB Hard disk and using a Windows Install Vista\7\8+ ISO file and NOT using the default WIMBOOT method, you will also need a Removable-type of ‘ Helper’ USB flash drive containing these 3 files –
- AutoUnattend.xml (overwritten – required for Win Vista and later OS Install ISOs),
- Unattend.xml (overwritten – required for WinPE ISOs and some Windows Install scenarios)
- WINHELPER.USB (marker file to find correct USB drive)
These 3 files must be on the root of your USB ‘Helper’ Removable-type Flash drive.
Additional Files (.key, .txt, .xml)
Add a .txt file to change the text in the menu
For payload files in the Windows Install fodlers (except XP folder) you can also add a .txt file of the same filename containing a single line of text such as:
title some_text_here\nsome_help_text_here
the text will be used as the menu title instead of the name of the file itself (note that the line must start with the lower-case word ‘title‘ or ‘iftitle‘). See here for more details. If you have .iso32 or .iso64 files and a matching .txt file, the .txt file must also test for ‘bitness’ (use the Txt_Maker.exe app to make the .txt file).
Note: .iso files of 0 length are ignored (but may add to the total file count displayed in the menu!).
Add a .key file to hold Product Keys
For Win8/10/SVR2012/2016, the product key can be typed in manually by the user, after selecting an ISO in the Easy2Booty menu.
To use your own pre-defined set of Product Keys, make lots of .key files (copy the format from the other files) –
OR
if you have lots more product keys you can add all the keys to the CHOOSE FROM A LIST.key file.
You can delete any .key files you don’t want. Another alternative is to make a .xml file with your Product Key already in it and not use .key files at all.
1a – Example Win8 Preview Pro.key file
Win8_PreviewPro.key
!BAT
set KEY=TK8TP-9JN6P-7X7WW-RFFTV-B7QPF
1b – Example CHOOSE FROM A LIST.key file
CHOOSE FROM A LIST.key
!BAT
echo
echo    WINDOWS 8 PRODUCT KEYS
echo -e ======================
echo Build 6.2.9200
echo 1=XKY4K-2NRWR-8F6P2-448RF-CRYQH   Pro
echo 2=FB4WR-32NVD-4RW79-XQFWH-CYQG3   Core
echo
set /p ask=Choose a key :
if "%ask%"=="1" set KEY=XKY4K-2NRWR-8F6P2-448RF-CRYQH
if "%ask%"=="2" set KEY=FB4WR-32NVD-4RW79-XQFWH-CYQG3
Add an .xml file to automate an install
You can also have your own unattend.xml files in the same folder. The xml file can contain all your settings and a product key – you can just choose any xml file and run the ISO.
If you delete all .xml files from the WIN/8/SVR2012/WIN10/SVR2016 folders, then the default unattend.xml will be automatically used and the user will not be prompted to select an xml file. You can find example XML files in the .\SAMPLE XML FILES sub-folders.
Simply copy the XML files into the menu folder and they will be listed in the menu.
Windows Product Keys
After you have selected an ISO, E2B will prompt you to select any unattend.xml file that is present in the \_ISO\Windows\Win8 folder from a list or CHOOSE A PRODUCT KEY or from any *.xml file or NO KEY.

Note that ‘Single Language’ versions of Windows ISOs usually contain a single image of Windows Home\Core only. You can define your own Unattend.xml files which should contain the correct product key and can also contain your own settings too. These must contain a special entry for LOADISO.CMD (see below). Any extra .xml files will also be automatically listed. If you delete all .xml files from the Vista/7/8/SVR2012 folders, then the default unattend.xml will be automatically used and the user will not be prompted to select an xml file.
Choose a Product Key – you can use the Easy2Boot default Unattend.xml file and then pick a key from a list of user predefined product keys using the Select a Product Key file menu. Product keys can either be contained in separate .key files and/or in one single ‘CHOOSE FROM A LIST.key’ file (see above for an example of the contents). You can tailor the CHOOSE FROM A LIST.key file to show only the product key entries that you want to allow (you can edit it using NotePad – see above for details – rename the file so that it is not overwritten if you later update E2B).
The pre-defined .key files can be deleted or added to. These can be selected by using the E2B menu (items 2-6 in the example above). If you select the …CHOOSE FROM A LIST.key menu option (1) then you will be presented with a pre-defined list of different keys:
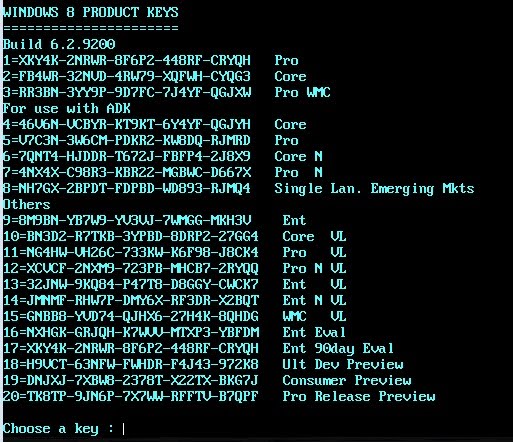
You must always choose the correct key for your version of Windows – if you use a key for a different version, Windows may report a ‘license’ or other error.
Run a WinPE script (e.g. automatically add a WinPE driver)
In both E2B and agFM, if a .cmd file is present in the same folder as the .iso file and has exactly the same name, then it will automatically be run.
You can use this to install a driver (e.g. a special mass storage or network driver that is not in the WinPE OS) or perhaps run a diskpart script to partition the target disk before setup.exe is run and your XML file is run.
REM Example file - must be in same folder as the Windows ISO but have a .cmd file extension
REM When the WINDOWS VISTA,7,8,10,11 ISO file is run by E2B or agFM, under WinPE, this file will automatically run if it has the identical file name but a .cmd extension
REM - e.g. \_ISO\WINDOWS\WIN11\Win11.iso   and this file with same name e.g.  \_ISO\WINDOWS\WIN11\Win11.cmd

echo on

REM save current dir  (probably X:\WINDOWS\SYSTEM32) and change to the directory containing this .cmd file
pushd %~dp0
dir /w /ad
pause

set USBDRIVE=%~d0
echo %0 is running
REM change to the same drive letter that the ISO is in
cd %USBDRIVE%\
%USBDRIVE%
echo d0=%~d0 dp0=%~dp0 CD=%CD% p0=%~p0
echo USBDRIVE=%USBDRIVE%
dir /w /ad
pause

echo now install oem driver using inf files + other files
REM install a mass storage driver - example
pnputil /add-driver %~d0\_ISO\WINDOWS\installs\DRIVERS\IntelRAID\ia*.inf /subdirs /install
pause

REM Restore original dir (should be X:\WINDOWS\SYSTEM32)
popd
echo Finished
pause
echo off
Note that the driver must not require a reboot (because WinPE is in RAM).
Note that this does not add the driver into the OS files which are later installed onto the target hard disk. You will also need to modify the ISO and add the driver files into the install.esd or install.wim file (e.g. using nLite or a special utility).
How to remove the ‘Repair’ prompt
If you don’t want the blue console window to prompt you to repair Windows (see screenshot above), then create an .XML file for your ISO by copying one of the XML files already present. Make sure the Product Key is correct and make sure that all references to LOADISO.CMD are changed to LOADISONP.CMD (NP=No Prompt). Some xxx (no prompt to repair) XML files may already be present.
Tip: You can suppress the ‘Press any key for Windows Repair only’ 4-second delay prompt by adding set NOREPAIR=1 to the end of your \_ISO\MyE2B.cfg file (E2B v1.A8+).
The agFM menu system (Legacy and UEFI) also allows you to select XML files (but not .key files).
Add your own .xml file to automate an install
You can also have your own unattend.xml files in the same folder as your ISO file (any name but must end in .xml). This can contain all your settings and a product key – you can just choose any xml file before you run the ISO. If you delete all .xml files from the Vista/7/8/SVR2012 folders, then the default unattend.xml will be automatically used and the user will not be prompted to select an xml file.
For an example look at the \_ISO\e2b\firadisk\auWin8.xml file (for Win8\10). These contain a special RunSynchronous section which runs LOADISO.cmd – this is responsible for loading the ISO so that Windows Setup can access it as a DVD. E2B will copy the contents of your XML file to \AUTOUNATTEND.XML before it boots from the ISO. You XML file must be modified so that it runs LOADISO.cmd which will run ImDisk and install the ISO as a virtual DVD drive. An alternative is to use SDI_CHOCO to install drivers and applications automatically. You may find the Unattend.XML generator here useful – but you must add the RunSynchronous code required by E2B afterwards.
Tip: If the 5×5 Product Key in the XML file starts with the six characters ASKME- then E2B will prompt you for a new Product Key. I suggest you use ASKME-ASKME-ASKME-ASKME-ASKME to be compatible with agFM.
To make an XML file – read my blog page here.
If the file DEFAULT.XML exists in the same folder as the ISO, then the DEFAULT.XML file will be automatically picked by E2B (E2B v1.B0+).