Table of Contents
UEFI – Adding Windows 7/8/10 which have >4GB Install.wim/Install.esd files
New for 2020: Just boot directly from the ISO. We can now use the a1ive grub2 File Manager (agFM) to Secure UEFI-boot to large or small Windows ISOs. See here for details.
The instructions below allow you to make a FAT32 Partition Image (.imgPTN file) containing large (>4GB) Windows Install files – this is useful if you have problems Secure Booting to agFM.
E2B eBooks are available.
Introduction
agFM currently allows you to Secure UEFI-boot and then directly select ISOs of any size and boot from them – however, if you require Secure Boot to always work with Windows, you should convert the ISO to a .imgPTN file.
To UEFI-boot, we need to use a FAT32 .imgPTN file, but the largest file supported by FAT32 is 4GB.These instructions only apply if the largest file inside your ISO is larger than 4GB and you need to UEFI-boot.
Here is a typical error message from MakePartImage (MPI_FAT32) when you have a large file inside your ISO file:
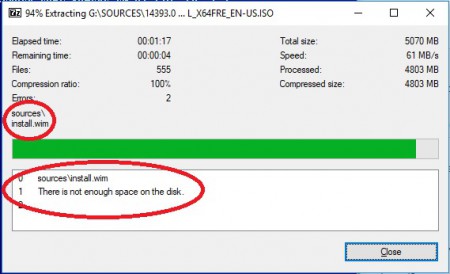

You can have an NTFS E2B USB drive containing a 20GB .imgPTN file formatted as FAT32, as long as no single file (usually the \sources\install.wim or install.esd file is the largest) inside the .imgPTN image is > 4GB. Examine the files inside the ISO file to check for large files…
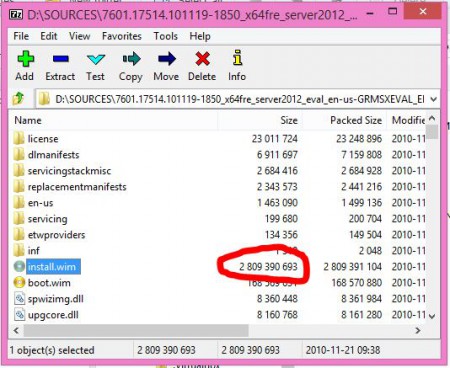
Note: The install.wim in the example ISO above is the largest file inside the ISO and it is below 4GB. So, in this case, you can just drag-and-drop the Windows ISO onto the MPI_FAT32 shortcut to make a .imgPTN file. You can then use the FAT32 .imgPTN file to MBR or UEFI-boot.
The special instructions below do not need to be followed unless the .wim or .esd is over 4GB in size and you need to UEFI-boot.
Tip: Use a file extension of .imgPTN23 instead of .imgPTN if you have an E2B v2 USB drive that includes agFM on Partition 2.

The E2B USB partition 1 must be formatted as NTFS in order to hold .imgPTN files of a size greater than 4GB.
For UEFI-booting (from all systems), the .imgPTN file on the E2B drive must be internally formatted as FAT32. Some systems will also UEFI-boot from an NTFS partition but many systems will only boot from a FAT32 volume, so always use MPI_FAT32 if you want to UEFI-boot from a .imgPTN file.
The internal format of the .imgPTN file must be FAT32 for UEFI booting.
The maximum partition size for a FAT32 .imgPTN file is 32GB because, when using the MakePartImage script, Windows will refuse to format any partition larger than 32GB as FAT32.
Methods 1-6
If you do not want to UEFI-boot, you can use the MPI_NTFS shortcut.
I recommend that you do not convert custom All-In-One (AIO) ISOs that have files larger than 4GB inside them by using Methods 2-4 below – instead try Method 1 or use WinNTSetup instead. Using two partitions for UEFI-booting (Methods 2-5 below) can result in mixed degrees of success or failure depending on the system’s firmware. If you need to be able to UEFI-boot on a wide variety of systems, then use a single FAT32 partition .imgPTN solution or use several versions of smaller ISOs instead of one large ISO or use Method 1 below to split the WIM file and use one single FAT32 partition for the .imgPTN file.
Removable E2B Flash drives
I recommend Method 1 (and using Split-WinISO to split >4GB WIM files) or for a more manual method, try WinNTSetup (note that with WinNTSetup, you can install a UEFI-bootable Windows OS from an MBR boot and thus a .imgPTN file is not required).
Methods 1, 4, 5 and 6 can be used if E2B is on a Removable USB Flash drive.
If splitting the install.wim or .esd file does not work for your particular payload, try Method 6.
Fixed-disk E2B drives
If your E2B USB drive is of the ‘Fixed Disk’ type…
If you have Install ISOs containing small files <4GB:
- Place ISOs in \_ISO\WINDOWS\xxx folders (MBR booting only)
OR - Make FAT32 .imgPTN files using MakePartImage and place them in the \_ISO\MAINMENU or \_ISO\WIN folder (supports UEFI and MBR booting)
If you have Install ISOs containing large (install.wim) files >4GB
- Place ISOs in \_ISO\WINDOWS\xxx folders (MBR booting only) – E2B drive must be formatted as NTFS (or exFAT)
OR - Split the install.wim file and make a FAT32 .imgPTN file (see Method 1 below) (supports UEFI and MBR booting)
OR - Make two image files, one FAT32 and the other NTFS (see Methods 2/3/4 below) (supports UEFI and MBR booting)
- Add a second FAT32 partition to your E2B USB drive and use one NTFS .imgPTN file (Method 5)
To convert your Windows Install ISO to a .imgPTN file, use the MakePartImage.cmd script.
Method 5 involves making a permanent second (FAT32) partition on your E2B USB drive but only one partition image needs to be created for each ISO so there is no ‘partition order’ problem (see MOVE_IMGPTN below for details of this problem). However, this may stop some systems from MBR-booting to E2B (no MBR boot option!)!
You can UEFI-boot directly from the MBR\CSM menu by using the Clover boot option in the CSM menu – no need to reboot and select the ‘BIOS’ UEFI USB boot option. However, some systems may crash when loading Clover.
Note: All UEFI-systems should support FAT32. Some UEFI systems also support UEFI-booting from NTFS partitions (e.g. Asus Z87 mainboard). In this case you can just create an NTFS .imgPTN file by dragging-and-dropping the ISO file onto the MPI_NTFS shortcut.
Try improving the WIM file compression
For some reason Microsoft don’t use the best compression. On a Windows 10 system, extract the ISO contents to an empty folder and run DISM to compress the WIM file. Use the Windows command line to change to the \sources folder which contains the install.WIM file.Then rename the install.wim to install.wim.org. Then run DISM…
dism /export-image /sourceimagefile:install.wim.org /sourceindex:1 /destinationimagefile:install.wim /compress:recovery
Now delete install.wim.org if the install.wim is below 4GB in size – if not then compression won’t work and you will have to try one of the methods below.Now you can use the folder as the source to create a FAT32 .imgPTN file – just drag-and-drop the folder onto the MPI_FAT32 Desktop shortcut.
Use WinNTSetup instead?
If these methods seem too complicated for you, you may prefer to use WinNTSetup.exe.
Unattended installs
To automate a Windows install, see here.
UEFI booting – How to add Windows 7/8/10 installers with >4GB install.wim files
Note: Methods 1, 4 and 5 can be used if E2B is on a Removable USB Flash drive or Fixed Disk type.
Methods 2 and 3 are for Fixed Disk USB drives only because the 2nd partition will not be accessible to Windows (unless recent Win10 is used).
Method 5 requires you to add a 2nd FAT32 partition to your E2B USB drive – Removable or Fixed Disk type (it can be used for file storage or other purposes at the same time)
Please note: Many UEFI systems will not list the E2B drive in the UEFI boot list if it contains more than one partition, therefore using two partition images (Methods 2-5) may not work on every type of system!Method 1 will be the most reliable and work on a wider variety of systems.
Methods 2-5 each have their own advantages and disadvantages. Due to system firmware bugs, there is no ‘clear winner’ – that is why there is a choice!
Method 1 – FAT32 single-partition using split wim files (Fixed or Removable – *RECOMMENDED*)
Suitable for Secure Boot
Split_WinISO
Chandra has written a Windows application that will automatically convert and split Install.WIM\ESD files for you (see here).

- Download and install the latest MPI Tool Kit onto your Windows system
- You MUST run Split_WinISO.exe from the MPI folder (same folder as MakePartImage.cmd) and click on the ISO button to select a Windows Installer ISO file.
- Check that at least one WIM or ESD file is listed. You can use the ‘View’ button to see the contents of the Install.wim file.
- Leave the SPLIT SIZE (MB) field as 4000 (it may be less than 4000 if the ISO does not require splitting).
- Click on the 4 CONVERT button (the MPI button will not split the wim\esd file – only use the MPI button if <4GB files present).
- Answer the questions – choose FAT32 (not NTFS)
- Be sure to enter the FULL PATH for the new .imgPTN file when prompted.
The ISO will be converted to a FAT32 .IMGPTN file and the large .WIM\.ESD file(s) will be split into smaller files.
Note: Temporary disk space is required on your Windows system drive (C: drive). Optionally, Split_WinISO can also add the necessary files inside the boot.wim file to run \auto.cmd too.
IMPORTANT EI.CFG file: If prompted by MakePartImage.cmd during the making of a Win 8 Install .imgPTN image file, you must enter either V or R as appropriate (for Volume Licence (MAK or KMS) or Retail/OEM) depending on what type of ISO you have as the source. This will create a \sources\ei.cfg file (Win8\10 doesn’t normally have one) which will bypass Setup’s 5×5 Product Key entry request. If you do not create an EI.cfg file for Win8\10, you will get a “Windows cannot find the Microsoft Software License Terms. Make sure the installation sources are valid and restart the installation.” error message. Thanks to Simone for this method!
If you experience problems (if it prompts for Product Key or ‘license’ error, it will be because the EI.cfg file contents are not correct or you have used the wrong Product Key.)
— o O o —
Methods 2-6 below use two partitions, you may need to use MOVE_IMGPTN or SWITCH_E2B in order to get UEFI booting to work…
Note: If you get a ‘Missing MBR Helper’ message when booting in MBR mode from a .imgPTN file on some systems, rename the file to .imgPTNLBAa23 (but this may cause the UEFI boot option to not be listed by the UEFI firmware!).
Alternative methods to split a large .wim\.esd file
If you have a install.esd file, you can convert it to a .WIM file and then split the WIM file.
See here for a script that will convert the .esd file to a single large .wim file using DISM (all images inside the .esd are converted).
Use WinToolKit or DISM to split the file using a DISM command, e.g. DISM /Split-Image /ImageFile:d:\temp\sources\install.wim /SWMFile:d:\temp\sources\install.swm /FileSize:3000
- 1. Extract all files from ISO to empty temp folder
- 2. Convert install.esd to install.wim using script
- 3. Split install.wim to install.swm and install2.swm (choose 3GB max size)
- 4. Replace install.esd with install.swm and install2.swm (in same folder)
- 5. Drag-and-drop temp folder onto MPI_FAT32 shortcut to make .imgPTN fileThis method should work on all types of USB drives.
This method may be unsuitable for modified (e.g. AIO) ISOs which have been coded to use an install.wim file.
- 1. Extract the ISO contents to a folder on your system hard disk (e.g. using 7Zip)
- 2. Download and run the WinToolKit
- 3. In WinToolKit – Select Tools – Imaging – Wim Splitter
- 4. Select the \sources\install.wim file as the source
- 5. Use install.swm as the target file and select Custom – 3000 as the size
- 6. Click Start
- 7. Delete the sources\install.wim file (check that the \sources\install.swm and install2.swm files are present first!)
- 8. Use MakePartImage to create a .imgPTN file using the folder as the source and FAT32 as the filesystem
Method 2 – using two partitions (Fixed-disk E2B drives only or later Win10 versions)
This method works with USB Hard Disks and also special USB Flash drives of the ‘Fixed Disk’ type only – it does not work with normal ‘Removable’ UFDs unless using recent 2018+ Win10 ISOs. This method uses two partitions, a bootable FAT32 partition to hold all the Windows install files except the large Install.wim file, and a second NTFS partition which holds the large install.wim file. This method may be unsuitable for AIO ISOs which have a modified X:\windows\system32\winpeshl.ini file. Result after switching partitions:
Partition 1: FAT32 = contains all Windows Install files except \sources\setup.exe and install.wim\esd (.imgPTN image)
Partition 3: NTFS = contains only \sources\setup.exe and \sources\install.wim or install.esd (image file has no file extension)
- Can UEFI boot via BIOS (inc. Secure Boot)
- Can UEFI boot via Clover
- Can MBR boot via BIOS
- E2B disk must be fixed disk type (but Win 10 2018 or later will work with both fixed and removable USB flash drives)
You can install Windows 7/8/8.1 using a large install.wim or install.esd file as follows:
1. On your Windows system hard disk, create two folders to extract your Windows Install ISO onto – e.g. C:\temp\Win81\MAIN and C:\temp\Win81\AUX1
2. Using 7Zip or some other method, extract the entire contents of the ISO into the MAIN folder
3. Cut and paste (i.e. move) the MAIN\Sources\Install.wim (or install.esd) and MAIN\Sources\Setup.exe files to the C:\temp\Win81\AUX1\Sources folder e.g. AUX1 folder should now have these two files:
AUX1\Sources\install.wim
AUX1\Sources\setup.exe
4. IMPORTANT: Check that the files at MAIN\Sources\Install.wim (or install.esd) and MAIN\Sources\Setup.exe files no longer exist
5. Run MakePartImage (drag-and-drop folder onto MPI_FAT32 Desktop shortcut) using the MAIN folder as the source to create a file named – e.g. Win81.imgPTN – you must select FAT32. If the conversion fails due to insufficient space, specify a larger size. Note: The filename must only have one dot (.) in the name just before the file extension – do not use a name like Win8.1.imgPTN which has two dots in the name!).
When prompted to make the EI.cfg file, choose the correct option (either Retail or Volume Licence) depending on what ISO you have used. e.g. from an Administrator command prompt, (note: the source folder path MUST end with a \) MakePartImage “C:\temp\win81\MAIN\” “C:\temp\Win81.imgPTN” FAT32 700 Win81 “WINDOWS 8.1 64-bit AIO”
6. Run MakePartImage (drag-and-drop folder onto MPI_NTFS Desktop shortcut) using the AUX1 folder as the source to create a file named – e.g. Win81 – it must not have a . in the file name – you must select NTFS as the filesystem If prompted to make an EI.cfg file, choose the same option as before. If you have a problem booting, move the ei.cfg file to the second partition.
7. Copy both the Win81.imgPTN and Win81 files to your E2B USB hard disk folder (e.g. \_ISO\MAINMENU or \_ISO\WIN). The MAIN file extension must be .imgPTN or one of it’s ‘family’ .imgPTNxxx.
The AUX1 image file must have an identical filename but no file extension (no dot in the name).
Note: If your UEFI firmware does not list the USB drive in it’s boot list, try using MOVE_IMGPTN or SWITCH_E2B (see Method 4 below for details).
If you want to add an answer file, follow the procedure above using the MAIN folder as the source.
Method 3 – using two partitions and Clover (1st Ptn = FAT32) (Fixed-disk E2B USB only)
Not suitable for Secure Boot
This method works with USB Hard Disks and USB Flash drives of the ‘Fixed Disk’ type only – it does not work with ‘Removable’ UFDs.
With this method, you cannot UEFI-boot using the system’s UEFI boot firmware, you can run a UEFI install by MBR-booting and using Clover to boot in UEFI mode. Some systems may crash when loading Clover so this method may be more troublesome on some systems than method 1 or 2. Partition 1 = FAT32 (.imgPTN image) – can have any non-Windows Install payload e.g. linux, WinToGo boot files+Windows in NTFS ptn, WinPE, etc. (must NOT contain \sources\setup.exe or \sources\install.wim/swm/esd files). You can just use an empty folder as the ‘Source’ for MakePartImage or use EFI_TOGO – recommended (see Method 4).Partition 3 = FAT32 or NTFS (image file with no file extension).
1. Obtain the EFI_TOGO_V3 files, unzip, drag-and-drop the file onto the MPI_FAT32 Desktop shortcut to make a .imgPTN file
2. Drag-and-drop the ISO or source folder onto the MPI_NTFS Desktop shortcut to make a file with no file extension
3. Copy both files to the E2B USB drive and run \MAKE_THIS_DRIVE_CONTIGUOUS.cmd
4. Drag-and-drop the large .imgPTN file onto the MOVE_IMGPTN Desktop shortcut (see Method 4 below) to check that the two files are in the correct order or use or SWITCH_E2B.
5. If required, run \MAKE_THIS_DRIVE_CONTIGUOUS.cmd (you may need to repeat steps 4 and 5 if the files have been moved)
Note: The filename must only have one dot ( . ) in the name just before the file extension – do not use a name like Win8.1.imgPTN which has two dots in the name or else both files will appear in the E2B menu!
- Can UEFI boot via system firmware to UEFI files on 1st ptn only (if any EFI files present instead of EFI_TOGO – e.g. memtest86)
- Can UEFI boot via MBR and Clover to 32-bit and 64-bit NTFS partition
- Can boot via UEFI firmware to EFI boot files NTFS partition if EFI_TOGO used on FAT32 partition.
- Can MBR boot to 1st ptn payload
- Can MBR boot to bootmgr and Windows installer on 2nd ptn
See Tutorial 122 – Method 3 for more details.
Note: If your UEFI firmware does not list the USB drive in it’s boot list, use MOVE_IMGPTN (see Method 4 below for details).
Method 4 – using NTFS+FAT32 partitions and Clover (NTFS Fixed or Removable E2B drive) UEFI-boot, Clover and MBR boot
Not suitable for Secure Boot.
Note: If you have an E2B USB HDD, then Method 3 is better.
This method works with both Removable and Fixed USB drives.
For UEFI-booting from the NTFS partition, the Rufus EFI boot files are placed on the FAT32 partition.
The E2B partition should be formatted as NTFS. For UEFI-booting, the .IMGPTN file must be located on the disk before the file with no file extension – otherwise the UEFI-boot entry will not be listed by the firmware (see MOVE_IMGPTN for details).
The E2B drive must be formatted as NTFS. With this method, you cannot UEFI-boot using the system’s UEFI boot firmware unless you use the EFI_TOGO files in the FAT32 partition image. EFI_TOGO (see below) will allow a system to UEFI-boot from the NTFS partition as it contains EFI NTFS drivers – however, some UEFI-BIOSes will not list the drive as UEFI-bootable in the boot menu list unless the .IMGPTN file is positioned before the FAT32 file on the E2B drive!
Partition 1 = NTFS = WindowsInst.imgPTN (or WindowsToGo payload)
Partition 3 = FAT32 = made from an empty folder or EFI_TOGO_V2 (recommended) or E2B_UEFI_BOOT_ADDON_NTFS64
To make:
1. Drag-and-drop a Windows 7/8/10 ISO onto the MPI_NTFS shortcut to make (for example) Win81_x64.imgPTN (any name will do)
2. Download EFI_TOGO_V3 and extract the files to make a new EFI_TOGO folder (it should contain the EFI folder as shown below):
- .\EFI_TOGO_v2
- .\EFI_TOGO_v2\EFI
- .\EFI_TOGO_v2\EFI\Boot
- .\EFI_TOGO_v2\EFI\Rufus
Drag-and-drop the EFI_TOGO_v3.zip file onto the MPI_FAT32 shortcut to make (for example) Win81_x64. (same file name but with no file extension). EFI_TOGO can be also downloaded from the E2B Alternate Download – Other files area. It supports 32-bit and 64-bit UEFI systems.
If you use an empty folder for the FAT32 partition, then it will not be capable of booting via a UEFI system (only by MBR booting + Clover -> UEFI Windows). An alternative is to use E2B_UEFI_BOOT_ADDON_NTFS64 – this boots to rEFInd UEFI boot manager + NTFS driver – from there you can boot to any EFI boot file present on the disk via rEFInd icon menu (press ENTER if ‘map error’) – 64-bit UEFI only.
The filenames must be identical (no . dot in the FAT32 filename or it will appear in the menu as well as the .imgPTN file!) – e.g. file names = Win81_x64.imgPTN + Win81_x64
IMPORTANT:
Copy the large .imgPTN file to the E2B USB drive first and run \MAKE_THIS_DRIVE_CONTIGUOUS.cmd.
Then copy the smaller . file (no extension) to the same folder and run \MAKE_THIS_DRIVE_CONTIGUOUS.cmd
3. Make all files on the E2B drive contiguous by running \MAKE_THIS_DRIVE_CONTIGUOUS.cmd MOVE_IMGPTN/SWITCH_E2B.exe
4. The .imgPTN file must be located on the disk before the other file that does not have a file extension, or else direct UEFI-booting may not be possible because the drive may not be listed by the firmware. After making the files contiguous, try selecting the .imgPTN file using SWITCH_E2B – if the files need re-ordering, it will offer to try to move them. An alternative is to use the MOVE_IMGPTN script.
Read and follow the instructions in the \_ISO\docs\E2B Utilities\MOVE_IMGPTN\ReadMe.txt file.
You must make a shortcut that will run with administrator rights.
Drag-and-drop the WindowsInst.imgPTN file onto the MOVE_IMGPTN administrator shortcut and press [ENTER] if required.Look for a green=PASS screen on completion.
Note: If you are having problems with re-ordering, try swapping over the file extensions so that the .imgPTN file is the small file, and the file with no extension is the large file. This should work for Fixed-disk E2B drives. If you have a Removable USB flash drive however, it will only work for Windows 10 1607 or later based files.
5. The two files must be contiguous. If you are warned by MOVE_IMGPTN or SWITCH_E2B that they are not contiguous, then repeat steps 3 and 4 until it reports success. If it cannot re-order the files, install and run Defraggler – Defrag on the E2B drive, followed by Defraggler – Advanced – Defrag free space, and then run \MAKE_THIS_DRIVE_CONTIGUOUS.cmd and then try SWITCH_E2B.cfg!
- for MBR-booting – boot to the NTFS partition directly (CSM Menu)
- for UEFI-booting via Clover – MBR boot to the CSM menu and run Clover which will then UEFI-boot
- for UEFI-booting from system firmware – pick the UEFI boot option (if your UEFI BIOS lists your drive in the boot list – not all do!)
This method can be used to boot WindowsToGo and MDT Windows Deployment payloads from a Fixed- or Removable USB drive via MBR or UEFI.
Note however that Windows 8.1ToGo and Win10ToGo do not boot from a removable drive (unless you use a VHD file to hold the image or use Win10 1607+).
Method 5 – Add a 2nd FAT32 partition to your E2B drive (Fixed or Removable E2B drive – may not work on all systems)
Not suitable for Secure Boot.
This method uses the UEFI:NTFS files as used by Pete Batard’s Rufus UEFI:NTFS scheme.We need to create a second small FAT32 partition at the end of the E2B USB drive which contains the UEFI boot files. WARNING: The big disadvantage with this method, is that you may not be able to MBR-boot to the E2B or CSM menu on some systems! This is because some systems will just give a UEFI boot option if a valid UEFI boot file is present but will not present you with an MBR boot option. If this happens, I suggest you temporarily rename the \EFI folder in order to be able to boot to E2B on that system.If you prefer, you can use Rufus to re-format the USB drive by selecting the special ‘Format Option’ arrow and setting UEFI:NTFS. This will format the USB drive with a FAT partition already containing the correct files – just copy over the E2B files to the NTFS folder and then install grub4dos to the MBR and PBR using RMPrepUSB.

Use Rufus to wipe and partition the E2B USB drive if you want the second partition to be as small as possible. 1. Create an NTFS E2B USB drive with a small FAT32 partition at the end:
PTN1: NTFS E2B
PTN2: FAT32 300MB or larger (it can be FAT instead of FAT32 if you want it to be smaller)
PTN3: unused
PTN4: unused
You can use Easeus Home Paritition Master for this (it can make mulltiple partitions on Removable USB drives). Be careful to avoid the extra PUPs when you install it!
2. Copy Pete Batard’s UEFI:NTFS files to the FAT32 partition (can be downloaded as EFI_TOGO_V3). If you used Rufus to prepare the USB drive, update the files in the FAT partition with EFI_TOGO to use the latest version. If your E2B drive is a Removable USB drive, you can switch PTN1 with PTN2 for access using the Switch_E2B partitions button or RMPrepUSB – Ctrl+O – 2 and copy the files over. There should be a \EFI folder in the root after copying the files then switch back to the NTFS partition in the same way as before.
We can now add large Windows Install AIO files as follows:
1. Drag-and-drop the source ISO or folder onto the MPI_NTFS Desktop shortcut to make a .imgPTN file.
2. Copy the .imgPTN file to the E2B USB drive (e.g. the \_ISO\WINDOWS\WIN8 folder or \_ISO\MAINMENU, etc.)
3. Rename the file to use a .imgPTNLBAa23 file extension.
Now you can switch to the .imgPTNLBAa23 file (using the E2B menu or Switch_E2B) and then MBR (if the BIOS gives you that option) or UEFI-boot.
We don’t need to use two .imgPTN files because the last partition will always be the UEFI boot file partition so we have no ‘partition order’ problem.
Method 6 – Boot to a WinPE and mount the ISO
Instead of directly booting to Windows, you can boot to a Windows 10 based WinPE and then mount your Windows Install ISO file as a virtual drive (usually by right-clicking on the ISO file and choosing the ‘mount’ option). You can then run \Setup.exe directly from the new virtual DVD drive.
The WinPE (e.g. HBCD_PE or Strelec) can be extracted to a FAT32 Partition 3 or you can create a FAT32 .imgPTN file from it – boot to WinPE – and then run \e2b\SWITCH_E2B.exe or \e2b\Restore_E2B.cmd to restore the E2B partition 1 – now find and mount the required ISO file and run \Setup.exe.