Table of Contents
Official Ventoy Images
You can have the latest version of Ventoy on your E2B USB drive, but it must be a .img file and you must ‘switch‘ it in to Partition 2.
It is easy to make the .img files(s) – just run the Windows script provided with E2B – see below for details…
WARNING: DO NOT USE VENTOY TO UPDATE THE IMAGE AFTER IT HAS BEEN SWITCHED IN!
Do not use the Ventoy2Disk.exe tool to update the drive – it will destroy your E2B drive and you will not be able to restore E2B or agFM!
To update to the latest version of Ventoy, simply re-make the image files as described below.
The ‘Ventoy for Easy2Boot’ version is located on Partition 2 of the E2B USB drive (if installed) but it may not contain the very latest version of Ventoy. However, you can download the latest official release version of Ventoy as a partition image file and then replace Partition 2 of the E2B USB drive with the unaltered, official Ventoy boot files. Your E2B USB drive will now be magically transformed into an ‘official’ Ventoy USB drive! Note: The new Ventoy partition 2 will be exactly 32MB and must not be resized.
An alternative approach is to first create a new MBR NTFS Ventoy USB disk using the Ventoy2Disk utility and then add the Legacy E2B files onto it (see blog article here).
See my blog for more details concerning Ventoy and E2B/agFM.
IMPORTANT – PLEASE READ THIS!
When you select a new Ventoy partition image, it replaces the agFM/Ventoy for Easy2Boot files on partition 2 and also replaces grub4dos boot code with grub2 boot code. You can then legacy-boot to Ventoy via grub2 or you can UEFI-boot directly to the new Ventoy image which is now on the second partition. In this way x86 Legacy BIOS, IA32 UEFI, x86_64 UEFI, ARM64 UEFI, MIPS64EL UEFI are all supported (or whatever is in the latest version of Ventoy).
You must restore the original agFM partition 2 and boot code when the Ventoy partition is no longer required and you want to boot to the E2B legacy menu system and the agFM menu system in partition 2 (see below for details).
Introduction
A cmd script on Partition 2 can be run which automatically finds, downloads the latest version of Ventoy and then makes new Ventoy partition image files on Partition 2 of the E2B USB drive. One of these three Ventoy image files can then be ‘switched-in’ to replace the agFM partition 2. You will then have a USB drive with an ‘official’ copy of Ventoy with the correct Ventoy boot code and the correct partitions that Ventoy expects.
Three slightly different versions of the 32MB Ventoy EFI Partition 2 image files will be created:
- ventoy.disk.img – Ventoy with Secure Boot/MokManager (you must enrol the certificate file provided using MokManager).
- ventoyNS.disk.img – Ventoy (no Secure Boot) – use if other two images do not boot correctly on some BIOSes. You must disable Secure Boot in BIOS.
- ventoyKAS.disk.img – Ventoy with Kaspersky shim – can immediately Secure Boot as long as the Kaspersky shim is not blacklisted in the BIOS UEFI DBx blacklist database (same method used by agFM). Mok Manager is not used/needed.
Each 32MB Ventoy partition image file is created on Partition 2 of the E2B USB drive and you can pick one of them using the agFM menu system. This means you can choose one of three different Ventoy configurations and do you not have to reformat the entire USB drive to try out each configuration of Ventoy.
Partitions 1 and 3 (if present) are not affected).
- To ‘switch-in‘ a Ventoy disk image file as Partition 2, you must use the agFM (or grubfm) menu system (agFM is based on grubfm).
- To restore the original agFM partition 2, you must use the grubfm menu system by first booting Ventoy and then to a grubfm iso file from within Ventoy.
The E2B USB drive can have two or three Primary MBR partitions. The last primary partition 4 slot must be unused.
Standard E2B MBR-partitioned USB drive:
Ptn1: NTFS with \_ISO folder and payload files (grub4dos legacy boot code)
Ptn2: FAT32 with agFM and ‘Ventoy for Easy2Boot’ files
Ptn3: optional user partition
Ptn4: (unused)
After switching-in a Ventoy partition 2 image file:
Ptn1: NTFS with \_ISO folder and payload files (grub2 legacy boot code) + grubfm_multiarch.iso file for restore operation
Ptn2: 32MB FAT16 (VTOYEFI)
Ptn3: optional user partition
Ptn4: (unused)
Installation/Update
This process will make the latest version of Ventoy images.
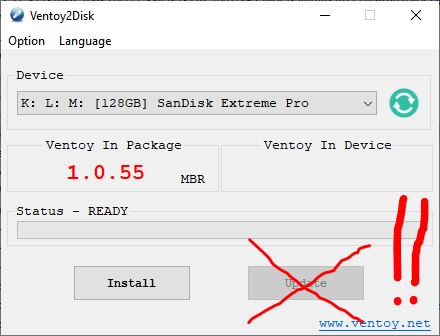
WARNING: Do not use the Ventoy2DIsk.exe tool to update Partition 2 – it will appear to work but it will destroy your E2B backup and you will not be able to restore E2B or agFM!
These instructions assume you have E2B v2.09 or later installed already and have agFM v1.74 or later on Partition 2 of the E2B USB drive.
Whenever a new version of Ventoy is released, just re-run the script described in Step 3 below again to download the latest release.

- First ensure that your E2B USB drive does not have any .imgPTN partition image already switched in – the easiest way to check this is to run \_ISO\SWITCH_E2B.exe – if the ‘Restore E2B Partition(s)’ button is NOT greyed-out then click it to restore the original E2B partitions. The E2B partition 1 and the E2B_PTN2 partition 2 volumes should now be present. Check that Partition 2 is NOT the 32MB VTOYEFI partition. If it is then follow Section 3 below to restore the E2B\agFM partition first.
- Run \e2b\Update agFM\Download and update agFM_v2.cmd (on the 2nd partition) or download the latest zip file of agFM UEFI files and extract all the files to Partition 2 of your E2B USB drive – this overwrites the existing agFM files. You will need agFM v1.74 or a later version. If the \e2b\Update agFM\Download and update agFM_v2.cmd file is not present then you may have a Ventoy image already switched in – in which case you should boot from the USB drive to Ventoy and follow Section 3 below to restore the E2B\agFM files first.
- Run \e2b\Update agFM\Make_Latest_Ventoy_Partition_Image.cmd from Partition 2 of the USB drive to automatically make the three new image files in the root of Partition 2. You may also be prompted to download the grubfm_multiarch.iso file and add it to Partition 1. Internet access is required and ImDisk must be pre-installed on your Windows system. If using a Removable-type USB Flash drive, then Win10/11 is required.
If you do not already have ImDisk installed on your Windows system, you can download and install it from here.
The E2B_PTN2 FAT32 Partition 2 must have approx. 100MB of free space available for the new downloaded zip file and the new Ventoy image files.
NOTE: If you have downloaded a CI version of Ventoy-Windows.zip (for debug\testing) then you must extract the ventoy-xxxxxxx-windows.zip file which is inside the CI download file into the \e2b\Update agFM folder on Partition 2. Then drag-and-drop the extracted file onto the \e2b\Update agFM\Make_Latest_Ventoy_Partition_Image.cmd file which is in the same folder (agFM v1.80+). - ‘Defrag‘ – The three new image files created in the root of Partition 2 need to be contiguous (they usually are but not always!). You can make them contiguous by running “\_ISO\docs\Wincontig\WinContig.exe” and then ‘Add’ the three new .img files and click on ‘Defragment’ – or, easier still – by installing ‘Defraggler’ on your Windows system and right-clicking on each .img file and choosing ‘Defraggler – Defragment’.
The three \ventoy.disk.img files on the second partition are the new Ventoy images – do not move them – they must be located in the root of Partition 2 so that they will appear in the agFM startup menu and they must be contiguous.
1. Switch the Ventoy 32MB image into partition 2
The three Ventoy images should have been made as described above.
1. First boot to agFM (either Legacy\MBR boot to the E2B menu and then load agFM or UEFI-boot direct to agFM on Partition 2).
2. Select one of the three new ‘Official Ventoy’ menu entries from the startup menu – the chosen Ventoy image file will be switched into Partition 2 and the system will reboot. The image file must be contiguous.
If you are using the standard \boot\grubfm\startup_default.cfg file then you will see the three Ventoy image menu entries at the bottom of the menu, if the Ventoy image files are present.

If you have added your own \boot\grubfm\startup_menu.txt menu file for your agFM menu file, you will need to add the extra menu entries for the three .img files into your startup_menu.txt file (see \boot\grubfm\SAMPLE_xxx.txt files).
Note: The ‘Secure Boot’ and ‘no Secure Boot’ images correspond to the two options offered by the Ventoy maker tool, the third ‘bypass Secure Boot’ image contains the Kaspersky signed shim EFI file and will usually boot even on a Secure Boot-enabled system – it can then load Secure or non-Secure payloads. If your UEFI BIOS displays a security warning and fails to secure-boot, it will be because Windows has blocked it by adding an entry into the UEFI BIOS DBx blacklist database. You can either clear this DBx database using the BIOS Setup menu or disable Secure Boot in the BIOS.
Some systems may not boot to agFM if the ‘bypass Secure Boot’ image is used even if Secure Boot is disabled (black screen, single dot or cursor only) – in that case use the ‘no Secure Boot’ image instead and disable Secure Boot in the BIOS settings.
You can now UEFI or Legacy\MBR boot to Ventoy on Partition 2. The USB drive now contains the Ventoy grub2 boot loader.
Note: Do not attempt to switch-in any .imgPTN partition images whilst in this state! Do not attempt to ‘fix’ the drive if prompted by E2B when a .imgPTN file is selected. You cannot switch-in another image file until the original E2B/agFM partition 2 is restored. Also do not attempt to update Ventoy using the official Ventoy Update method – it will prevent you from restoring the agFM Partition 2 afterwards – instead you must remake the 3 Ventoy images and the latest version of Ventoy will be downloaded and used to re-make the image files.
2. Using Ventoy
Once you have switched-in a Ventoy partition image file, you can configure Ventoy and use it as described on the Ventoy website. Typically this involves creating a \ventoy folder on Partition 1 of the E2B USB drive and adding plugin files and configuration files. These files will also be used by ‘Ventoy for Easy2Boot’ if you run it after the original Partition 2 is restored.
The VentoyPlugson.exe tool in the \ventoy folder can now be used to configure Ventoy (and Ventoy for Easy2Boot).
A new eBook ‘Getting started with Ventoy‘ is available here – it applies to any USB drive that contains Ventoy (not just E2B USB drives).
Because the grubfm_multiarch.iso is also present on E2B Partition 1, you can boot to this ‘vanilla’ version of grubfm from Ventoy. This means you can use grubfm to try booting to ISO/VHD files if Ventoy does not work on a particular file. The grubfm_multiarch.iso file can be copied to a different folder on Partition 1 so that it will appear in your own Ventoy menu scheme if your particular menu scheme does not list ISO files that are in the root of Partition 1.
Note: Once Partition 2 (VTOYEFI) is switched in with the Ventoy boot files, then any changes or tweaks you make to that Ventoy ‘VTOYEFI’ volume will permanently alter that image – but you can always make new Ventoy partition image files if you mess it up! There should be no need to change any files on the 2nd ‘VTOYEFI’ partition.
Do not update the image using the Ventoy2Disk.exe tool or the Linux tools – it will destroy the E2B\agFM partition backup information and you will not be able to restore the agFM 2nd partition!
Load the Easy2Boot Menu system
Although it is possible to load the E2B menu system from Ventoy, I do not recommend it because the grub4dos boot code is no longer present after the Ventoy partition and boot code has been replaced. Also it could be dangerous to try to switch in .imgPTN files whilst the USB drive is in this state. If however you really want to try the legacy E2B menu system, you can use the Ventoy extended grub2 menu file \ventoy\ventoy_grub.cfg (see here for details). The following menu entry will only work when Legacy booting to Ventoy and can be used in your \ventoy\ventoy_grub.cfg file…
if [ -f ${vtoy_iso_part}/grldr -a -f ${vtoy_iso_part}/_ISO/e2b/grub/e2b.cfg -a "${grub_platform}_${grub_cpu}" = "pc_i386" ]; then

menuentry 'Easy2Boot (MBR)' --class=custom {
	insmod ntldr
	set root=${vtoydev},1
	ntldr ${vtoy_iso_part}/grldr
	clear
}

fi
Copy the sample .cfg file (“\ventoy\Sample Ventoy config files\ventoy_grub.cfg“) and also copy the ReloadVentoy.mnu file from “\_ISO\docs\Sample mnu files\Ventoy\ReloadVentoy.mnu” which will load Ventoy from the E2B menu system.
Files to add to support loading E2B menu from Ventoy and Ventoy menu from E2B:
\_ISO\MAINMENU\ReloadVentoy.mnu (Load Ventoy (Legacy))
\ventoy\ventoy_grub.cfg (press F6 in Ventoy menu system to load this file)
Do not attempt to use Ventoys own ‘Update’ tool to update the USB drive – it may destroy your E2B drive! Only use grubfm to restore the E2B original partitions as described below.
3. Restore the original E2B partitions
Before you can boot to agFM on Partition 2 again or load .imgPTN partition image files or legacy boot to E2B, you must first restore the original agFM Partition 2 – this will remove the Ventoy 32MB Partition 2.
- First boot to Ventoy and then select the grubfm_multiarch.iso entry as shown below (it is in the root folder):

grubfm_multiarch.iso will load the grubfm user menu from the Ventoy partition. You should now see a new grubfm menu (see below).
Tip: grubfm may be able to boot some files which Ventoy has problems with, so you can also use grubfm as an alternate boot method.
Note: Do not delete the grubfm multiarch ISO file from the root of the E2B USB drive. You can also copy it to any other menu folder to make it easier to find.
- To restore the original agFM menu system, after booting to grubfm_multiarch.iso, select the ‘Restore agFM partition 2‘ menu entry – then confirm the restore operation by pressing 1 when prompted.
The original partitions and grub4dos boot code will now be restored and Partition 2 will now contain the agFM (and old Ventoy) files. The system will reboot.

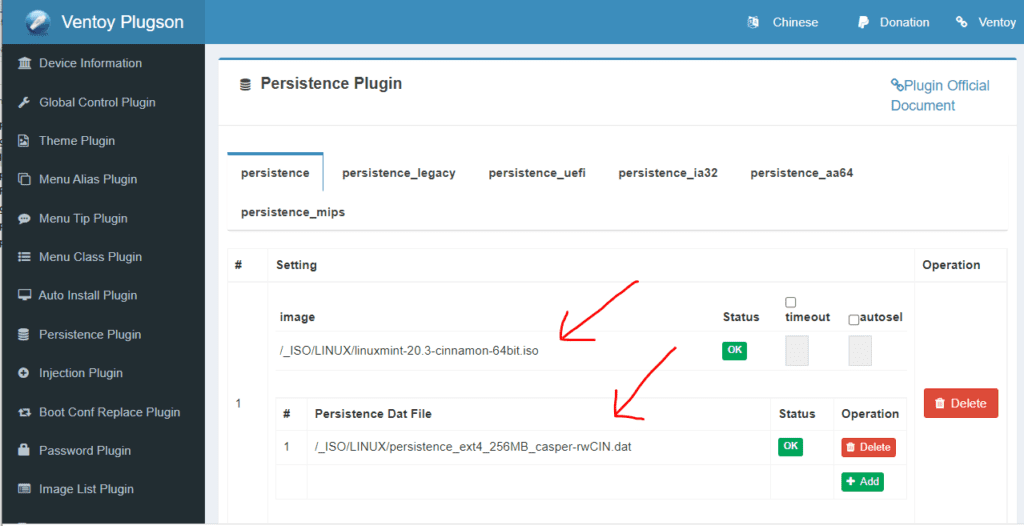
Ventoy configuration file (ventoy.json)
Ventoy can use a powerful \ventoy\ventoy.json configuration file located on the first partition of the USB drive (e.g. to run Linux with persistence).
You can use the Windows program VentoyPlugson.exe to make this file and edit it.
The Make_Latest_Ventoy_Partition_Image.cmd script will add this to your USB drive when you make the images (agFM v1.78+) or you can extract the files from the ventoy .zip windows download file (e.g. ventoy-1.0.70-windows.zip). The two files needed from the .zip file are:
- \ventoy\VentoyPlugson.exe
- \ventoy\ventoy\plugson.tar.xz
Detailed instructions and step-by-step exercises are available in my Ventoy eBook.
Add Ventoy Plugins and Persistence files
The file \e2b\Update agFM\GetLatestVentoyPluginFiles.cmd automatically downloads the latest plugins required by Ventoy for some boot functions (Windows vhd plugin, Windows wim plugin, Linux persistence .dat files in a .zip file, bootable ISO to remove Ventoy Secure Boot whitelist key from UEFI BIOS NVRAM) – see www.ventoy.net for details or my Ventoy eBook.