Table of Contents
Install XP 32-bit + DPMS
Installing Windows XP 32-bit directly from an ISO requires 3 boot stages (see basic video here), the first two boots must be from the E2B USB drive:
- Use the E2B+DPMS download to make your E2B drive.
- Use official Microsoft XP SP3 ISO (should be 600-800MB in size) or one of the Recommended later XP SP3 32-bit ISOs here.
- Do NOT configure the BIOS with the E2B USB drive as Drive 0 = first HDD.
The internal hard disk should be the first disk. Boot from the E2B USB drive using the BIOS Boot Selection menu and hotkey (e.g. F2, F8, F9, F10, F12, ESC – depending on system) - Boot from the E2B USB drive and choose STEP 1 for first text-mode Windows XP Setup stage (formats and copies file to hard disk)
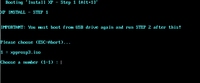
- Re-boot to the E2B USB drive again after Windows text-mode Setup stage resets and choose STEP 2
- Re-boot after Windows GUI-mode Setup stage has completed after STEP 2 (if it reboots to E2B press F7 to reboot to the hard disk – or remove E2B USB drive and reboot)
Notes:
- The E2B+DPMS process works by creating two virtual floppy disks, one containing the FiraDisk\WinVBlock driver which loads the ISO as a virtual CD and the other floppy disk which contains the correct 32-bit disk driver for XP. XP Setup will automatically load both drivers from the virtual floppy drives.
- For the most reliable installation experience (less chance of BSOD!), load the ISO into memory in STEP 1 (Alt+1 and answer Y) and then later after reboot, choose STEP 2 (use Alt+2). Loading the ISO into memory on each boot is not always necessary however – it depends on what mass storage driver is required and what BIOS/chipset the system has.
- If you want to use a unattend.txt\winnt.sif file with the ISO, refer to the Unattended Installation page.
- If you have a modern system, the Driver Pack included in E2B may be too old and may not contain a driver for your disk controller. You can update the Driver Pack by following the ‘Update DPMS’ instructions or try WinNTSetup and use a Windows 10 ISO+Win XP ISO.
- You can quickly check to see if a driver for your system is included in E2B by using the Utilities Menu – List matching XP DriverPack.ini entries menu.
- After installation, use Legacy Update on your Windows XP OS to get the latest drivers and updates (requires internet access).

Tip: If you get a ‘STOP: 0x000000A5’ BSOD error or ACPI-related error, then when Setup prompts you to press F6 to install drivers, press the F7 key. Press F5 to allow you to choose the type of system you have (e.g. ACPI type, multiprocessor, etc.).
Tip: NEVER set the USB drive as the first boot device in the BIOS Setup menu. The first boot device should always be set to the internal hard disk that is the system’s boot device – otherwise an Operating System may install boot code onto the E2B USB drive instead of the internal disk! Always use the BIOS Boot selection pop-up menu to boot from the E2B USB drive.
Instructions
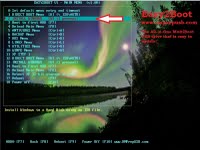
1. Press Ctrl+I to select the Windows Install Menu
2. Press Alt+1 to run step 1

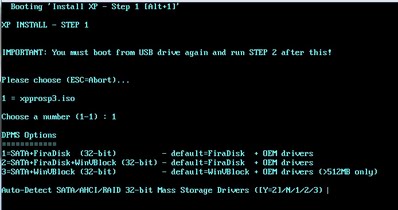
3. Choose your XP ISO file
4. At the DPMS Options prompt – hit [ENTER] for Y (equivalent to option 2). The two F6 SRS (SCSI/RAID/SATA) floppy images will automatically be made for you which contain a Ram Disk driver such as Firadisk and the correct OEM mass storage driver. (If you have problems with the Windows installation – e.g. Windows BSOD or resets just before T-3 minutes stage or have a SCSI controller, try option 3=WinVBlock instead followed by Alt+2 for the 2nd stage).
Note: If booting from an E2B USB-HDD and using FiraDisk (default) then you need to answer Yes to the ‘Load XP ISO into memory’ question or else you will get a BSOD 0x0000007B error when Setup switches to Windows protected mode!
512MB systems
If booting from an E2B USB Hard Disk, you cannot install to AHCI/SCSI systems having less than 512MB of memory with Firadisk, because you need to load the ISO into memory. You can use WinVBlock instead, but WinVBlock requires loading the ISO into memory in STEP 2. For this reason, if you have AHCI/SCSI/RAID systems with 512MB or less, use E2B on a USB ‘Removable’ Flash drive. There are two ways around this:
Low RAM Option 1 : Use UltraISO to reduce the size of the ISO by deleting all folders from the ISO except \i386 folder, also delete all files >1MB in the i386\LANG folder. Then use the default Firadisk option and load ISO into RAM (use default options).
Low RAM Option 2: Use DPMS option 3 (WinvBlock) for STEP 1, and use Step 2 (<512MB) menu entry for STEP 2 (may not work on every system though – BSOD 0x0000000A error).
5. Wait for XP Setup to start – or press [ENTER] if you are impatient
Note: you can enter A for Abort or C for Command prompt (or D for Debug at command prompt) at this last prompt and then press [ENTER]. C/D drops you to the grub4dos command shell – pressing ESC from within the shell will continue where you left off and start Windows Setup).
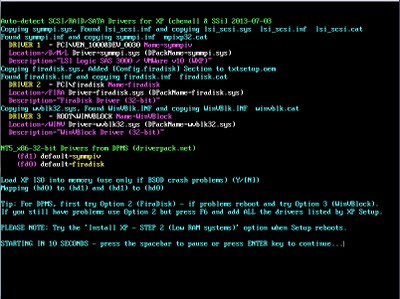
This colourful screen shows that a Mass Storage Driver has been found for a SCSI controller.
If the fd1 and fd0 drivers are both ‘firadisk.sys’ then no suitable disk driver has been found and Windows XP may not be able to find your internal disk drives.
6. Now go through the normal XP install options (there is normally no need to press the F6 key). Format the drive and allow XP Setup to copy the files to the hard disk as usual.
7. When the system restarts, boot back to the E2B USB drive again (if the system boots to Windows you will get an ‘.asms files not found’ error – just reboot back to E2B again and carry on as below).
8. Press Ctrl+I to select the Windows Install Menu again
9. Press Alt+2 – this is the safest and most reliable option for XP Step 2 (or use Alt+3 but you must leave the USB drive connected – if you used OEM+WinVBlock you MUST use Alt+2 and not Alt+3)
Now choose the SAME ISO XP install file that you chose in step 1. If you get an ‘asms files not found’ error, repeat the whole install again from ‘Step 1’ but choose the WinVBlock driver. If possible, always load the whole ISO into RAM (answer Y when prompted).
10. Windows Setup GUI Mode will run and you can complete the installation of Windows XP (after it reboots)
Note: If the FiraDisk RAMDisk driver was installed, it will be removed if you answer Y for Yes to the prompt that will appear when you get to the XP Desktop.
Although the FiraDisk driver does no harm, it does show up as as ‘Unknown Device’ in Device Manager. If you want to keep FiraDisk, answer N for No.
The two Virtual Floppy disks that are generated in memory will contain identical files (all driver files will be on both disks). The only difference is that one disk will contain a txtsetup.oem file with a different default driver setting from the other. ie. one txtsetup.oem file will be set to load an AHCI or SCSI driver and the other will be set to load the OEM Mass Storage driver.
If you have an IDE system and no OEM driver is required, both WinVblock (fd0) and Firadisk (fd1) will be loaded.
E2B DPMS2 Options
1 = OEM+FiraDisk – does not add the WinVBlock driver to the F6 floppies – use if drivers won’t fit on the floppy disk using option 2
2 = OEM+FiraDisk+WinVBlock – THIS IS THE DEFAULT = Y = FiraDisk will be loaded
3 = OEM+WinVBlock+FiraDisk – the default Ram Disk driver that will be loaded will be WinVBlock – use if FiraDisk fails
If you just press the [ENTER] key then Option 2 will be selected = FiraDisk.
If you choose 1 then it is the same as Option 2 (except that the WinVBlock drivers will not be copied to the Virtual F6 floppy disks) which may save space and allow for larger Mass Storage drivers.
If you choose 3 then both FiraDisk and WinVBlock drivers are copied to the Virtual F6 floppy disks, but Windows will load the WinVblock driver automatically instead of the FiraDisk driver (unless you press F6).
The best option to use is option 2. Only use option 1 or 3 if option 2 does not work.
FailSafe: If you have a particularly difficult system that seems to crash (BSOD), use Step 1= Alt+1 – then DPMS2 option 2 = FiraDisk – then Y=load ISO into memory – then Press F6 and load all 3 drivers (OEM+Fira+WinV) – reboot – then choose Alt+2
IMPORTANT: If the Option 3 (WinVBlock driver) is used, you can only use it on 512MB+ systems because in STEP 2, you must use the ‘STEP 2 – Install XP [Alt+2] (512MB+ systems]’ option.
NOTE: You can use both FiraDisk and WinVBlock and an OEM disk driver, press F6 at the start of XP Setup and then load all the drivers listed.
No Mass Storage Driver (hard disk) found!
E2B will identify the PCI ID of your Mass Storage Driver (e.g. SATA disk contoller or SCSI/RAID disk controller) and look for a matching PCI ID in the DriverPack.ini file. You can check this by using the ‘List matching XP DriverPack.ini entries‘ menu in the E2B Utilities menu.
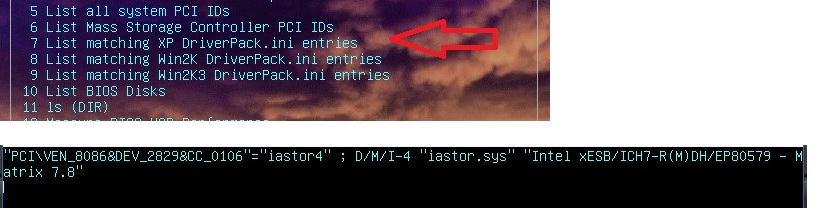
This shows a PCI Vendor ID of 8086 (Intel) and 2829 (device ID) has been detected for your Mass Storage controller and that the DriverPack.ini file points to the XP 32-bit drivers in the \_ISO\e2b\grub\DPMS\D\M\I\4 folder, which are for the ICH7 controller chip. If no text output is displayed, then E2B could not find a match for the PCI ID of your controller in the DriverPack.ini file.
To list the PCI ID of your disk controller, use the Utilities – List Mass Storage Controller PCI IDs menu entry.
You may find a more recent version of the DPMS drivers here and for how to update the DPMS driver pack (see below).
For the Toshiba Satellite C55D issue – see here. Fixed in E2B DPMS v2.14b and later versions.
Known Issues
- s2k332.cat missing – If using the D/M/L driver pack, you need to unzip the s2k332.7z file.
- 0x00007B as Setup loads Windows at start of text-mode Stage 1 phase – try loading the ISO into memory (answer Y before the question times out!) or select the WinVBlock driver instead of the FiraDisk driver.
- If the E2B USB drive is a USB Hard Disk, load the ISO into memory when asked.
- If you have a DELL PC and no matter what you try you always get BSOD 0x0000007B error – re-make the XP ISO and use a special version of \i386\ntdetect,com.
- VBox Scsi (symmpiv driver) install resets at approx T-3 (almost at end of stage 2) – use WinVBlock rather than FiraDisk
- VBox SAS (symmpiv driver) IRQ_NOT_LESS_OR_EQUAL at approx T-12 – use Alt+1 (loads ISO into memory) for Step 2.
- To avoid a 0x000000A0 STOP error, press the F7 key when prompted to press F6 by XP Setup.
- If WinSetupFromUSB works but E2B does not, convert the WinSetupFromUSB USB drive to a .imgPTN file and add it to your E2B drive.
DPMS Output text
The colourful text displayed by DPMS will show you what 32-bit drivers were selected and what two drivers will be loaded by default if you do not press F6.
If more than one OEM (SRS) driver is found, you will be asked by E2B to choose which one you want to be the default.
If more than one OEM driver is required you MUST PRESS F6 at the start of Setup and load ALL the drivers manually from the list presented. This is because the maximum number of drivers that DPMS can install automatically (without pressing F6) is 2 (one for each virtual floppy – and one must be the RamDisk driver FiraDisk or WinVBlock).
Using DPMS in your own grub4dos menu
If you wish you can use the DPMS2 package in your own application. The DPMS driver folders (\D\M\) must be located directly below the folder that contains the DPMS2.g4d batch file. If you wish to generate a Ram Disk driver floppy, you must specify a value for the grub4dos environment variable FIRA (1=Firadisk only, 2=FiraDisk(default)+WinVBlock, 3=WinVBlock(default)+Firadisk. If you do not set the FIRA parameter before calling DPMS2.g4b then only the SRS F6 virtual floppy (or floppies) will be made.
If there is no SRS driver required and you asked for two floppies and use FIRA=2 or FIRA=3, then one floppy will have a default driver=FiraDisk and the other default=WinVblock.
If you use FIRA=2 or 3 and ask for just one disk you will be asked to choose which driver you want loaded by default.
The DPMS2.g4b batch file also takes a parameter (optional)
- (no parameter) = create maximum of two floppies
- 0 = create fd0 only
- 1 = create fd1 only
- 2 = create maximum of two floppies (same as no parameter)
e.g
- #create two F6 floppies (one SRS, one default=Firadisk)
- set FIRA=2
- /mypath/DPMS2.g4b 2
or
- #create one SRS OEM driver F6 floppy on fd0
- set FIRA=
- /mypath/DPMS2.g4b 0
or
- #create one SRS OEM driver F6 floppy on fd1 + WinVBlock as default on fd0
- set FIRA=3
- /mypath/DPMS2.g4b
Note that some special commands are also required in your grub4dos menu – see the ..\grub\XPStep1.g4b, ..\grub\XPStep2.g4b and ..\grub\XPStep2LowRam.g4b batch files for help.
Update DPMS with the latest XP 32-bit Mass Storage drivers
The version of the Mass Storage Driver Pack used in E2B can be found in the \_ISO\e2b\grub\DriverPack.ini file (e.g. v.1.72 has a modified version of MSD 1412115). If you are installing XP to a modern system, you may find that the E2B+DPMS download does not contain the new driver that is required for your chipset. In this case you will need to update your E2B USB drive using the latest DriverPack Mass Storage XP 32-bit build as follows:
- Make an E2B+DPMS USB drive in the usual way
- Download a new build from here – go to Post #1 for the latest version and also the latest posts for the latest Beta build.
Here is the 1405176 May 2014 build download (old). - Delete the \_ISO\e2b\grub\DPMS\D folder from your E2B drive
- Delete the \_ISO\e2b\grub\DPMS\DrivePack.ini file from your E2B drive
- Unzip the driverpack download to the \_ISO\e2b\grub\dpms folder – this should make a new \_ISO\e2b\grub\DPMS\D folder.
- Rename \_ISO\e2b\grub\DPMS\DriverPack_MassStorage_wnt5_x86-32.ini to DriverPack.ini
Version 1412115 is here (2014-12-11). E2B uses a bugfixed version of this driver pack (DP_MassStorage_wnt5_x86-32_1412115.7z).The latest Nightly builds of driverpacks can be found near the last post on this forum thread.
Tip 1: the DPMS2 batch file in E2B parses the DriverPack.INI file to look for a matching PCI ID. You can edit the INI file to change which driver and folder is used for a particular PCI ID (if you know what you are doing!).
Tip 2: The E2B – Utilities menu has menu entries that can check if a suitable driver can be found in the DPMS Driverpack.ini file. Use one of the ‘List matching DriverPack.ini entries’ menu entries.

Useful Information
Refer to the XP Setup Stages Reference Guide here. The Alternate Downloads area contains an old Driver Pack that should work for Haswell Z87 systems (DPMS_Z87.zip) if the latest version in E2B does not work.