Table of Contents
UEFI-boot from a Windows 7 Install ISO
Please note:
- Windows 7 is very old and does not contain modern USB 2 or USB 3 drivers – try a tested recently made Win7 ISO which has added drivers
- Always use a USB 2 port – standard Win7 does not contain modern USB 2 or any USB 3 drivers.
- The Microsoft Windows 7 64-bit ISO does not contain the standard \EFI\BOOT\BOOTX64.EFI UEFI boot file
- Windows 7 32-bit does not support UEFI32 – you must use Win7 64-bit..
- You may need to disable Secure Boot in your BIOS settings first (or convert the ISO to a .imgPTN23 file using the MPI Tool Kit).
- Some modern systems are not compatible with Windows 7 UEFI64 (may hang)
Use agFM or ‘Ventoy for Easy2Boot’ to UEFI64-boot from a Windows 7 x64 ISO (.winiso option).
If you see an error message about ‘CD/DVD drive drivers required’ then your WIn 7 ISO is too old for your system – it cannot access the E2B USB drive which contains the Windows 7 ISO file because it does not have the correct USB drivers for your modern system.
Installing Windows 7 to a modern system
Using this method, the Windows 7 ISO does not need modern USB2\3 drivers:
- Add a recent Strelec Windows 10 ISO to the \_ISO\WINPE folder of your E2B USB drive (or HBCDPE)
- UEFI64-boot to the WinPE ISO (using agFM or Ventoy for Easy2Boot)
- Use the Explorer application to find your Win 7 x64 ISO – right-click – ‘mount’ (e.g. using ImDisk)
- A new virtual CD\DVD drive letter should be created – now run \setup.exe from the mounted ISO (ignore any .dll errors if you see any)
OR try a tested recently made Win7 ISO which has added drivers.
Partition Image file (.imgPTN23)
If you have problems booting from the ISO, you can try a .imgPTN file – however this will not solve the lack of modern USB drivers problem!
To UEFI-boot from a Windows 7 64-bit ISO (Win 7 32-bit UEFI is not supported by Microsoft) you can convert each ISO to a FAT32 .imgPTN file using MakePartImage and the MPI_FAT32 Desktop shortcut. Windows 7 (64-bit) will not UEFI-boot from USB unless the \EFI\BOOT\BOOTX64.EFI file is present but it is not included in the Microsoft Win7 x64 ISO!
Later versions of the MPI Tool Kit (0.096+) will try to add the missing BOOTX64.EFI boot file (see below for details).
- Convert Win7 ISO (on hard drive) to .imgPTN file using MPI_FAT32 from the MPI Tool Kit
- Copy new Win7 .imgPTN to E2B USB drive (e.g. \_ISO\WINDOWS\WIN7 folder)
- Run \MAKE_THIS_DRIVE_CONTIGUOUS.cmd to make file contiguous
- MBR-boot to E2B menu (or run \_ISO\SWITCH_E2B.exe) and select the Win7 .imgPTN file (partition will be changed)
- UEFI-boot from the E2B drive
If any file inside the ISO is larger than 4GB, use Split WinISO to make smaller files.
Windows 7 32-bit and all earlier Windows OS’s do not support UEFI-booting.
Note: E2B v1.75+ allows you to add .imgPTN files to the \_ISO\WINDOWS\xxxx folders (except for the XP folder).
The Windows 7 64-bit UEFI boot problem!
Unlike the later Windows Install ISOs, the Windows 7 64-bit standard Microsoft ISO does not contain the correct UEFI boot file that is required for USB disk booting (Win7 ISOs only support CD\DVD booting).
Note: Ensure CSM\Legacy Mode is enabled in the BIOS settings, even if you are UEFI-booting – Win7 x64 UEFI may need BIOS access or it may not fully boot! To UEFI 64-bit boot, the file \EFI\BOOT\BOOTX64.EFI must be present.
Tip: You can install Windows 7 onto modern (USB 3) systems using WinNTSetup.
Use Split_WinISO.exe to add the boot file
The BOOTX64.EFI boot file will usually be automatically added to the .imgPTN23 file when made using the MPI Tool Kit, if it is not, you can try using the Split WinISO utility to make the .imgPTN23 file.
The Split_WinISO Windows utility (by Chandra) can automatically add the missing bootx64.efi file and make a .imgPTN file…
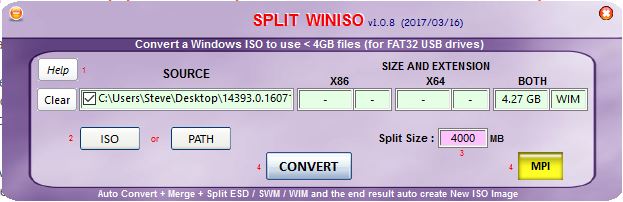
- Download Split_WinISO.exe and copy the .exe file to the MPI folder (Split_WinISO is already included in later versions of MPI).
- Run Split_WinISO.exe and click the ISO button to select your Windows 7 x64 ISO
- Click on the MPI button to convert the ISO to a FAT32 .imgPTN file – if you do not see the MPI button then you did not copy the .exe file to the MPI Tool Kit folder!
Manually change the boot files
First, check if the file ‘\EFI\BOOT\BOOTX64.EFI‘ is in your ISO (or inside .imgPTN file). If it is not present then it will not UEFI-boot from a USB drive and we need to obtain the file and add it to our .imgPTN file.
Run E2B and select the Windows 7 64-bit.imgPTN file that you have already created using MakePartImage. You can do this by running \_ISO\SWITCH_E2B.exe or run the ‘QEMU_MENU_TEST (run as admin).cmd’ script on the E2B USB drive until you see the Windows 64-bit CSM menu in the QEMU window and then quit QEMU and Eject the USB drive using the Windows System Tray icon, then re-connect it.
The contents of the E2B USB drive should now comprise of the Windows 7 64-bit payload. If the ‘\EFI\BOOT\BOOTX64.EFI’ file is missing, you can obtain and copy the file to the USB drive by using one of the two methods below:
If you have access to a Windows x64 system, copy the file C:\Windows\Boot\EFI\bootmgfw.efi to the USB drive’s \EFI\BOOT\ folder and rename the file to \EFI\BOOT\BOOTX64.EFI. Do NOT use the bootmgr.efi file – it doesn’t work!
OR…
The file bootmgfw.efi can also be extracted from a Windows 7 (or higher) x64 Install DVD. It is located in the 2.7 GByte+ large archive \sources\Install.wim (and in the \sources\boot.wim file too usually) which should now be on your USB drive. The file can be extracted using an archiving program such as 7Zip. This file is usually located in the subdirectory “1” of the archive at 1\Windows\Boot\EFI\ under 7Zip. Copy the file to the USB drive’s \EFI\BOOT folder and rename the file to \EFI\BOOT\BOOTX64.EFI
The USB drive should now be UEFI-bootable and you should see the CSM menu now inform you that the BOOTX64.EFI file is present and also see a Clover boot option.
Note: The Virtual Box ‘BIOS’ does not support UEFI-booting of Windows 764-bit – the animation will just stop (Win8 and later work OK). However, you can try booting using the Clover menu entry in E2B CSM mode which usually works under VBox.
Still will not boot?
It should not be necessary, but if it fails to UEFI-boot, also copy the whole \EFI\MICROSOFT\BOOT folder to the \EFI folder (see screenshot below).

The partition contents of the USB drive should now look like this (note the \EFI\BOOT\BOOTx64.efi file must be present).
Adding Intel USB 3.0 drivers to Windows 7
Windows 7 install ISOs do not support USB 3.0 ports or controller chips, so if you want to boot from a USB 3.0 port, you will usually need to add the USB 3.0 drivers (tip: sometimes just using a USB 2.0 port will work but sometimes it will not!). Once you have made the .imgPTN file, you can ‘switch’ to it and then run the Windows 7 USB 3.0 Creator utility. This will modify the install.wim and boot.wim files and add the Intel USB 3.0 drivers. Note that this utility only adds the Intel USB 3.0 drivers for Intel chipsets; it does not add non-Intel USB 3.0 drivers (e.g. AMD). There is also a video showing how to modify an ISO or USB drive here.
Tip: I find it easier to boot from any recent WinPE or Windows Install ISO that supports USB 3.0 (e.g. Win 8.1 or Windows 10), and then run WinNTSetup.exe and install the Windows 7 ISO using WinNTSetup. There is no need to modify the Windows 7 64-bit ISO if you use this method. You can then install the USB 3 and other drivers once Windows has been installed. Instead of booting to Windows 10, you can boot to a Strelec or HBCD_PE ISO and then run Setup.exe from the Windows 7 ISO after ‘mounting’ it first (see top of page).