Table of Contents
MBR-boot from a Debian\Kali ISO with persistence
This example is for Kali but should work with most Debian-based LiveCD ISOs which use a volume label of ‘persistence’ for their persistent filesystem and a ‘persistence.conf’ file inside the file system.
The .isopersistdebian file extension used in this article is only for E2B Legacy booting – for UEFI and MBR booting with persistence, see here.
Legacy-boot + persistence from ISO
- No Partition 3 – Partition 3 on the USB drive must be free (unused). See below if you have a Partition 3 already in use.
- This only works in the Legacy E2B menu system (not agFM or Ventoy).
1. Copy your Debian-based Linux LiveCD ISO to a menu folder such as \_ISO\LINUX.
2. Rename the file so that it looks nice as a menu entry (it can contain spaces and parentheses).
Ensure the file name does not contain any dots (otherwise the -rw persistence file will be displayed as a menu item in the E2B menu but it is not actually bootable).
Change the file extension of the .iso file to .isopersistdebian (or .isopersistdebian64 if it is for 64-bit systems only).
e.g. Kali 2019 v2 amd64.isopersistdebian
3. We now need a persistence file with a ext2/3/4 or xfs filesystem containing a persistence.conf file inside that filesystem.
You can download a ready-made one as follows:
- Download the .zip file file from here and extract one of the persistence_ext4_xxx_persistence.day files – e.g. persistence_ext4_512MB_persistence.dat. The file may also be on your E2B USB drive in the \_ISO\docs\Linux Persistence Files folder and there may be an extraction .cmd file you can run to automate the extraction (E2B v2.14+).
- Extract one of the files of the required size using 7Zip (nested folder structure – keep going until you get to the .dat file you want) and that ends in *persistence.dat which will work with Debian\Kali ISOs.
- Rename the .dat file to Kali 2019 v2 amd64-rw (must EXACTLY match the name of your ISO plus ‘-rw’).
- Copy the -rw file to the root of the E2B USB drive or put it in the same folder as the Kali ISO
- You can then skip the remaining steps as the file will already contain the persistence.conf file.
- \_ISO\LINUX\Kali 2019 v2 amd64_.isopersistdebian.iso
- \Kali 2019 v2 amd64.isopersistdebian-rw
Alternatively, you can make a persistence file of any size as follows:
Click on \_ISO\_Make_Ext.bat to make an ext3 persistence file of the required size.
- The persistence file must have exactly the same name as the ISO but with -rw at the end and it must have no file extension (no dot in the name).
- The persistence file must saved to the root of the E2B drive or to the same folder as the .isopersistdebian file.
- Use ext3 and a volume name of ‘persistence‘.

You should now have these two files on the E2B drive:
- \_ISO\LINUX\Kali 2019 v2 amd64.isopersistdebian
- \_ISO\LINUX\Kali 2019 v2 amd64-rw
You can also create a .txt file if you wish to change the menu entry.
4. Boot to the E2B menu system and select and run the .isopersistdebian file.
If the -rw persistence file cannot be found or if it does not have a volume name of ‘persistence’ you will be warned. In this case, fix the problem before continuing.
For the first boot, you should expect to see a warning message similar to ‘WARNING: persistence.conf is not present in xxxxxx-rw’ because the persistence file does not yet contain the correct contents.
5. Continue and choose the ‘Live USB Persistence‘ menu option…

6. Run a Terminal session (click on square black icon with $ sign) and make a persistence.conf file on the new 3rd partition of the USB drive.
In the example below which was run from a Virtual Machine, the USB drive is sda but on a real system it will be sdb or sdc, etc.

If you get an ‘Access denied’ error, then precede the command with ‘sudo’, e.g.
sudo bash -c "echo '/ union' > /mnt/usb/persistence.conf"
7. Now shutdown and reboot linux again using the same ‘Live USB Persistent’ menu option.
There should be now be no warning message from E2B.
To test that persistence is working, type df in a terminal session, you should see the persistence volume listed as /run/live/persistence
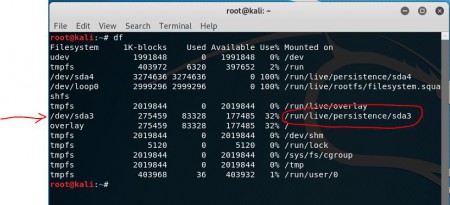
If you make any changes now (except for kernel updates which won’t work) they should be persistent.
You can instead use the _isopersistdebian.iso file extension so that the ISO file will also be seen by agFM\grubfm\Ventoy as a standard ISO
e.g.
- \kali-linux-2022.2-live-amd64_.isopersistdebian64-rw
- \_ISO\LINUX\kali-linux-2022.2-live-amd64_.isopersistdebian64.iso
By using ’64’ we ensure that the file is not listed in the E2B menu when you boot to E2B on a 32-bit CPU.

You can check the persistence.conf file inside your *-rw file by opening it in 7Zip – then select the conf file and press F3 to view the contents.

Booting Kali ISO + Persistence if Partition 3 is already in use
You will need to use a .mnu file and edit it.
Copy the file “\_ISO\docs\Sample mnu files\Linux\kali-linux-2022.2-amd64_Persistent_PTN3_NOT_USED.mnu” to \_ISO\LINUX\MNU folder and edit is as required (see contents for instructions).
LUKS encryption
You can use a LUKS encrypted volume if the menu option is present, but it requires some additional commands.
This example assumes sdb is the E2B drive…
cryptsetup --verbose --verify-passphrase luksFormat /dev/sdb3
cryptsetup luksOpen /dev/sdb3 my_usb
mkfs.ext3 -L persistence /dev/mapper/my_usb
e2label /dev/mapper/my_usb persistence
mkdir -p /mnt/my_usb
mount /dev/mapper/my_usb /mnt/my_usb
echo "/ union" > /mnt/my_usb/persistence.conf
umount /dev/mapper/my_usb
cryptsetup luksClose /dev/mapper/my_usb
UEFI booting
See blog post here.
Parrot OS – error: symbol ‘grub_file_filters’ not found – If you see this error on UEFI–booting from a .imgPTN file, it is because the grub2 version used does not understand the FAT32 filesystem that the linux files are now on.
To fix this, extract all the files from a Ubuntu x64 ISO’s \EFI\BOOT folder and overwrite the files in the \EFI\BOOT folder of the FAT32 partition.
If you also want UEFI32 boot to work, repeat this using a Ubuntu or similar 32-bit ISO and copy the *.efi files over.