Table of Contents
Install Windows Vista,7,Server 2008 R2
Please note: Windows 7 does not contain modern updates, .Net, chipset drivers or USB 3 drivers and only supports old USB 2 chipsets.
Microsoft Win 7 Install 64-bit ISO is missing the UEFI boot file for USB booting. For Win 7 UEFI it is best to create a .imgptn23 partition image file from the Win7 ISO.
You might like to update your Win7 ISO with the latest updates and USB drivers using ‘7Up‘ or use WinNTSetup as a way to install Windows 7 onto modern systems from an ISO.
Tip: NEVER set the USB drive as the first boot device in the BIOS Setup menu. The first boot device should always be set to the internal hard disk that is the system’s boot device – otherwise an Operating System may install boot code onto the E2B USB drive instead of the internal disk! Always use the BIOS Boot selection pop-up menu to boot from the E2B USB drive.
You can also add any number of OEM/System Builder Windows Install ISO files and .imgPTN* files to the correct folders under \_ISO\Windows\sub-folder and name them as you wish.
Multi-language Win7 ISO files can be downloaded from Digital River (see Useful Links on this site).
You MUST place the .ISO files in the correct folder – e.g.
\_ISO\WINDOWS\WIN7\Windows_7_32.iso
\_ISO\WINDOWS\SVR2K8R2\Windows_Server_2008.iso
A useful flowchart for WinPE\Setup.exe\Winpeshl.exe\Startnet.cmd\wpeinit.exe is here (note: it is not entirely accurate however!).
Files ending in .iso64 will only be listed in the menu if a 64-bit CPU is present (.iso32 also supported) (E2B v1.94+).
Note: Some Windows Install ISOs may work if you give them a .iso or .isope01 file extension and place them in an ordinary folder (e.g. \_ISO\MAINMENU). Windows Install ISOs may cause E2B to use the WIMBOOT method which does not require a Removable USB drive to be used.
.imgPTN files will work from most folders (except \_ISO\WINDOWS\XP).
You can rename the ISOs and use spaces in the ISO filenames to make them look better in the menu if you wish (or add a .txt file – see below).
E2B v1.A8+ allows booting of Windows Vista-10 ISOs without the need of a WinHelper USB flash drive by using WIMBOOT.
Installing Windows 7 to a modern system
You can obtain an updated Win7 ISO which has modern drivers added (see ‘Tested Payloads‘ page for a link).
Or else if you use this method, the Windows 7 ISO does not need modern USB2\3 drivers added into it:
- Add a recent Strelec Windows 10 ISO to the \_ISO\WINPE folder of your E2B USB drive (or HBCDPE)
- Legacy or UEFI64-boot to the WinPE ISO (using E2B, agFM or Ventoy for Easy2Boot menu system)
- Use the Explorer application to find your Win 7 ISO – right-click – ‘mount’ (e.g. using ImDisk)
- A new virtual CD\DVD drive letter should be created – now run \setup.exe from the mounted Win7 ISO (ignore any .dll errors if you see any)
After Win7 has been installed, you may not be able to use any USB devices because modern USB2/3 drivers are not included in standard Win7. If your keyboard, mouse and network is working you may be able to add the required drivers by downloading them from the internet.
Win 7 64-bit UEFI for modern USB 3 systems
- Make or obtained a Win7 64-bit ISO which already includes new USB 3 drivers (see Tested Payloads page – e.g. Win7 Home/Prof/Ult/Ent Jan2021 with latest chipset and USB 3 drivers (pre-activated)
- Drag-and-drop ISO file onto MPI_FAT32 desktop shortcut to make a .imgPTN23 file (ei.cfg can be deleted when prompted) – choose ‘no rEFInd = N’ if you want secure boot.
- UEFI-boot from target system and select Win7 .imgptn23 file – reboot to partition 1 and install Win7.
USB 3.0 and NVMe driver support
Windows 7 install ISOs do not support USB 3.0 adapters/chipsets or modern USB controllers, so if you want to boot from a USB 3.0 port, you will need to add the USB 3.0 drivers to the ISO. Even if you are using a USB 2.0 port, it may be that Windows does not contain the correct drivers for the USB controller chip if it is a modern PC/notebook. Check if the Windows can ‘see’ your USB drive as follows:
1. After booting to Setup, type SHIFT+F10 to open a console window.
2. Type ‘diskpart‘ and press ENTER key.
3. Type ‘list disk‘ – check that your USB drive is listed – if not, then Windows (WinPE) does not contain the correct driver for your USB controller.
4. Type ‘exit‘ to quit diskpart.
You can use the Intel Windows 7 USB 3.0 Creator utility. This will modify the install.wim and boot.wim files and add the Intel USB 3.0 drivers.
Note that this utility only adds the Intel USB 3.0 drivers; it does not add non-Intel USB 3.0 drivers.
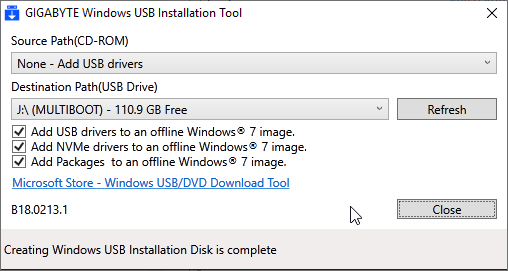
You may find it easier to convert the ISO to a .imgPTN file and then use the Intel Windows 7 USB 3.0 Creator utility or the Gigabyte Windows 7 tool (YouTube).
- 1. Convert ISO to Win7 .imgPTN file
- 2. Copy to E2B \_ISO\MAINMENU folder
- 3. Run \_ISO\SWITCH_E2B.exe and double-click on the Win7 .imgPTN file
- 4. Run the Creator tool using the USB as the source and target (do NOT allow the tool to format the drive!)
- 5. For 64-bit UEFI-booting, you will need to add \EFI\boot\bootx64.efi from a Win8/10 64-bit ISO
Another alternative is to boot to a Windows 10 ISO so that you have access to USB 3 devices and then run WinNTSetup to install from a Windows 7 ISO (if you don’t need NVMe drivers).
Britec’s video shows how to use different tools to add USB 3 drivers to a .imgPTN flat file USB drive or a ISO file.There is a video showing how to modify an ISO or USB drive here.
See here for how to add the correct USB driver into the ISO file. Also YouTube video here.
Additional Files
Add a .txt file to change the text in the e2b legacy/MBR menu
You can also add a .txt file of the same filename and add an alternate title (rather than have the filename listed in the menu).
If you also add a .txt file of the same filename containing a single line of text such as:
title some_title_here\nsome_help_text_here
then that text will be used as the menu title instead of the name of the file itself (note that the line must start with the lower-case word ‘title‘). See here for more details.
Note: .iso files of 0 length are not listed (but may add to the total file count displayed in the menu!).
Add your own .xml file to automate an install
You can also have your own unattend.xml files in the same folder as your ISO file (any name but must end in .xml). This can contain all your settings and a product key – you can just choose any xml file before you run the ISO. If you delete all .xml files from the Vista/7/8/SVR2012 folders, then the default unattend.xml will be automatically used and the user will not be prompted to select an xml file.
For an example look at the \_ISO\e2b\firadisk\au.xml file (for Vista and Win7) and the \_ISO\e2b\firadisk\auWin8.xml file (for Win8). These contain a special section which runs LOADISO.cmd – this is responsible for loading the ISO so that Windows Setup can access it as a DVD.

E2B will copy the contents of your XML file to \AUTOUNATTEND.XML before it boots from the ISO. Your XML file must be modified so that it runs ImDisk via LOADISO.cmd to install the ISO as a virtual DVD drive. You can download Windows 7 Install ISO files from the link on the Useful External Links page. For more details on how to install Windows Vista and later OS’s see Tutorial #43. You may find the Unattend.XML generator here useful – but you must add the RunSynchronous code used by E2B afterwards. To make an XML file – read my blog page here.
Windows 7 does not support USB 3.0 as it does not contain USB 3.0 drivers. However, you can convert a Win7 Install ISO to a .imgPTN file, switch to the .imgPTN partition and then modify the boot.wim and install.wim to add the USB 3.0 drivers. See here for more details. If you just want to add Intel chipset USB 3.0 drivers, you can use the nice Intel utility here.
If the file DEFAULT.XML exists in the same folder as the ISO, then the DEFAULT.XML file will be automatically picked by E2B (E2B v1.B0+).
If only one XML file exists in the same folder, it will be automatically selected.
If you make a .imgptn23 image file, you can place an \autounattend.xml file in the root (inside the .imgPTN23 file). This only works for standard Microsoft Win7, not for All-in-One ISOs/images.
WinHelper Flash drive (only if using non-default non-WIMBOOT boot process)
This only applies if you answer ‘No’ when asked if you want to boot using WIMBOOT… If you are booting Easy2Boot from a USB Hard disk to install from Windows Install ISO files, you may also need a USB ‘WinHelper’ flash drive containing these 3 files –
- AutoUnattend.xml (overwritten by E2B – required for Win Vista and later OS Install ISOs),
- Unattend.xml (overwritten by E2B – required for WinPE ISOs)
- WINHELPER.USB (marker file to find correct USB drive)
These 3 files must be on the root of your USB ‘Helper’ Flash drive . Do NOT modify them – they are modified by E2B automatically. You may find it easier to convert the ISO file to a .imgPTN file. This will allow you to both MBR and UEFI-boot and you will not need a ‘Helper’ Flash drive or an XML file. E2B v1.75 allows you to add .imgPTN files to the \_ISO|WINDOWS\xxxx folders (except for the XP folder).
NOTE: Always run WinContig to ensure all files are contiguous after copying them over (Ctrl+F2 in RMPrepUSB).
Always use unmodified Microsoft Windows Install ISOs – if you use a modified ISO, it may not work. In this case, convert the ISO to a .imgPTN file using MakePartImag