- Cannot UEFI64 boot to agFM menu on some systems – solid cursor and hangs
- Windows 11 – WBEM/WMIC missing error
- Error 6: Too many fragments
- How to Partition a large (>128GB) USB drive
- Installing Easy2Boot or Ventoy on a USB Flash drive always fails!
- E2B menu is not displayed when legacy-booting on some systems
- ‘Windows cannot find the Microsoft License Terms. Make sure the installation sources are valid and restart the installation.’
- SWITCH_E2B.exe will not switch in any .imgPTN file
- .imgPTN23 OpenSuse-based image fails to fully boot with error ” Don’t know how to handle ‘root=live:LABEL=EASY2BOOT’ “
- How to Secure Boot to any payload
- How do I remove the initial, blue ‘Easy2Boot’ start-up banner screen on a legacy boot?
- How do I change the E2B background wallpaper?
- How do I change the order of items in a menu?
- How do I change the menu entry for a payload file?
- Windows Install (AIO) ISO E2B Legacy-boot fails
- Cannot restore E2B after updating Ventoy using the Ventoy2Disk utility
- Install Windows 7 onto modern USB 2 and USB 3 PCs and notebooks
- Development versions of Windows causes Make_E2B.cmd to quit/exit
- ‘ERROR: Windows PATH is bad – no path to WBEM’ and ‘wmic.exe not recognised’ errors
- Windows Setup partition error when UEFI-boot and using ‘wipe disk’ XML file
- How to fix a Windows boot issue
- E2B USB drive is not listed by UEFI BIOS as a boot device
- UEFI: agFM/Ventoy Menu not loading or ISOs not running [on one particular system]
- E2B hangs when loading XP ISO (Step 1)
- ‘Cannot find GRLDR’ BIOS text message on legacy boot
- When UEFI-booting using Virtual Box under Windows, the VM display switches to a very high resolution, how can I prevent this?
- File not found – xx\xx\xx\DISKPART.SCR when running Make_E2B script
- My XML file is not listed by agFM (even though other .xml files are)
- E2B USB drive will not now UEFI-boot to agFM menu (but did before)
- 0xc000000f BSOD error
- 0xc000014c or 0xc0000178 BSOD errors when booting to Windows\WinPE – but only on some systems.
- Windows ISO error: ‘A media driver your computer needs is missing’ or ‘CD\DVD device driver is missing’
- Why am I prompted to select an XML file when installing Windows?
- How do I remove the rotating E2B icon and boiler plate from the menu?
- UEFI64 boot to agFM menu fails with blank\black screen and no messages (maybe with cursor at top-left) but only fails on some computers (others computers will UEFI64-boot OK)
- When the Make_E2B .cmd file runs it just immediately quits and no message is displayed.
- ‘Secure Boot violation’ or ‘Operating System Loader signature found in SecureBoot exclusion database’ – Secure Boot no longer works.
Cannot UEFI64 boot to agFM menu on some systems – solid cursor and hangs
Some bad UEFI BIOSes may hang when booting from the default \EFI\BOOT\BOOTX64.EFI agFM/grubfm boot file.
e.g. Dell Latitude 7400 or some Lenovo or Acer laptops
The solution is to boot from the \EFI\GRUBFM\bootx64.efi file instead.
See also this FAQ to easily fix it using the legacy E2B menu system and the Disable UEFI64 Secure Boot (Blank screen BUGFIX) menu entry.
This can also be fixed by using the UEFI BIOS option of booting to any file and then go to partition 2 of the E2B USB drive.
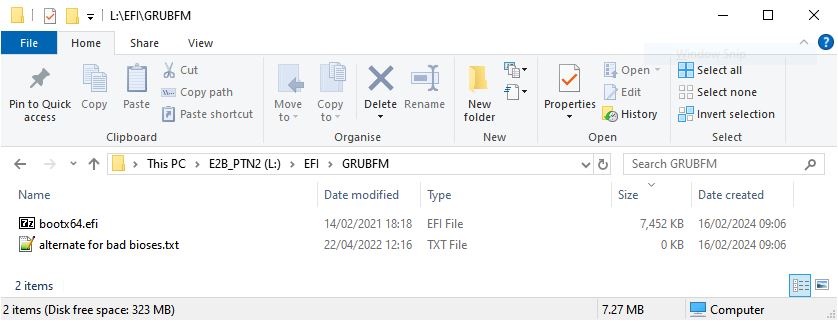
You can change the EFI64 boot file on the E2B drive – Partition 2 permanently as follows:
- Rename the file on the E2B_PTN2 partition from \EFI\BOOT\BOOTX64.EFI to BOOTX64.EFI_ORIGINAL This is just so you can restore it easily later if needed.
- Copy the file on the E2B_PTN2 partition from \EFI\GRUBFM\bootx64.efi to the \EFI\BOOT folder
Note that you may not be able to boot in Secure mode at all if you change this file.
The following is taken from a Reddit post by pRedditory_Traits:
In 'General' under 'Boot Sequence' make sure it is listed. If it is, it probably says something like "UEFI: USB DISK 3.0 PMAP, Partition 2" and if you click on the box that says that, so it is highlighted blue, and click on the 'View' button, it will probably say in the 3rd box labeled 'File Name' as \EFI\BOOT\BOOTX64.EFI and that one DOES NOT WORK on this computer apparently. I'm pretty sure this is the default one used by E2B but I could be wrong, please correct me if so. You'll want to click "OK" or the X to exit that window, and back in Boot Sequence, click "Add Boot Option," it will open another window and MAKE SURE TO GIVE IT A NAME in the Box that says "Boot Option Name:" on the top. Look for the one that ends in "/HD(2.MBR_________" The blank line will be some HEX code like "0x22e2749B" so it could be "/HD(2.MBR0x22e2749B" as that is what mine was, but it will be apparent that it is the second partition. Don't select it, click on the "..." by the 3rd menu option named "File Name:" and it will open yet another window. In that window, at the top, it has a drop-down menu for "File System:" click that and select "FS1:" as opposed to "FS0:" again, noting that it is the 2nd partition. The left-hand pane has Directories, select the one labeled "EFI" and after that, the one labeled "GRUBFM" that is within EFI. There should be a text file there that says "alternate for bad bioses.txt" Ironic right? And RIGHT BELOW that is a file "bootx64.efi" take note of the lack of capital letters on this one. It is the one that fixed my issue and it will hopefully fix yours, too. Select it and click on "Ok" once more, and you're almost there! Double check you set a name under "Boot Option Name:" and select "Ok" yet again.

Now, finally, click on the box with your new Boot Option name, and click the Up arrow slightly to the right of it to move it to the top of the list. Now, hit "Apply" in the bottom-right if necessary and reboot the machine.

Instead of a still, unmoving "_" underscore cursor, it should blink and proceed to booting to Easy2Boot as normal and you should be all set.
Back to Index
Windows 11 – WBEM/WMIC missing error
WBEM/WMIC missing error when running .cmd files or Make_E2B.exe under Windows 11
A new Windows 11 installation may not include the WMIC utility by default. See here
Add WMIC using: Windows 11 – Settings (Winkey+I) – Apps – Optional Features – View Features – WMIC – Install
A Windows restart/reboot may be required after installing WMIC.
Or you can run this batch file to install WMIC.
Back to Index
Error 6: Too many fragments

The file is too fragmented. Run \MAKE_THIS_DRIVE_CONTIGUOUS.cmd to try to fix it.
If this does not work, install the Windows utility Defraggler – right-click on the file and select ‘Defraggler- Defragment’
Back to Index
How to Partition a large (>128GB) USB drive
If your USB drive is over 128GB in capacity, I recommend that you keep Partition 1 and Partition 2 to within 128GB from the start of the drive. This is because many PC and notebook BIOSes have a USB bug where they cannot access sectors past 128GB on a USB drive.
Drives greater than 2TB should not be used. GPT partitions should not be used on the USB drive.
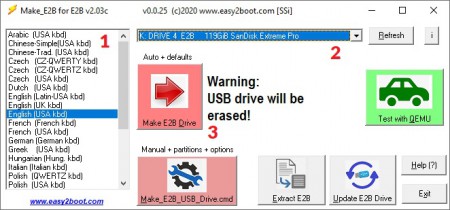
When using Make_E2B.exe, I recommend you use the Gear Wheel button to make a USB drive as follows:
- NTFS 127GB
- FAT32 1GB
- NTFS (rest of free space, use 999 as prompted)
If you want to add bootable payloads to Partition 3, then you can create a similar folder structure to Partition 1. e,g, \_ISO\BACKUP, \_ISO\LINUX, \_ISO\MAINMENU, etc. and then place your payload files in the new folders on Partition 3.
Then copy the file “\_ISO\docs\Sample mnu files\E2B Menus\PTN3_ADD_ALL_FOLDERS_TO_MENU.mnu” to the (Ptn1:)\_ISO\MAINMENU folder on the first partition so that you can list and boot from the payload files on partition 3.
Note that if you wish to boot Windows Install ISOs with XML files from Partition 3, you must also add and edit extra .mnu files to \_ISO\MAINMENU. See the .mnu file “\_ISO\docs\Sample mnu files\Windows\Win10_8_7_ISO_on_PTN3.mnu” for an example. You must also add any .XML files you want to use.
Note that some payload files (e.g. Linux ISOs) will need to be made contiguous. I recommend installing Defraggler and then using it by right-clicking on the ISO file and choosing ‘Defraggler – Defragment’.
.imgPTN files should not be placed on Partition 3 as they may prevent your whole USB drive from being ‘seen’ by a UEFI BIOS or OS once you switch-in the image file.
Both agFM and Ventoy can browse all files on Partition 3, so no special menu is required.
Back to Index
Installing Easy2Boot or Ventoy on a USB Flash drive always fails!
If you are using a cheap USB flash drive (e.g. 2TB USB 3.0 flash drive which cost $8) then the USB Flash drive is obviously a FAKE!
It may report it’s size as 2TB (or whatever is expected – 128GB, 256GB, 512GB, 1TB) but it probably contains only a few GB of slow, faulty flash memory!


You can test the USB drive by filling it full of mp4 video files and then playing the first and last ones, or you can test the USB drive using FakeFlashTest or H2TESTW. See here for details.
Back to Index
E2B menu is not displayed when legacy-booting on some systems
E2B will first display a text-mode screen and show a blue startup banner for 5 seconds when you legacy-boot (not UEFI-boot).
After that it will process the settings in the \_ISO\MyE2B.cfg file and set the required video mode.
If the user has not specified a different graphics mode using the GMODE parameter in the \_ISO\MyE2B.cfg file, then E2B will use 800×600 24/32-bit colour mode by default.
Some graphics adaptors or monitors may have difficulties displaying this mode (perhaps via HDMI or DisplayPort or VGA) and so you may see a garbled or blank screen instead of the 800×600 E2B Main Menu. You can try using the default E2B menu hotkeys below:
- CTRL+F7 – switch to text mode (graphics mode 3) – E2B v2.16+ required
- ALT+F7 – switch to 1024×768 graphics mode (grey background) – E2B v2.16+ required
- CTRL+F8 – restart grub4dos and reload E2B (similar to rebooting but faster)
Note that with some notebooks BIOSes, you may also have to hold down the ‘Fn’ key, if present on the notebook keyboard, at the same time. There is usually a BIOS configuration option to disable this annoying Fn key feature.
You can configure the MyE2B.cfg configuration file to always load in text mode or 1024×768 mode – see here for more details of ‘themes’.
Back to Index
‘Windows cannot find the Microsoft License Terms. Make sure the installation sources are valid and restart the installation.’
If Windows Setup reports this error, it means that an XML file was used but contained no (or the incorrect) Product Key. Some Windows installers require a Product Key to be specified (e.g. Win8, SVR2022, etc,).
You must ensure that a suitable Product Key is used if the install method uses an XML file (e.g. E2B, agFM).
Note that Windows trial or evaluation versions use a different key from the standard generic installation keys. For these trial\evaluation versions you must use the correct Product Key in the XML file. If you cannot find a key that works, then install without using an XML file (e.g. using Ventoy or Rufus) and then run Produkey from NirSoft to discover the Product Key that was used.
Back to Index
SWITCH_E2B.exe will not switch in any .imgPTN file
First ensure you are using the latest version of SWITCH_E2B.exe (included in latest E2B download) and agFM.
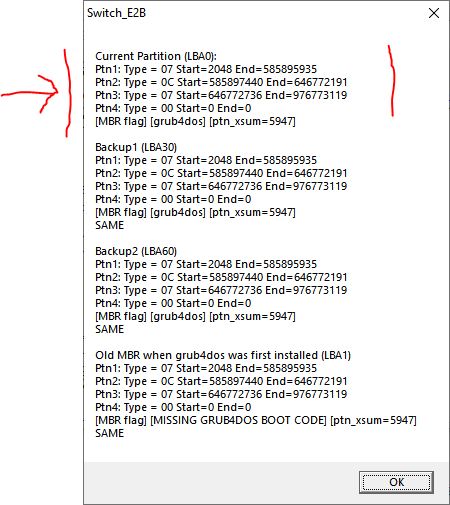
If SWITCH_E2B.exe complains about the partitions being changed, use the ‘Display Partitions’ button to examine the four Primary partition table entries.
If Partition 4 is Type 0 but has a start position that is not 0 then simple boot from the E2B USB drive (legacy or UEFI) to the menu and then quit (or use the menu to select any .imgPTN file). When the E2B\agFM menu loads, it will automatically clear the contents of Partition 4. If you don’t have a system to boot from, then run \QEMU_MENU_TEST (run as admin).cmd from the E2B USB drive under Windows. Once at the MAIN MENU – press F10 to quit – Partition 4 should now be cleared.
LBA30 usually contains a backup of the original partition table.
If you have changed the size/position of any of the partitions on the drive, E2B, agFM and SWITCH_E2B.exe will refuse to switch-in any .imgPTN file.
Check carefully that Partitions 1, 2 and 3 look correct (Use SWITCH_E2B.exe – Display Partitions – Current Partition LBA0. Partition 4 should be all 0’s. if the partitions look correct then run fix30.g4d to fix the backup sector. See here for more instructions.
If the partitions 1, 2 and 3 (in LBA0) look incorrect then use the ‘Restore E2B Partitions’ menu entry in agFM or follow the instructions here.
Back to Index
.imgPTN23 OpenSuse-based image fails to fully boot with error ” Don’t know how to handle ‘root=live:LABEL=EASY2BOOT’ “

If you convert OpenSuse-based ISOs to .imgPTN23 files using the MPI Tool Kit (v0.103 or previous) you may see this error when you UEFI-boot.
This issue should be fixed if you use MakePartImage v0.104 to make the .imgPTN23 file (for UEFI).
Workarounds:
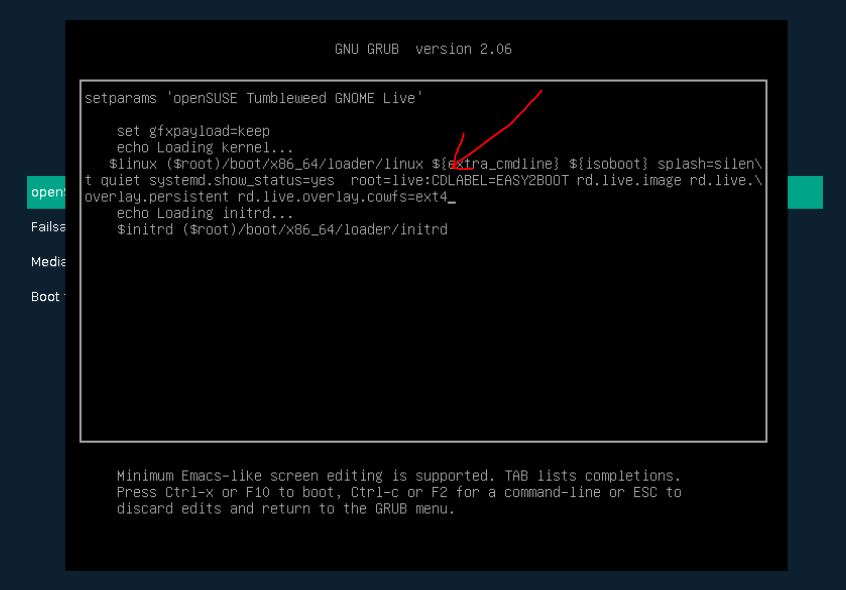
- In the OpenSuse boot menu – select the menu entry and then press ‘e’ to edit it – then change the string LABEL to CDLABEL. Then press F10 to boot. See screenshot above.
- With the .imgPTN23 file switched in, edit the \boot\grub2\grub.cfg file and replace all occurrences of :LABEL with :CDLABEL. This will permanently fix the issue.
- Don’t use a .imgPTN file – just directly UEFI-boot to agFM and then select the ISO file or use ‘Ventoy for Easy2Boot’.
Note: Legacy booting is not supported by the .imgPTN file.
Back to Index
How to Secure Boot to any payload
Secure Booting to a multiboot loader/manager such as grub2 often first boots to an EFI shim boot file which can then load the unsigned/insecure grub2 kernel.
However, the shim which is used (e.g. by Ventoy or agFM) may be blacklisted in the DBx database of your UEFI BIOS NVRAM. This will prevent these shims from being used to Secure Boot.
A Secure Boot system should only boot from signed EFI boot files and should only run signed executable files.
We can convert most bootable payloads such as a bootable USB drive partition (Linux or Windows, etc. made by RUFUS) or a Windows Install ISO or a bootable image or zip file into a .imgPTN23 file using MakePartImage.cmd.
So on Partition 1 of the E2B USB drive we can have many different .imgPTN23 files which will secure boot (e.g. Windows To Go, WinPE, Ubuntu, RedHat, Fedora, etc.). We can select any one of these and Partition 1 will instantly be replaced by the files in that .imgPTN23 file. Note that the filesystem within the .imgPTN23 image needs to be FAT32 because all UEFI firmware can boot from FAT32 partitions (but not all can boot from NTFS partitions).
These .imgPTN23 files can be switched in using SWITCH_E2B.exe (a 32-bit Windows utility) so that you can then Secure-boot from Partition 1. After use, you can restore the original E2B Partition 1 by using SWITCH_E2B.exe again.

You do not need to use another Windows system however if your USB drive already contains WinPE.
- Create a FAT32 .imgPTN23 file and copy it to Partition 1 of your E2B drive
- Run \MAKE_THIS_DRIVE_CONTIGUOUS.cmd to defragment the .imgPTN23 file
- Create a new Primary (not Logical) FAT32 Partition 3 on the E2B USB drive. There should be no Partition 4 – Partition 4 MUST be kept free (unused).
- Copy onto Partition 3 a complete WinPE flat-file set of files – this could be DLCBoot or Strelec or Bob Omb’s WinPE or the special WinPE reduced-size files as detailed in eBook #3 (with download). The WinPE should be UEFI64-bootable and should support WoW64 so that it can run 32-bit Windows applications such as SWITCH_E2B.exe. You can also include a 32-bit Secure Boot WinPE if you think you may need to boot from Secure UEFI32 systems (quite rare).
- You will find a copy of SWITCH_E2B.exe on Partition 2 of the E2B USB drive in the \e2b folder, and it will also be inside each .imgPTN23 file. However, it may be useful to also copy it to the root of Partition 3,
- Now you can Secure Boot to WinPE from Partition 3 and run SWITCH_E2B.exe and select any .imgPTN23 file you like. Then reboot from Partition 1 to run the new payload. When you have finished, Secure Boot to Partition 3 again and restore the original E2B partition 1 using SWITCH_E2B.exe – you can then select a different .imgPTN23 file if you wish.
In this way you can Secure Boot boot to any FAT32 image.
E2B already contains a MEMTEST86 .imgPTN file. Once you have added WinPE to your Partition 3, you can experiment with the MEMTEST86 file to see how this works.
eBook #3 contains details of where you can download ready-made WinPE files from which supports Legacy booting and Secure UEFI32 and UEFI64 booting.
Files >4GB
If your Windows Install ISO contains an install.wim or install.esd file larger than 4GB, you can use Split WinISO to make the .imgPTN23 file.
If you use many Windows Install ISOs or WinPE payloads which have >4GB files in them, you may find it more convenient to simply create NTFS .imgPTN23 files and use the Partition 3 bootmgr to boot from Partition 1.
- Create an NTFS .imgPTN23 file using MakePartImage, copy it to Partitition 1, make it contiguous, select it in SWITCH_E2B.exe and switch it in.
- Run BootIce.exe under Windows and modify the \EFI\Microsoft\Boot\BCD file on Partition 3 to add an entry to boot to the \sources\boot.wim file on Partition 1.

You can now boot from Partition 3 and choose the correct boot option to boot from Partition 1 of the new image.
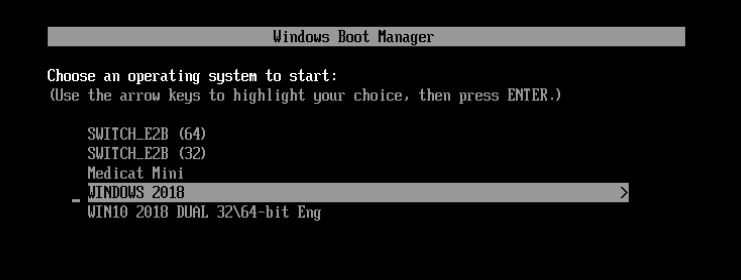
If you select a non-existent entry by mistake, you can simply try all of them until one works.
This menu includes options to boot to the small Ptn3:WinPE images that contain SWITCH_E2B.exe (from eBook #3) and also the Medicat Mini Win10 boot.wim file that has been copied to E2B Partition 1.
Each .imgPTN23 file will require a different entry, so you should include the name of the payload in the ‘OS title’ – e.g. Win10 21H2 Eng.
Note: For best legacy\BIOS boot compatibility, it is best to NOT add any \EFI boot folder to the normal large E2B Partition 1 – it may prevent some BIOSes from giving you a legacy\CSM boot option.
Back to Index
How do I remove the initial, blue ‘Easy2Boot’ start-up banner screen on a legacy boot?
This start-up banner (and the 5-second delay) can be removed by following the instructions in eBook #1.

If you have already made a donation of £5 ($8 US) or more or bought 3 eBooks (but not eBook #1), then please Contact Me for instructions.
More Information
E2B eBooks are available here.
If you are interested in automated Windows install, read eBook #2.
Details on how to make a pure-UEFI multiboot E2B drive (with links to some sample files) can be found in the E2B UEFI multiboot eBook #4.
E2B can secure boot most payloads without the need of MOK manager or special shims by converting your payload (e.g. ISO, VHD. IMG) to a special partition image file. E2B/agFM can then physically switch in that partition image file.
For a fast, reliable USB drive for use with E2B and WindowsToGo, I recommend the Sandisk Extreme Pro USB 3.1 (#ad Amazon affiliate link) or any USB 3 SSD.
Back to Index
How do I change the E2B background wallpaper?
- Place your 800×600 32-bit colour .jpg or .bmp file in the \_ISO folder of the E2B USB drive.
- Launch the \_ISO\E2B_Editor.exe program. This allows you to edit\create a \_ISO\MyE2B.cfg file which can specify the resolution and default wallpaper file.
The menu display mode is determined by the setting in the \_ISO\MyE2B.cfg file. Use 800×600 32-bit colour (or 1024×768 but may not work on older systems). Do not exceed 1024×768 or else grub4dos may crash!
.jpg files must be in standard non-progressive 100% format (use Microsoft Paint to re-save it).
agFM and Ventoy use different menu systems. agFM can use a simple background picture on a text-based menu. agFM and Ventoy can also use a grub2 theme.
Change the other E2B menu backgrounds
To change the background loaded by any E2B menu, you can place a .bmp or .jpg file in the \_ISO folder which has the same folder name as the menu folder.
For instance, if you copy over an 800×600 32-bit colour .jpg file \_ISO\MAINMENU.jpg, it will be loaded when the MAINMENU folder is displayed.
If you have a \_ISO\LINUX.bmp 800×600 32-bit colour file, it will be loaded when the LINUX folder is displayed.
If you have a \_ISO\UTILITIES_MEMTEST.jpg file, it will be loaded when the MEMORY TEST menu is loaded.
Tip: .jpg files will be smaller and quicker to load.
Back to Index
How do I change the order of items in a menu?
E2B will sort the files into alphabetical order.
The easiest way to change the order is by using a sort order prefix – e.g. _010_Ubuntu x86 64-bit.iso
E2B will automatically remove any _xxxxx_ prefix when it displays the filename in the menu.
The agFM and Ventoy menu systems will list the complete filename however.


Back to Index
How do I change the menu entry for a payload file?
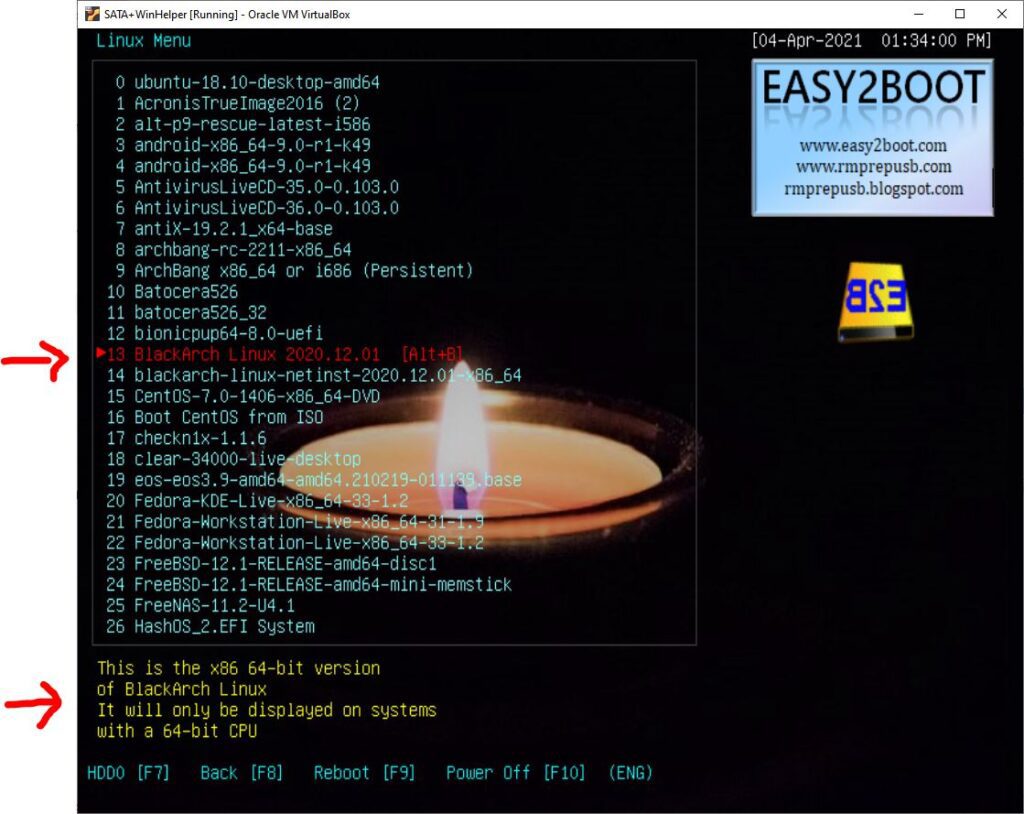
In most cases you can simply rename the payload file – e.g. change blackarch-linux-full-2020.12.01-x86_64.iso to BlackArchLinux 2020.12.01.iso.
Avoid using filenames with special characters such as = & # $ which may cause problems with the E2B, agFM and Ventoy menu systems.
The other alternative is to create a new matching .txt file which has the same name as the payload file
- blackarch-linux-full-2020.12.01-x86_64.iso
- blackarch-linux-full-2020.12.01-x86_64.txt
A UTF-8 encoded text file saved using Windows NotePad if non-English characters are required.
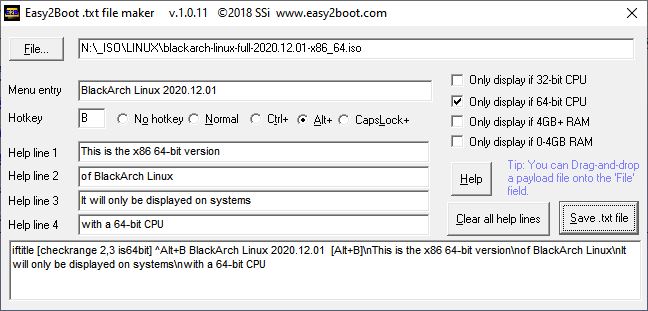
A .txt file can be used to display a different menu title for the iso file of the same name. The contents of .txt file must be a single line – for example:
iftitle [checkrange 2,3 is64bit] ^Alt+B BlackArch Linux 2020.12.01 [Alt+B]\nThis is the x86 64-bit version\nof BlackArch Linux\nIt will only be displayed on systems\nwith a 64-bit CPU
You can use the .TXT file maker utility to help you make the file and you can define a hotkey and up to four lines of help text. You can use \E2B Launcher.exe to run the .TXT Maker utility.
You can see the E2B menu entry below, the ISO filename is no longer listed but the contents of the .txt file are used instead:
Back to Index
Windows Install (AIO) ISO E2B Legacy-boot fails
The file structure of AIO (all-in-one) Windows Install ISOs or other non-standard Windows Install ISOs are often non-standard.
This means they may fail to be recognised by the E2B grub4dos batch file or agFM and may fail to boot to Windows Setup (e.g. 0xc000000f error or similar).
The WIMBOOT process assumes standard Windows boot files are present, so the first thing to try is not to use WIMBOOT.
Instead you can try booting to the Ventoy menu system or use the procedure below if using the E2B legacy menu system:
- If possible – use an E2B Removable USB Flash drive rather than a USB HDD drive (or Corsair GTX flash drive)
- Copy the AIO ISO file to the \_ISO\WINDOWS\WINAIO folder (or one of the \_ISO\WINDOWS\xxxxxxx folders)
- Select the ISO file in the E2B Windows Install menu – you should see a prompt to skip WIMBOOT after selecting an XML file (see below):

4. Press ENTER quickly when you see this message so that WIMBOOT is not used.
Tip: You can make E2B automatically not use wimboot by changing the filename and adding the characters NOWIMBOOT to the filename of the ISO file – e.g. \_ISO\WINDOWS\WINAIO\Windows AIO 7_8_10 NOWIMBOOT.iso.
You can skip the 2 seconds delay and user prompt to use WIMBOOT by adding WIMBOOT to the filename (will then not use WIMBOOT automatically)..
If you are using a Fixed-disk (USB HDD) type of E2B USB drive then the AIO ISO may fail to load the ISO as it may be using a Win7/8 version of bootmgr which only looks on Removable media for the \AutoUnattend.xml file used by E2B for non-wimboot operation. You can add an E2B ‘helper‘ USB drive as well as the E2B USB drive to work around this.
Note: agFM only uses wimboot, so if you are UEFI-booting (or Legacy booting), then try using the Ventoy menu system to boot the AIO ISO.
Back to Index
Cannot restore E2B after updating Ventoy using the Ventoy2Disk utility
If you have made Ventoy official partition images and switched one of them into Partition 2 using agFM then you must NOT then try to update the new Ventoy drive because this will completely format and re-write the entire contents of Partition 2 and will also overwrite the E2B backup sectors located at the start of the E2B USB drive and replace the grub4dos boot code.

This means that you cannot restore the original E2B Partition 2 or the original boot code.
The best thing to do is to backup (copy) all the contents of Partition 1 (the first NTFS partition with the payload files, etc.) and also Partition 3 if you made an extra partition and then remake the E2B USB drive using Make_E2B.exe again and copy the files back onto the USB drive.
If you wish to have the latest official Ventoy version, you must re-make the Ventoy partition images again using the \e2b\update e2b\Make_Latest_Ventoy_Partition_Image.cmd script on the second partition of the E2B USB drive.
Back to Index
Install Windows 7 onto modern USB 2 and USB 3 PCs and notebooks
The standard Microsoft Windows 7 ISO does not contain drivers for modern USB 2 and USB 3 chipsets. This means that when you boot from E2B\agFM\Ventoy, etc. to Windows 7 Setup, the ISO file will not have been loaded as a virtual DVD because Win7 Setup cannot find the ISO file or even see the USB drive!
You will see a message about missing DVD device drivers because Setup cannot find the ISO which is on the USB drive.
If you cannot find a suitably modified Win7 ISO (see Tested ISOs page) then the next best solution is to make a new ISO file with added USB drivers. This is very easy to do using the Asus EZ Installer utility.
- Download the Asus EZ Installer utility from here. If your Windows PC that you are using is running Windows 10, then use the Windows 10 version. If you are downloading the utility on a Windows 7 PC, then choose the Windows 7 version. I chose the Windows 10 version as I am using a Windows 10 PC.

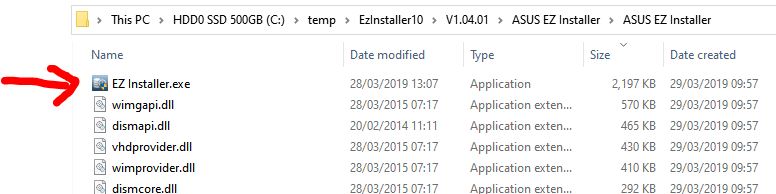
2. Extract the contents of the downloaded .zip file to a new folder on your PC. I used C:\temp.
3. Find the ‘ASUS EZ Installer.zip’ file and extract the contents to the same folder that it is already in – I used right-click – Extract here (7Zip),

4. Run the EZ Installer.exe utility which you will now find in the newly extracted folder.
5. Find your Microsoft Windows 7 ISO file in Windows Explorer and mount the ISO as a DVD virtual drive. I used ImDisk for this but you can right-click on the ISO file in Explorer and use ‘the Windows 10 Mount’ option instead. You should now have the Windows 7 ISO mounted as a new drive with a new drive letter – e.g. N:
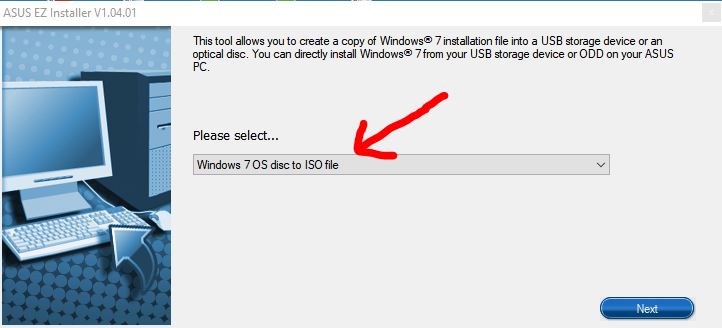
6. In EZ Installer, select the new virtual DVD drive as the source after choosing ‘Windows OS disc to ISO file’

7. Browse to a destination folder where the new ISO can be stored – tick the two check boxes if applicable (I ticked only Compatibility Mode)
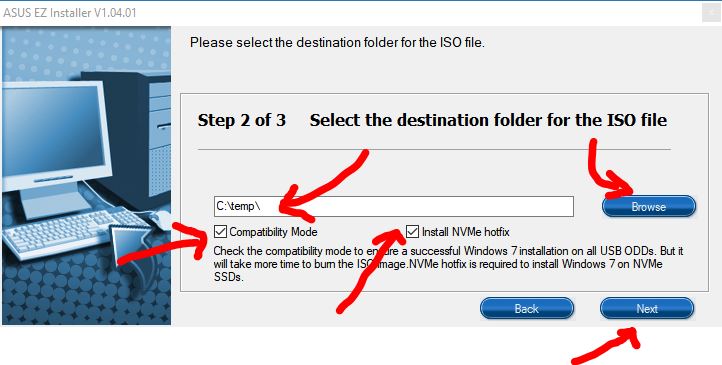
8. Step 3 is the creation of the new ISO file – it will take quite some time, so be patient.
The new ISO can now be copied to the \_ISO\WINDOWS\WIN7 folder on your E2B USB drive and should work on systems with modern USB 2 or USB 3 ports.
Back to Index
Development versions of Windows causes Make_E2B.cmd to quit/exit
Development versions of Windows 10 and Windows 11 do not include working versions of wmic.exe. When you run any .cmd batch file which uses wmic.exe then it will quit the batch file and exit. Please use a release version of Windows when using any E2B .cmd scripts or Make_E2B.exe.
Back to Index
‘ERROR: Windows PATH is bad – no path to WBEM’ and ‘wmic.exe not recognised’ errors
Some Developer versions of Windows 10 and 11 do not contain wmic.exe.
If you have a 2024 or later version of Windows 10 or 11, you may be able to add WMIC by using this command in an Administrator cmd shell:
DISM /Online /Add-Capability /CapabilityName:WMIC~~~~
This command can take 5-10 minutes.
Please use a Release version of Windows or add wmic.exe plus associated files/folders from a full release version of Windows.
To add wmic.exe from a release version, copy the C:\Windows\System32\wbem folder and subfolders (you will need Admin rights). You will also need to add the folder to your Windows Path.
Note: Running SFC /scannow may remove wmic.exe on a developer version of Windows (untested?).
Back to Index
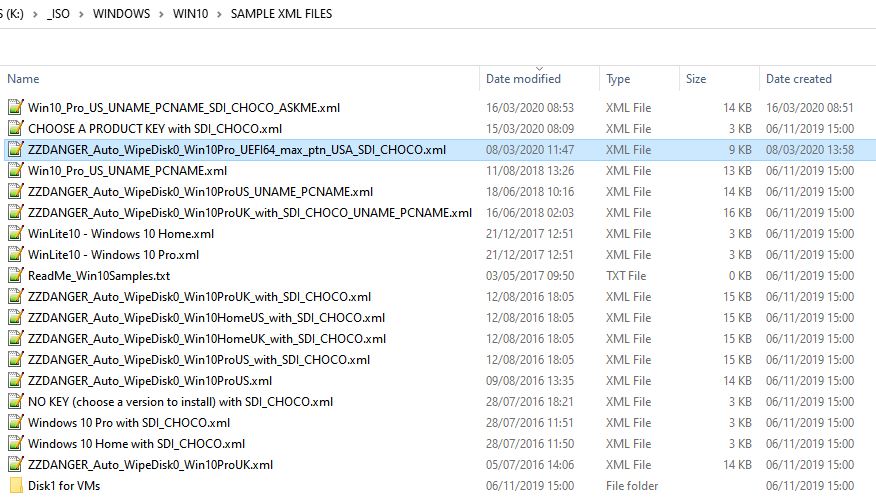
Windows Setup partition error when UEFI-boot and using ‘wipe disk’ XML file
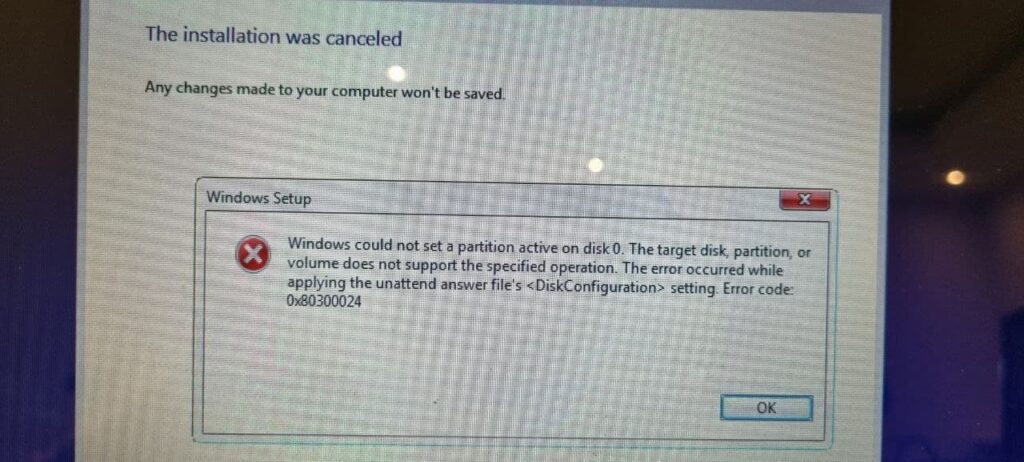
If you UEFI-boot to agFM or Ventoy and use an XML file which automatically wipes the target disk and creates new partitions, then the XML file must create GPT partitions.
Most of the sample XML files in Easy2Boot which wipe the target disk begin with ‘ZZDanger’ and create MBR\Legacy partitions and so are not suitable to use when UEFI-booting.
One sample file for UEFI is provided which auto-wipes the disk and creates GPT partitions and that can be used for UEFI64 (see below).
Windows 10 XML files and Product Keys can also be used with Windows 11.
You can make your own XML files using the XMLtoE2B.exe Windows utility.
More information is available in E2B eBook #1 and eBook #2.
Back to Index
How to fix a Windows boot issue
Scenario: Your Windows PC\notebook will no longer boot to Windows from it’s internal hard disk\SSD.
Procedure:
Legacy or UEFI?
Windows can be booted it two very different ways: Legacy or UEFI.
To repair a Windows installation you must boot from the ISO or Recovery files in the same way that Windows was booted in.
Many systems can boot in both Legacy mode (sometimes called CSM or BIOS or MBR mode) and UEFI mode.
- If your Windows internal system disk (usually the first disk) is a GPT-partitioned disk then your Windows system must have been booted via UEFI.
- If your Windows internal system disk (usually the first disk) is NOT a GPT disk then your Windows system must have been booted via a Legacy BIOS boot.
You can check the partition type using one of these methods:
- In E2B – Utilities menu, use List BIOS Disks – a partition type of 0xEE shows the drive is has GPT partitions.
- In agFM – F3, the Windows disk will show ‘gpt’ type partitions – e.g. hd1,gpt1.
- In WinPE – DISKPART – LIST DISK, there will be an asterisk in the GPT column of GPT disks.


If your Windows disk is GPT you MUST EUFI-boot to the E2B USB drive (typically the agFM menu system will load).
If your Windows disk is Legacy (not GPT) you MUST Legacy\BIOS\CSM boot to the E2B USB drive (typically the E2B menu system will load).
Fixing the Windows system
Note: NEVER set the first boot device as the E2B USB drive – the BIOS boot menu should be set to boot from your internal Windows system drive. Always boot from the E2B USB drive using the BIOSes Boot Select pop-up menu (using a hotkey such as F8 or F12).
- Use the Microsoft Windows Install ISO
a. Boot to E2B\agFM in the correct way – Legacy or UEFI (see above)
b. Select and boot to the ISO
c. DISCONNECT THE E2B USB DRIVE
d. Choose the Repair option – Startup Repair
If you have booted using E2B from a WinPE ISO, ensure the file has a ’01’ file extension – e.g. WinPE.iso01 or WinPE_.iso01.iso.
This ensures that the first internal hadr disk is recognised as the ‘boot device’ and not the E2B USB drive!
Important note: Always disconnect the E2B USB drive once you have booted to WinPE (which loads into RAM). This prevents the USB drive from accidentally being ‘repaired’.
WinPE commands for a quick fix
Get to the Windows Command prompt and try these commands which operate on the ‘boot drive’.
Note: Ensure you disconnect the E2B USB boot drive first in case it thinks the boot disk was your USB drive and installs Windows boot code/files onto it!
This assumes you have a standard Windows system (do not use if you have a dual-boot Linux/Windows system).
- bootrec /fixmbr (will appear to be successfully even if you Legacy-boot to USB and use on a GPT\UEFI disk)
- bootrec /fixboot (will appear to be successfully even if you Legacy-boot to USB and use on a GPT\UEFI disk)
- bootrec /scanos (will appear to be successfully even if you Legacy-boot to USB and use on a GPT\UEFI disk)
- bootrec /rebuildbcd
You can use Diskpart – List Vol to view the volumes and List Part to view the partitions.
Use SEL VOL or SEL PAR to select a partition. Use ASSIGN LETTER=V to assign it a drive letter if it does not have one.
For legacy booting:
bcdboot C:\Windows /s C:\ (Recreates the system partition files on C: with those copied from C:\Windows (change drive letters as appropriate).
For UEFI booting:
bcdboot C:\Windows /s V: /f UEFI (you must use Diskpart to assign the V drive letter to the 100MB EFI FAT32 Hidden partition)
For both Legacy and UEFI:
bcdboot C:\Windows /s V: /f ALL (where you have used Diskpart to assign the V drive letter to the 100MB EFI FAT32 Hidden partition)
To make a Legacy disk bootable, use:
bootsect /nt60 SYS /mbr (Rewrites boot code to the system partition and updates your master boot record with legacy boot code)
Note: Ensure you disconnect the E2B USB boot drive first in case it thinks the boot disk was your USB drive!
Master Boot Record – The first sector on the whole drive and contains a boot loader as well as information about partitions on the drive.
Volume Boot Record (aka Partition Boot Sector/System Partition in MS terminology) – The first sector on a partition containing information to load an operation system.
Quick fix commands for repairing Windows
You can try to fix any corrupted Windows files using:
sfc /scannow /offbootdir=D:\ /offwindir=D:\Windows
A separate DISM command can scan the Windows component store for corrupt files and automatically repair them:
DISM /Image:D:\ /Cleanup-Image /RestoreHealth
Back to Index
E2B USB drive is not listed by UEFI BIOS as a boot device
An E2B USB drive contains an MBR partition on the first sector of the USB drive.
The MBR (Master Boot Record) contains a partition table consisting of four 16-byte entries.
For UEFI-booting, a FAT partition is required, so one of the partitions should be FAT (FAT12/FAT16/FAT32).
The second partition on a typical E2B USB drive will contain a FAT32 partition with the UEFI boot files on it.
The boot file \EFI\BOOT\BOOTX64.EFI is required for UEFI64 booting (or BOOTIA32.EFI for UEFI32 systems).
The UEFI BIOS is more fussy than the old Legacy BIOS about the MBR partition table.
If one or more of the four entries in the partition table is not in ascending order or overlaps another partition entry then the UEFI BIOS will refuse to access the drive and the UEFI shell may ignore one or more of the partition on that drive.
To check the partitions:
- Legacy\MBR boot to the E2B USB drive (tip: you can use QEMU_MENU_TEST (run as admin).cmd under Windows if you don’t have a BIOS system).
- Go to the grub4dos command line (e.g. SHIFT+P – enter password – SHIFT+C)
- On the grub4dos command line type checkptns (hd0) (default is hd0)

Also, on the grub4dos command line type graphicsmode 3 and press ENTER then type display_ptns (hd0) to view the table
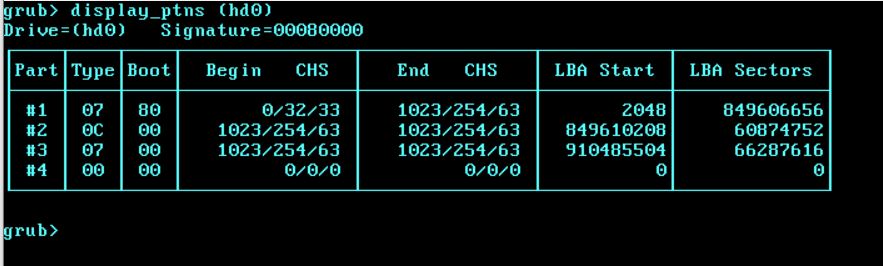
Partitions of Type 0 are ignored by UEFI and Windows.
Note: A typical issue is that you have previously selected a .imgPTN file and it has added/replaced a new partition which is only suitable for Legacy\MBR booting.
In this case, Legacy/MBR boot to the E2B CSM menu and choose the Restore E2B menu option.
Alternatively, type RestoreMBR if you cannot restore the original E2B partitions after using a .imgPTN file.

If all else fails, you can use a disk editor to remove partitions (or use RMPrepUSB to view and edit the MBR).
Back to Index
UEFI: agFM/Ventoy Menu not loading or ISOs not running [on one particular system]
If you have checked the UEFI/BIOS settings and they appear to be correct for UEFI-booting, but when you try to UEFI-boot you find that the agFM menu does not appear or when you select an ISO it does not seem to boot (or the USB drive LED flashes for a while and system hangs), or other strange things occur with agFM or Ventoy, then I recommend you reset the BIOS settings.
Go to BIOS Setup menu and find the ‘Exit’ Menu, then choose the ‘Load Default Settings’ option (or similar) and any other ‘default’, reset or Factory settings options you can see.
Then save the changes and reboot back into the BIOS Setup menu and ensure the settings are correct for Legacy and UEFI booting.
USB Legacy: enabled
Fast Boot: disabled
Boot Mode: Legacy (CSM) – if you want Legacy booting
For Secure Boot, I suggest you clear the DBx keys (if possible), or Restore Factory Keys
Back to Index
E2B hangs when loading XP ISO (Step 1)
It has been reported that some systems hang just after loading the XP ISO into memory during Step 1 XP Install but that earlier versions of E2B do not have this issue.
Try making an E2B USB drive using E2B v1.B1 (you can just click on the ‘Update E2B drive’ button of v1.B1 to change to the earlier version).
If your system works with v1.B1 and not with v2 of E2B, please could you contact me as I would very much like to identify and fix the issue which I think is due to the version of grub4dos (\grldr) that is used. To test this, make a v1.B1 version of E2B and check that it works with your XP ISO. Then replace the \grldr file with the \grldr file from the latest version of E2B and see if XP fails to load. Also try answering ‘N’ for No when it asks you about loading the ISO into memory. Please also report the system make\model and the total RAM in the system. Thanks!
Back to Index
‘Cannot find GRLDR’ BIOS text message on legacy boot
If you are using an E2B USB drive larger than 128GiB and have updated it, the \grldr file may now be outside the 128GiB limit.
Some buggy BIOSes have a USB drive bug and cannot access sectors past 128GiB on a USB drive, that is why I strongly recommend the first partition (and second) are within 128GiB of the start of the disk.
The solution is to remake your USB drive using a smaller partition 1 (below 128GiB) and then copy all your payload files back on (or don’t use systems with buggy BIOSes).
If Partition 1 is less than 128GiB then you may have a corrupt NTFS filesystem or the \grldr file may be missing. First fix the filesystem (e.g. using chkdsk U: /f where U: is E2B partition 1) and then copy all the files from the E2B download back onto the E2B USB drive (overwriting any existing files – your payload files and MyE2B.cfg file will not be changed).
Back to Index
When UEFI-booting using Virtual Box under Windows, the VM display switches to a very high resolution, how can I prevent this?
I use Virtual Box v5 + VMUB.
- UEFI-boot from the E2B USB drive to agFM
- Press F4 and then T to switch the menu system to textmode
- Now press F2 and select your ISO/payload file and boot from it.
If using Ventoy, try pressing F7 for text mode before selecting the ISO/payload file.
Back to Index
File not found – xx\xx\xx\DISKPART.SCR when running Make_E2B script

Please try E2B installer with E2B v2.10b Beta or later.
The bug in Make_E2B_USB_Drive.cmd occured if your %temp% environment variable contains one or more spaces.
Back to Index
My XML file is not listed by agFM (even though other .xml files are)
agFM\grubfm requires that the file extension is lowercase only (.xml) – please do not use any uppercase letters for the file extension.
A file extension of .XML will be ignored by agFM\grubfm.
Your .xml file must be in the same folder as the .iso file. Any folder can be used for the .iso and .xml files but it is best to use the standard sub-folders which are used by E2B and are located under the \_ISO\WINDOWS\ main folder – e.g. \_ISO\WINDOWS\WIN10.
Back to Index
E2B USB drive will not now UEFI-boot to agFM menu (but did before)
If your E2B USB drive was happily UEFI-booting to the agFM menu system before, but now your BIOS refuses to UEFI-boot to it (e.g. it does not offer any option to UEFI-boot to any partition), then the usual reason is that you have accidentally caused an extra partition entry to be added to the E2B partition table.
This can sometimes happen if you are using .cfg or .grubfm files which use the ‘partnew‘ grub2 command and you have made a mistake in the menu code (perhaps not defined the filename of one of the files?).
The easiest way to fix it is to Legacy-boot to the E2B menu – if there is an extra partition added (usually partition 4) then E2B will warn you and allow you to delete it.
Most UEFI BIOSes require that the primary MBR partitions are in ascending order and do not overlap each other. If such an extra partition is added (with a non-zero type number), then the BIOS will ignore the whole disk!
Tip: You can use the Windows utility RMPrepUSB.exe to view the MBR partition table entries ( Drive Info – 0).
Back to Index
0xc000000f BSOD error
If you are UEFI-booting, try both the agFM and Ventoy for Easy2Boot menus.
Try these fixes in this order.
- BIOS setting on PC may need to be set to UEFI: ‘Boot other OS’ instead of UEFI: ‘Microsoft Windows’
- Disable ‘Secure Boot’ in BIOS settings
- If booting a .VHD, .VHDX or .WIM, make sure the filename has no spaces in it.
- Convert the ISO to a .imgPTN23 file using MPI Tool Kit
- If the .imgPTN file still gives same error and a BCD issue is indicated, use BootIce to examine and repair the BCD file
Back to Index
0xc000014c or 0xc0000178 BSOD errors when booting to Windows\WinPE – but only on some systems.
If you find that some systems give BSOD errors but other systems boot correctly when using the same USB drive, this is often an indication of a USB I/O communication problem (hardware issue) with the USB port.
Example: Lenovo IdeaPad 300 notebooks
Frequently, this can be due to signal integrity issues and occurs with high-speed USB 3 drives when connected to a USB 3 port.
Solution:
1. Connect the USB 3 drive to a USB 2 port on the computer.
2. If no USB 2 port is available on the computer, then connect the USB 3 drive to the system using a USB 2 extension cable. This forces USB 2 data rates to be used.
Back to Index
Windows ISO error: ‘A media driver your computer needs is missing’ or ‘CD\DVD device driver is missing’
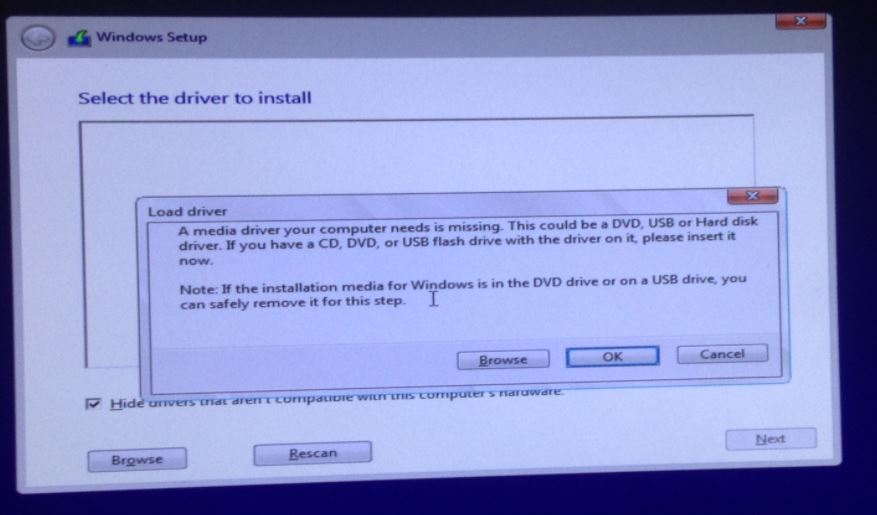
If you see a message asking for a ‘DVD’ or ‘CD’ then this means that Windows Setup cannot find the installation files (i.e cannot detect the E2B USB drive or E2B has not loaded the ISO file as a virtual DVD drive).
Setup is looking for the very large install.wim or install.esd windows installation source file (usually in the \Sources folder) on all drives in the system. If it cannot find this file then you will see this message. If you are booting from a Windows ISO, then the ISO must be loaded as a virtual DVD and given a drive letter so that Windows Setup can find the large Install.wim or Install.esd which is the installation source file.
There are usually two reasons for this:
- Windows Pre-Installation Environment (WinPE) does not contain the necessary USB driver (e.g. USB 3 driver) and so cannot ‘see’ the E2B USB drive.
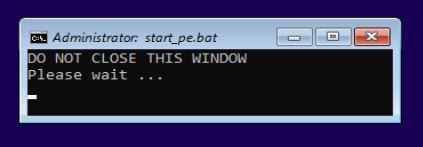
- If booting from an ISO file (using isowin) via E2B or agFM, the Windows Pre-installation start-up will usually load a special blue cmd shell box which will find and load the ISO file as a virtual DVD drive – e.g. Y:.
Windows Setup will then find the install.wim/install.esd file on the new Y: drive. If you don’t see the cmd window run (see below), then you may not have chosen the correct menu or file extension for the ISO, or your ISO is not compatible with that boot method.

Diagnose the problem
- Boot to Windows Setup until you see the error dialogue box – then use ‘Cancel’ button
- Type SHIFT+F10 (hold down SHIFT key and tap F10 key) – if nothing happens, try proceeding onto the next Setup screen.
- You should now see a new Windows CMD console window open up. Type the following commands:
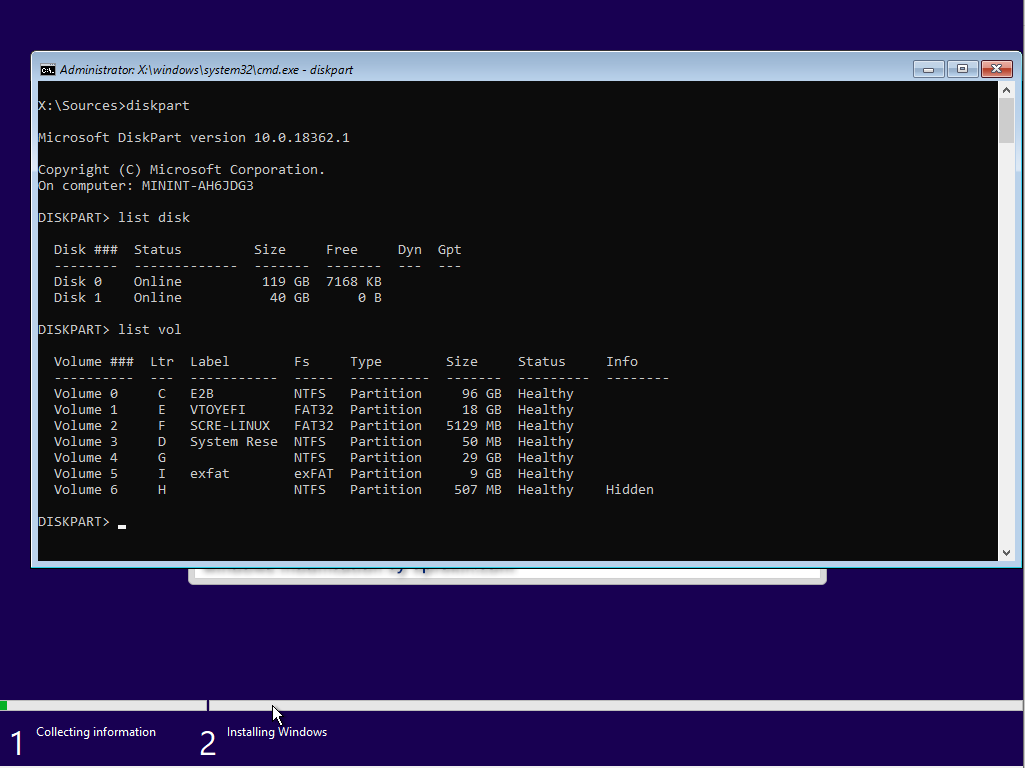
DISKPART
LIST DISK
LIST VOL
EXIT - Look for the USB drive in the list. If it is not present then Windows has not detected your USB drive and so it cannot read the ISO file which is on that USB drive. This indicates that the Windows PE that you have booted from does not contain the USB chipset drivers contained in your PC.
Solutions:
- If booting using the Easy2Boot legacy menu, ensure you have the ISO in the correct \_ISO\WINDOWS\xxx folder. If booting using agFM, ensure you select the .isowin boot option which is for booting Windows ISOs.
- Try a different menu system, e.g. try agFM or ‘Ventoy for Easy2Boot’.
- Try a USB 2 port instead of a USB 3 port – use a rear USB port (or connect the USB 3 drive to the computer using a USB 2 cable). Do not use a USB hub.
- Convert the ISO to a .imgPTN23 file using the MPI Tool Kit
- If the WinPE environment cannot ‘see’ the USB drive, then even a .imgPTN23 file will not work. You will need to modify your ISO by adding USB drivers into the boot.wim file.
- If using E2B on a USB Hard Disk, E2B should use the WIMBOOT method of booting the ISO. If you see the E2B message ‘WIMBOOT NOT USED‘ then you may have an incompatible Windows ISO. Please use a standard Microsoft Windows Install ISO file (or use E2B on a ‘Removable’ type of USB flash drive).
Back to Index
Why am I prompted to select an XML file when installing Windows?
An XML file can contain various ‘unattend’ settings for the install such as the Windows Edition (Home/Pro/Ultimate, etc.), Country, Language, disk partitioning details, core components, etc.
The Home or Pro XML files provided by E2B contain generic Windows installation-only Product Keys which are used to force Windows Setup to install that particular Windows Edition.
Most Windows 10 ISOs actually contain multiple different editions of Windows (e.g. Basic/Core, Professional, Ultimate, etc.).
For instance, if you install Windows from a Windows 8.1 ISO, it will not allow you to continue unless you enter in a valid 25-character Product Key. By choosing the correct XML file, we can force Setup to skip this step because the XML file contains a generic Product Key (e.g. for Core or Professional).
Another example: You have a Dell PC which came pre-installed with Windows 10 Home and you have since upgraded it to Windows 10 Pro. Now you want to wipe the disk and re-install a fresh version of Windows 10 Pro – but every time you try, Setup keeps defaulting to installing Windows 10 Home because the UEFI firmware has the Dell Win10 Home Product Key embedded in it’s firmware! So in this case, you can choose a Win 10 Pro XML file and then Setup will install Windows 10 Pro.
Another example: Some XML files contain all the settings to full automate the installation. Setup will automatically wipe, partition and format the target hard disk and then install a fresh copy of Windows onto it. It will then reboot and complete the OOBE setup, add a User Account (with password) and configure any other settings.
For more details see here or eBook #3.
Back to Index
How do I remove the rotating E2B icon and boiler plate from the menu?
These items are caused by entries in the \_ISO\MyE2B.cfg file.
You can play/remove the animation by pressing F2 when the E2B menu is displayed.
To remove the animation and boiler plate, edit the \_ISO\MyE2B.cfg file using Notepad and delete the STAMP1, ANIMFD3 and ANIMATE lines:
- set ANIMFD3=/_ISO/docs/Templates/Animate/E2B_GIF.ima
- set ANIMATE=0x90=3=9=615=160 (fd3)/frame_0001.bmp
- set STAMP1=0x80=570=23 /_ISO/e2b/grub/E2BPlate.bmp
Instead of deleting the lines, you can just insert a # symbol at the start of each line – see here for more details about stamps and animation.
Back to Index
UEFI64 boot to agFM menu fails with blank\black screen and no messages (maybe with cursor at top-left) but only fails on some computers (others computers will UEFI64-boot OK)
Some computers (e.g. Zyrex or Lenovo IdeaPad s145, new Acer laptops, etc.) may not UEFI64 boot to the Kaspersky Shim EFI file.
This may be due to it being blacklisted in the BIOS (perhaps in the UEFI BIOS DbX blacklist?).
UEFI64 booting may just give a blank screen, a cursor or a dot.
To fix this, we need to remove the Kaspersky shim and replace it with the agFM EFI boot file…
Either Legacy Boot to E2B Main Menu (e.g. using \QEMU_Menu_Test.cmd under Windows or a Legacy system) and use the ‘Disable UEFI64 Secure Boot (blank screen BUGFIX)’ menu entry…

OR
On Partition 2:
- Copy the file \grubfmx64.efi to \EFI\BOOT folder
- Make a copy of the file \EFI\BOOT\BOOTX64.EFI (if BOOTX64.KAS does not already exist)
- Delete \EFI\BOOT\BOOTX64.EFI
- Rename \EFI\BOOT\grubfmx64.efi to BOOTX64.EFI
Back to Index
When the Make_E2B .cmd file runs it just immediately quits and no message is displayed.
The most common reason is that your Windows PATH variable is bad. At the Windows command prompt type (not if XP OS)
where wmic
where find
These should return the path of the wmic.exe and find.exe files which are normally at C:\Windows\System32 and C:\Windows\System32\wbem.
Note that find.exe should NOT be a cygwin version but the windows\system32 version!
If these commands fail, you need to fix the PATH in Windows – see here https://exitcode0.net/adding-wmic-command-to-the-windows-path/ or just run SystemPropertiesAdvanced.exe from an Admin cmd prompt to edit the PATH system variable.
Try running the MAKE_E2B_USB_DRIVE (run as admin).cmd file by just double-clicking on it – you should see the a message to run it as Administrator. Then press ENTER and it should quit.
Now right-click on the same file and choose ‘Run as Administrator’ and answer the UAC prompt – if the script now seems to run very quickly but then aborts with no message displayed, you may have a problem with Administrator access on your system. Did you make any changes to UAC control or any Administrator account permissions?
To debug the issue, find “.\_ISO\docs\Make_E2B_USB_Drive\DebugAll_MakeE2B_Admin.cmd” in the download folder and right-click on it and choose ‘Run as Administrator’ – the batch file commands will now be echo’d to the console – answer any questions if prompted until the console disappears. Now open the e2b.log file that should have been created in the same folder and examine the last lines to establish the cause of the problem or send the e2b.log file to me.
Back to Index
‘Secure Boot violation’ or ‘Operating System Loader signature found in SecureBoot exclusion database’ – Secure Boot no longer works.
Cause: Windows Update has blocked the Kasperksy Boot file used by agFM
Solution:
Go into UEFI BIOS setup options and clear the DBx key blacklist list.
OR – disable Secure Boot in the UEFI BIOS setup options
OR – convert your ISO (or any payload) to a .imgPTN23 file using the MPI Tool Kit (the payload must have a signed EFI boot file and support Secure Booting)
See https://rmprepusb.blogspot.com/2021/01/latest-windows-update-kb4535680-blocks.html
Back to Index