Table of Contents
Add Windows XP
IMPORTANT!
- Use one of the tested 32-bit XP SP3 INSTALL ISOs – see here for download links to recommended XP ISO – other XP ISOs may not work! I suggest you try the 2018 ISO first.
- Do NOT use XP 64-bit ISOs (even if your CPU is 64-bit). XP 64 has very few drivers and it is never used! XP 32-bit will use up to 4GB of memory, has many drivers available and will work just fine.
- You must use the E2B+DPMS version of Easy2Boot (which includes disk drivers which are needed for installing XP 32-bit ISOs to SATA/RAID/SCSI disks).
The DPMS version includes the file \_ISO\e2b\grub\DPMS\Driverpack.ini and the XP drivers in the folder \_ISO\e2b\grub\DPMS\D. - If problems, set the BIOS options for Disk Controller = IDE, not AHCI or RAID. Try BIOS reset to defaults. Use legacy settings in BIOS if available. You may then be able to add AHCI drivers and then switch over the BIOS to AHCI later.
- Use USB 2 ports whenever possible – if your system only has USB 3 ports and you have a USB 3 E2B drive, try connecting the USB drive to the target system using a USB 2 extension cable to force it to use USB 2.
- Windows XP does not work on UEFI-only systems. Windows XP requires a system with the old IBM-compatible BIOS. You must use the E2B legacy menu system to install XP – the agFM and Ventoy UEFI menu systems will not work.
- Window XP is not longer supported by Microsoft and Windows Update and activation may no longer work. Try Legacy Update on your Windows XP OS instead to get the latest drivers and updates.
Unless you use the E2B+DPMS version of E2B, an unmodified, original Microsoft XP SP3 ISO will only be able to install to an IDE drive in the target system because Microsoft XP Install ISOs only support IDE-based systems. However, if you are using E2B+DPMS (E2B with the 32-bit Mass Storage Driver Pack added), then you can install from an XP 32-bit Install ISO onto most IDE/SATA/RAID/SCSI systems (systems aged up to approx. 2015 only – XP drivers for new systems are not available).
BIOS Setup
- Ensure your BIOS is set for CSM\Legacy booting if you have a modern UEFI BIOS.
- Set the Internal Hard Disk mode to AHCI (not RAID). You may need to change the USB option to EHCI – USB 2 (disable XHCI).
- Some modern 2018+ UEFI BIOSes may block access to internal disks when you MBR\Legacy boot from them – there is no way around this – you cannot boot DOS or XP from internal HDDs on these newer systems.
Tip: NEVER set the USB drive as the first boot device in the BIOS Setup menu. The first boot device should always be set to the internal hard disk that is the system’s boot device – otherwise an Operating System may install boot code onto the E2B USB drive (drive 0) instead of the internal disk! Always use the BIOS Boot selection pop-up menu to boot from the E2B USB drive (press F8/F11/F12 or whatever is needed for your BIOS).
Note: Windows Setup will indicate what drive letter it will assign to each partition when you select one of the partitions to install to. If you want to ensure that the XP partition boots as drive C:, then ensure the Active (boot) flag is set on that Primary partition and it is the first hard disk in the system. You can use a disk utility such as Diskpart to make the correct partition the Active partition (or use the grub4dos prompt and the makeactive command – e.g. makeactive (hd1,1) will make the first internal hard disk’s second partition active, because the E2B USB drive will be hd0 under grub4dos).
Possible Errors
- ‘STOP: 0x000000A5‘ error – to fix this, when XP Setup prompts you to press F6 to install drivers, press the F7 key instead.
- ‘STOP: 0x0000007EACPI.SYS‘ error – press F5 instead of F6 and select a different option – also disable ACPI in BIOS settings and update BIOS version.
- Black blank screen when running XP Setup Step 1 – add ‘set E820=0’ to your MyE2B.cfg file to fix buggy Dell BIOSes (E2B v1.B0+)
- ‘STOP: 0x0000007B’ on IDE systems.NTDETECT.COM (e.g. some Dell PCs, ThinkPads or 865GV chipset) – replace ntdetect.com in the ISO with a patched version from here. Problem is caused because it resets the USB controller and so loses access to the USB drive.
- ‘ASMS files missing‘ dialogue box – you must reboot to E2B and choose Step 2 from the E2B XP install menu. Installing XP from E2B is a two-step process.
‘Secret’ XP Setup Function Keys
During Windows Setup, you can use various function keys to activate certain features and commands. The following list details the functions keys, what they do, and when you can use them.
Three keys can be used when Setup is loading and displays ‘Windows Setup’ and you are prompted to press the F6 function key to install third-party small computer system interface (SCSI) and host controller drivers:
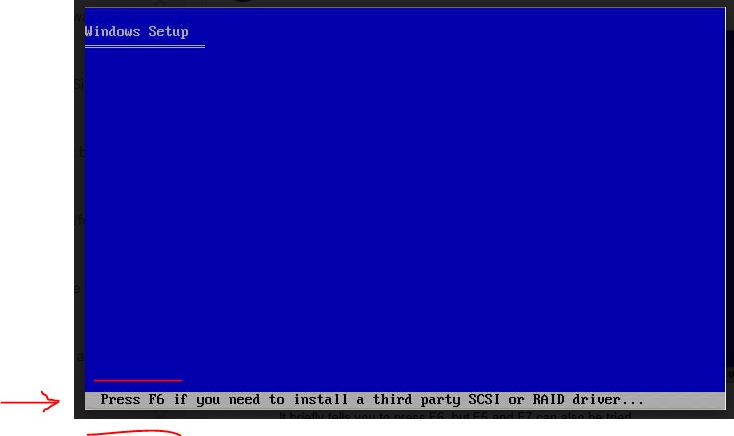
- F5 – For computer type or hardware abstraction layer (HAL) selection (may fix power-off issues during Setup.exe – Step 1)
- F6 – To install third-party SCSI and host controller drivers
- F7 – To run Setup without Advanced Configuration and Power Interface (ACPI)
When the “Welcome to Setup” screen is displayed, the following function keys can be used:
- F2 – To automatically start the Automated System Recovery (ASR) process.
- F10 – To bypass the menu screens and to load the Recovery Console
During graphical user interface (GUI)-Mode Setup, the following function keys can be used:
- SHIFT+F10 – To enable access to a command prompt during GUI-Mode Setup
- SHIFT+F11 – To display “old-style” wizards that give more detail
Note: Your Windows XP Install ISO files must be in the \_ISO\WINDOWS\XP folder.
If it is 64-bit Windows XP, ensure that the numbers ‘64‘ are used in it’s name – this will suppress the DPMS feature (so only works with old IDE systems only – DPMS only works for 32-bit XP)
If there is only one Windows XP ISO in the E2B folder, then that file will be automatically selected.
For a detailed explanation of the Windows XP Setup stages, process, error messages and possible causes – see here.
See also: PhilsComputerLab YouTube video
If your XP Install ISO is ‘special’ and not in standard Microsoft format – e.g. auto-installs or is modified, it is usually best to use WinSetupFromUSB to prepare a bootable USB Flash drive and then you can make a .imgPTN file using MakePartImage from the WinSetupfromUSB Flash drive.
1. Windows XP Installs in two steps using E2B+DPMS (driver pack mass storage files)
If you have an unmodified, original Microsoft 33-bit XP Install ISO, then you will be able to install XP to a target system even if it has an AHCI controller with SATA hard disks, or has SCSI or RAID hard disks. The correct 32-bit XP driver for the target mass storage devices is automatically selected by DPMS. You do not need to press F6 at the start of XP Setup.
If your XP ISO has been modified with driver packs or nLited, or if your ISO has $oem$ folders then it may not install correctly using the STEP1/2 method, so use the WinPE Install menu instead. For more details on how to install XP using DPMS, see the Install XP using DPMS page. You can also use a winnt.sif with an XP ISO for unattended installs – see the ‘Unattended Installs’ page.
See the XP+DPMS page for more information.
2. Windows XP 64-bit installs using the F6 method
Note: Windows XP 64-bit can access >4GB of RAM, however there are very few Audio, Video, USB, and other drivers available for 64-bit XP. Consequently, very few people use 64-bit XP unless they need to run XP as a server (it is not used as a Desktop OS). Service Pack 2 is the latest release of XP64.
The DPMS drivers in E2B+DPMS only works with 32-bit XP. You should install XP64 onto an old system which contains an IDE hard disk (or a SATA disk configured in the BIOS to be in IDE\Legacy mode).
The following instructions only apply if you are using a 64-bit XP Install ISO or if you are not using the DPMS version of E2B. For XP 64-bit ISOs, the number ‘64‘ must be in the ISO’s file name – e.g. Windows_XP_64-bit.iso. If possible, set the BIOS hard disk controller configuration settings to Legacy\IDE (not AHCI/SATA).
Copy the ISO files to the \_ISO\WINDOWS\XP folder.
1. Boot from your E2B drive, press Ctrl-I for the Windows Install menu and then Alt+1 for Step 1.
2. Choose from the list of XP ISOs.
3. You will see some instructions about pressing F6 – on some systems pressing F6 during Windows XP Setup is not necessary. So try without pressing F6 first.
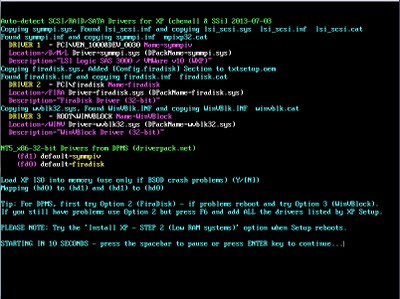
32-bit XP – If you get a BSOD in Step 1 or XP cannot detect your internal hard drive, then reboot and press F6 and select FiraDisk32+WinVBlock32.
64-bit XP – select 64-bit FiraDisk driver after pressing F6. See Tutorial 30 for how XP ISO installs work using FiraDisk, etc.
4. Continue with the text mode setup and allow the system to reboot after the copy-files stage has completed
5. Reboot back to the E2B USB drive (do NOT allow the computer to boot from the internal HDD). Select Ctrl-I and Alt+2 for Step 2.
6. The system should now boot from the internal HDD and continue the GUI Setup phase of the XP install. It may be necessary to confirm the loading of some drivers during this phase.
7. Once XP has been fully installed, you can delete the storage drivers which show up as errors in Device Manager and then install all drivers for your hardware in the usual way. For details on how to install Windows XP using the 2-step FiraDisk method see the instructions in Tutorial #30 (hint: if you get BSOD in Step 1, try without pressing F6).
3. Tablet PC and Media Center Edition
You need to add the \CMPNENTS folder to the CD #1 ISO file and ensure you use the correct Tablet PC or MCE Product Key when installing it.
See here for how to install these from one single ISO.
4. XP ISOs using $OEM$ folder
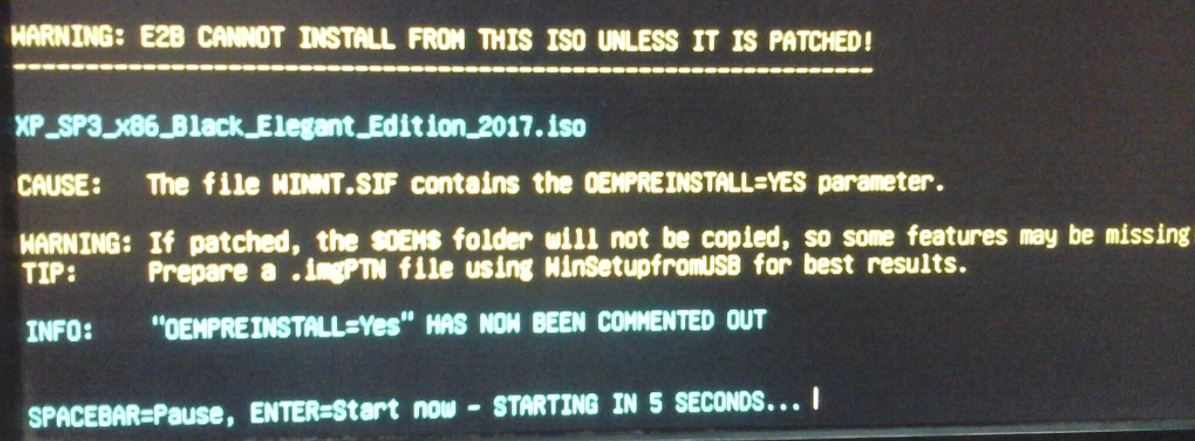
E2B does not support modified XP ISO files which include a \$OEM$\ folder structure and use OEMPREINSTALL=Yes in a WINNT.SIF file.
If E2B finds such an ISO, it will automatically modify the ISO to change it to OEMPREINSTALL=No – this means that the $OEM$ folder will not be used and the XP files will not install correctly.
Solution
To work around this:
1. Create a new USB Flash drive using WinSetupFromUSB and your XP ISO file (Do NOT use the ISO file that is already on the E2B drive because it will have been permanently patched by E2B – use an original copy of the XP ISO).
2. Test that your WinSetupFromUSB flash drive works correctly
3. Drag-and-drop the WinSetupFromUSB flash drive letter onto the MPI_FAT32 or MPI_NTFS Desktop shortcut to make a new .imgPTN file from the USB drive (you will need to install the MPI Tool Kit onto your office Windows system)
4. Copy the .imgPTN file to your E2B USB drive (e.g. \_ISO\MAINMENU or \_ISO\WIN)
Note: A .imgPTN file will not work in the \_ISO\WINDOWS\XP folder.
See the WinNTSetup page for more details.