Table of Contents
How to make a .imgPTN file (MakePartImage.cmd)
How to make a .imgPTN file
- Download and extract the MakePartImage MPI Tool Kit to a folder on your PC (then install ImDisk (included) and WinRAR (not included) + then run CreateDesktopShortcuts.cmd.

The MPI_FAT32 shortcut will be used most often.
2. Convert the ISO file (or UEFI-bootable USB drive or .zip file, DVD\CD or source files) to a partition image file (.imgPTN) using MakePartImage.
Drag-and-drop the ISO file (or source folder or USB drive letter) onto the MPI_FAT32 Desktop shortcut.
Usually, you will require a FAT32-formatted partition image to be made (FAT32 also supports UEFI booting). if you require and NTFS-formatted partition image then use the MPI_NTFS shortcut instead.
Answer N for No if asked to add rEFInd.
For ‘Clover’ question, use default = N
3. If prompted, just hit [ENTER] to accept the default size (or increase the size if there is a ‘not enough space’ error message).
4. Copy the .imgPTN file to your NTFS E2B USB drive (e.g. \_ISO\MAINMENU or \_ISO\WIN or \_ISO\LINUX). – See video above at 9:11.
Note: .imgPTN files copied to the \_ISO\WINDOWS\XP folder are not supported.
5. If you have agFM installed on the E2B USB drive, you should rename the file extension to .imgPTN23 so that partitions 2 and 3 are not removed when you select it later.
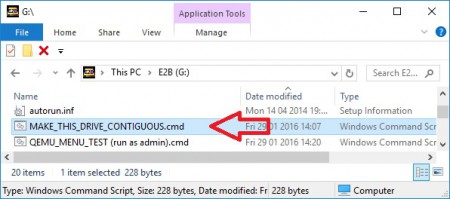
6. Run \MAKE_THIS_DRIVE_CONTIGUOUS.cmd file) to make all files on the E2B drive contiguous.
Note: if you are converting a large Windows ISO which has a file >4GB inside, then instead of MakePartImage, run Split WinISO.exe (ii can be found in the same folder). This utility will convert the large .wim or .esd file into smaller files so that they can be copied to a FAT32 partition. After conversion, Split WinISO will ask you if you want to save the converted files as a new .ISO file or as a .imgPTN file.
Two partition image files
Two partition images can be switched in at the same time – the second image file must have no file extension but an identical filename, e.g.
Ubuntu64.imgPTN23 (on partition 1)
Ubuntu64
The second file which has no file extension should ideally be on the third partition of the E2B USB drive if you want to UEFI-boot. This second file will replace partition 3.
The second file could be (for instance) an ext3/4 formatted volume or a swap partition for Ubuntu – or it could contain another complete Linux OS on a FAT/NTFS/ext volume.
If you only have one or two partitions on the E2B USB drive and want to UEFI-boot to the first image, use an extension of .imgPTN23 if you want to keep the 2nd partition.
Files larger than 4GB on a FAT32 volume
FAT32 partitions can only contain files of a size less than 4GiB per file. Windows INSTALL ISOs can often contain a large INSTALL.WIM or INSTALL.ESD which is >4GiB. You can split the large file inside a Windows ISO using Split_WinISO.exe so that it can be used on a FAT32 volume. Split_WinISO.exe will make a new ISO file or will call MakePartImage.cmd to make a new .imgPTN file.
Notes
NTFS E2B USB drives can UEFI-boot as long as you create a FAT32 .imgPTN file (e.g. using the MPI_FAT32 shortcut).
.imgPTN files are not just for UEFI images, you can use .imgPTN files for normal BIOS booting too (such as Hirens, DLC and All-In-One Windows install ISOs for use with E2B on a USB hard disk). When you boot to E2B and select an .imgPTN file in the E2B menu, it deletes the E2B partition table and replaces the E2B partition entry with the entry for the .imgPTN file. In this way, we now have a completely different partition on the USB drive! If the new partition is a FAT32 partition, then it will support UEFI-booting if the payload contains the required EFI boot files. You can view the new partition in Explorer and even directly and permanently change it’s contents, if you wish.
.imgPTN files can also be mounted as a drive volume by using ImDisk (from Windows Control Panel – ImDisk) and then edited and dismounted (‘Removed’).
ISO files of any size (up to 32GB) can be converted to a FAT32 .imgPTN file, as long as all the files inside the ISO are smaller than 4GB. For instance, a 6GB Windows 10 Install ISO can be converted to a FAT32 .imgPTN file as long as none of the files inside the ISO are more than 4GB in size. You can split the large file inside a Windows ISO using Split_WinISO.exe so that it can be used on a FAT32 volume.
If the .imgPTN file is larger than 4GB, your E2B USB drive must be formatted as NTFS (default) but it will still be possible to UEFI-boot from a FAT32 .imgPTN file.
Tip: To prevent partitions #2 and #3 from being removed from the E2B USB drive when using .imgPTN files, use the file extension .imgPTN23. See the list of file extensions for more supported .imgPTN file extensions.
Special instructions for Windows 7 64-bit UEFI booting here.
Note: You can add Windows Install .imgPTN files to the \_ISO\WINDOWS\xxxx folders (except for the \_ISO\WINDOWS\XP folder) as well as the standard E2B menu folders (E2B v1.75+).
UEFI Secure Boot is supported because there is no extra boot loader used, so if the original payload supports Secure Booting, then so will the .imgPTN file. Only add rEFInd if you need to UEFI-multiboot without Secure Boot (select different .imgPTN files on a UEFI-only system).
*Some UEFI systems (e.g. Fujitsu LifeBook) will not offer the user a MBR\CSM boot option if there are UEFI boot files present on the USB drive. This means that after changing to an .imgPTN file which contains EFI boot files, you may not be able to boot to the CSM Menu and restore the drive back to the E2B menu. For these systems, you must either MBR-boot on a different system, or use a Windows system to run \e2b\SWITCH_E2B.exe to restore the E2B partitions or remove the \EFI folder by renaming it temporarily.
Batch Conversion Tip: You can convert a whole batch of files which are placed in a folder into .imgPTN files by running .\utils\Convert_all_ISOs_to_imgPTN_Files (run as Admin).cmd. Questions are automatically answered using the default answer so no user interaction is required (Windows Install ISO files may require you to answer one question though).
Booting via UEFI
Easy2Boot uses the simple principle that a UEFI system will boot from a .EFI boot file on the first FAT32 partition of a USB drive (MBR or GPT).
UEFI firmware will always look for and boot from \EFI\BOOT\BOOTx64.EFI if it is an Intel 64-bit UEFI system, or \EFI\BOOT\BOOTia32.EFI if it is an Intel 32-bit UEFI system. So what Easy2Boot can do is replace it’s partitions with a FAT32 partition that contains your payload boot files.
Once the new FAT32 partition has been substituted (switched-in), we can UEFI-boot from the USB drive as long as it has the correct .efi boot file(s) on it.
For instance, recent Clonezilla ISOs support both 64-bit and 32-bit UEFI booting – this is easy to check – just look for the two .efi files \EFI\BOOT\BOOTx64.EFI and \EFI\BOOT\BOOTia32.EFI which are inside the ISO file.
If you want to UEFI-boot to an OS or utility, simply check that it has one or both of these files present. e.g. If the bootia32.efi file is not present then it does NOT support booting from a 32-bit UEFI system.
For each payload that you want to add (e.g. Clonezilla, Passmark Memtest86, Fedora, Acronis True Image, Windows 8 Install, etc.) we must make a FAT32 partition image (.imgPTN) file (though is some cases we can have both FAT32+NTFS partitions by using two image files).
Watch this YouTube video for more information.
Note: By adding rEFInd and using a second WinPE image, you can select a different UEFI .imgPTN file on a UEFI-only system.
SWITCH_E2B

The Windows 32-bit app. SWITCH_E2B.exe will allow you to switch in an imgPTN file before booting from the USB drive.
It can also restore the original E2B partitions after a .imgptn file has been switched in.
For Win7/8 users, it can also change the partition order and switch Partition 1 with Partition 2 so that you can access the second partition’s contents under Windows. You should always restore the original partition order before booting from the drive.
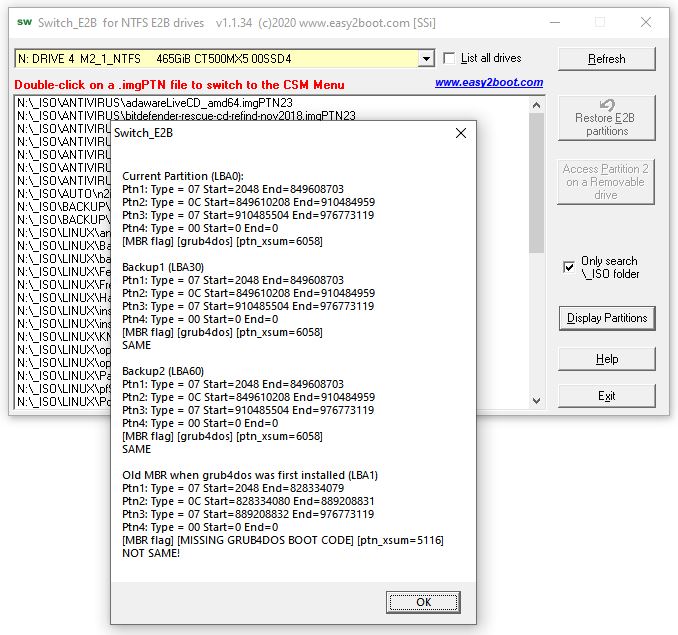
Display Partitions – shows you the current partitions on the USB drive and the backup sector contents. E2B keeps a backup of the original MBR (LBA0) in sectors LBA30 and LBA60. Grub4dos keeps a backup in LBA1. The partition table entries in these sectors are also displayed. Typically LBA30 is used when restoring the original partition table.
Troubleshooting MakePartImage
If ImDisk creates a virtual image but fails to dismount it, you will need to use ImDisk Manager in Windows – Control Panel to remove the virtual drive.
If the copy process fails due to insufficient space, create a larger image next time! Typically large ISO files require more extra space (+120MB).
If you wish, you can extract all the files inside the ISO to an empty folder (e.g. using 7Zip), then drag-and-drop the folder onto the MPI Desktop shortcut – that way you will not have any size problems.
It is always best to test E2B and .imgPTN files by booting on a real system!
Note: When running from a live partition, please shutdown or reboot ‘nicely’ or you may corrupt the files inside your image file!
ERROR: No Grub4dos installed to MBR of this drive!
To use .imgPTN files, you must install grub4dos into the first sectors of the disk (MBR install) – simply run RMPrepUSB and click the ‘Install grub4dos’ button and click ‘Yes’ to install grub4dos to the MBR.
Disk contents not changed when viewed in Windows
If you have changed partitions using an .imgPTN image inside a VM and then exit the VM, you may find that Windows Explorer does not show the new partition contents (i.e. it still shows the original contents even though you have changed the disk using a VM). To fix this, eject and unplug the USB drive and then reconnect it. Alternatively, use the Windows Disk Management Tool (diskmgmt.msc – use RMPrepUSB – Ctrl+K) and select Action – Rescan Disks.
Cannot boot to the CSM Menu in non-UEFI mode
If you find that one type of system will not boot to the CSM menu and you cannot return the USB drive back to the E2B menu, try renaming the .imgPTN file to .imgPTN23A. Ensure that your E2B drive (when in normal E2B-mode) has two or three partitions (check using RMPrepUSB – Drive Info – 0).
If you get a ‘Missing MBR Helper’ message when booting from E2B
If you are using an emulator (VBox or QEMU), this may be due to the VM getting confused by the change of partitions – there may actually be nothing wrong with the USB drive. Test the drive on a real system or use a different VM (e.g. if VBox is giving the error, see if it boots using RMPrepUSB-QEMU). Try unplugging and re-connecting the E2B drive. If this still fails, use RMPrepUSB to install grub4dos to the MBR and copy over the grldr file if it is not already present (eject and replug the USB drive first). If E2B says that the file is not a .imgPTN file or displays ERROR 60: file not contiguous or corrupt – run WinContig on the drive (RMPrepUSB – Ctrl+F2) to make all files contiguous.
Windows To Go boot BCD errors
If you are booting Windows To Go and have moved or copied the .imgPTN file, you will find that the BCD is no longer valid and so will get a BSOD error. This is because the Disk Signature of the E2B disk is set to start address of the .imgPTN file. If you move the file, it’s start position will change and so the Disk Signature will change when you switch to it. To fix this, switch to the .imgPTN partition and run bcdboot or BootIce to fix the BCD(s).
Booting from .imgPTN images
The E2B USB drive can be NTFS or FAT32. Use RMPrepUSB to format it. One of the USB disk sectors at LBA 30 or 60 need to be unused (it will be checked).
It must have the E2B files on the first partition or second partition. It can have a second partition (and even a 3rd partition), but the fourth primary partition must be empty. You must install grub4dos to the MBR of the E2B drive (grub4dos can also be installed to the PBR in addition to the MBR).
- When you select an .imgPTN file, E2B will backup the MBR sector to LBA 30 and 60 (if unused). For UEFI booting you must use a FAT32 image file. The screen will indicate if any UEFI boot files are present in the image (and thus may support UEFI booting).
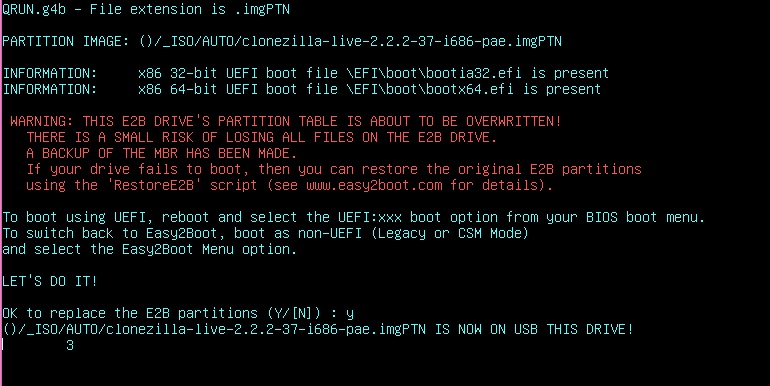
E2B will warn you before updating the MBR of the USB drive!
This prompt can be suppressed by using the .imgPTNAUTO file extension or using set AUTOCSM=1 in your \_ISO\My_E2B.cfg file.
E2B will then erase all 4 partition entries (though ptn 2 & 3 can be preserved if you use a .imgPTN23 file extension) in the USB drive partition table and replace the first partition table entry with a partition entry pointing to the .imgPTN file, and then switch to the new partition and display the CSM menu, as below:
- At this point the E2B USB drive contains a single partition which points to the new image (your original E2B partition table entries have now been backed up and erased!).
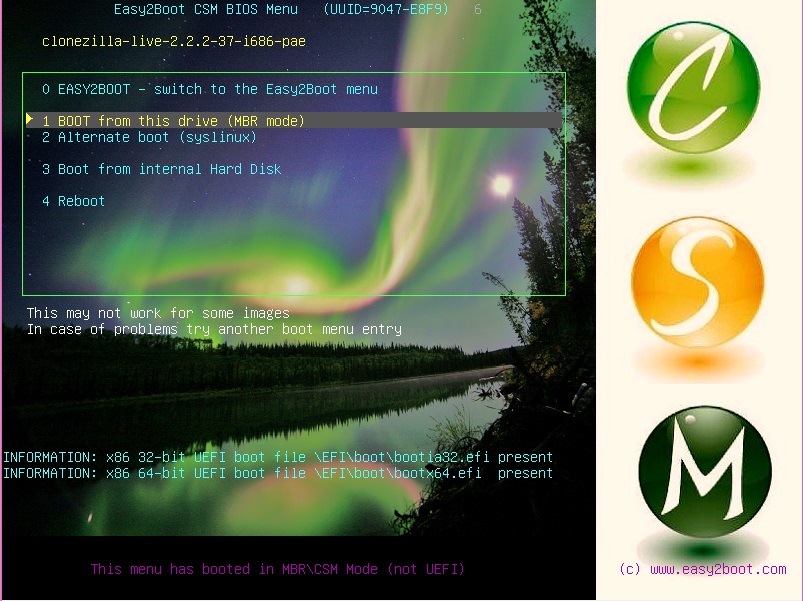
CSM Menu
- You may be able to run the payload contents in MBR mode.
- You can ‘Switch’ the drive back to the normal E2B menu (this will restore the original MBR and original contents of the E2B drive) – no reboot is required.
- If the ‘1 BOOT’ option doesn’t work, try another one if present (e.g. the ‘Alternate syslinux’ or grub menus)
- If a Clover menu option is displayed, you may be able to boot directly to the UEFI boot files in UEFI mode
- To boot to the USB drive in UEFI mode – choose Reboot. If you select UEFI boot mode in your BIOS menu for the USB drive, your USB drive will immediately boot from the payload files in UEFI mode.
Note: If you see the CSM menu then you didn’t boot in UEFI mode! - To return the E2B USB drive to normal E2B mode, boot the drive in MBR\CSM BIOS mode to the CSM Menu and choose the ‘Switch drive back to Easy2Boot’ menu option. The E2B menu will reload after the original drive partitions are restored – no reboot is required. You can also run the \e2b\RestoreE2B (run as admin).cmd file or the \e2b\SWITCH_E2B.exe utility from Windows.
Note: You can also test-boot the USB drive using VirtualBox+DavidB’s VMUB utility to swap between E2B Menu and CSM Menu modes.
Troubleshooting UEFI Mode
- If you cannot get the E2B image to boot in UEFI mode (you only get the CSM menu) then check the image is FAT32 and has either a \EFI\boot\bootx64.efi file or a \EFI\boot\bootia32.efi file present. If not then the BIOS won’t boot from it in UEFI mode or even give you that option! If your system has a 32-bit only CPU, then the bootia32.efi file MUST be present. If your system has a 64-bit CPU, then a \EFI\boot\bootx64.efi file is normally present (for Intel x86 systems) – note however that some systems which have a 64-bit CPU actually have a 32-bit UEFI BIOS and so will only boot 32-bit EFI boot files (typically these systems have a 32-bit version of Windows pre-installed even though they have 64-bit CPUs) – for a 32-bit UEFI system, the \EFI\BOOT\BOOTIA32.EFI file is required.
- If the CSM boot menu does not appear, and/or you cannot return the USB drive to the Easy2Boot normal menu mode:
1. Use QEMU in RMPrepUSB to boot from the USB drive and choose the ‘Switch to E2B’ option. If this does not work then go to Step 2
2. Unplug and re-connect your E2B drive. From Windows, run RestoreE2B (run as admin).cmd or SWITCH_E2B.exe utility which you will find in the MakePartImage MPT Tools download (run as admin). The same file may also be found on the E2B drive under \e2b.
- If linux does not fully boot on a VM such as VirtualBox, this is probably due to a ‘media=usb’ parameter being added by MakePartImage – it should work on a real system (but on a VM, the USB drive is emulated as a hard disk so linux cannot detect a USB drive as a USB drive). If you want it to boot on a VM, change the ‘media’ parameter in the \EFI\Boot\*.conf file to remove it or set it to look for a hard disk. Tip: Often removing the ‘media=usb’ parameter will allow it to boot on both a hard disk and a USB drive.
Linux UEFI-Mode booting
For most linux ISOs, just run MakePartImage using the ISO file as the source file and make a new .imgPTN file. Alternatively, some linux distros like Fedora, provide utilities to make a USB UEFI and MBR-bootable Flash drive. e.g. Fedora Live-USB Creator. Use a different, spare USB Flash drive as follows:
1. Create a working USB Flash drive using Live-USB Creator (no persistence)
2. Test it to make sure it works
3. Run MakePartImage and use the USB drive (e.g. specify H:\ if the USB drive is drive H:) as the Source to create an .imgPTN image. You can also just drag-and-drop the USB drive icon onto the MPI_FAT32 Desktop shortcut.
4. Now copy the .imgPTN file to your E2B USb drive.
Or you can…
1. Boot from the E2B drive and switch to the Fedora.imgPTN image by selecting it in the menu (this can be done using a VBox+DavidB’s utility (recommended!), on a real system – or – using the RMPrepUSB – QEMU button or VBox alone and then unplugging and reconnecting the USB drive to cause Windows to see that the partition has changed.
2. Quit the VM (or reboot to Windows if you used a real system) and connect the E2B drive to a Wiindows system. You should see the contents of the Fedora files (e.g. \EFI, \ISOLINUX, etc.) on the E2B USB drive.
3. Delete all the folders on the E2B USB drive image (e.g. isolinux, EFI folders) EXCEPT for the menu.lst, grldr and \e2b folder.
4. Run Live-USB Creator and select the Fedora ISO and use a different, spare, empty FAT32 USB Flash driveas the target – do not select any persistence.
5. Copy the files over from the spare USB Flash drive to the E2B image to update the xxxx.imgPTN file contents.
6. make sure the Volume Name (right-click – Properties) of the E2B drive is the same as the source USB drive (e.g. ‘LIVE’) or change the syslinux parameters to match.
Some menu systems use UUID (e.g. for persistence) – you should look at the .cfg and .conf files for any mention of UUID and change the value to match that of the image. When you use the CSM menu, it will show you the volume UUID at the top of the menu – e.g. UUID=E68A-1902.
Linux MBR\CSM-Mode booting
If MakePartImage sees a \syslinux folder, it will install the syslinux bootloader into the image. The ‘Boot from this drive in MBR mode’ menu option should then boot to the linux image correctly.So if you make a working USB Flash drive (e.g. using Live-USB Creator) you should be able to use MakePartImage to make a working .imgPTN image file from it which will boot to the syslinux menu.

If the #1 Boot menu or ‘Syslinux boot’ menu entries do not work (e.g. ‘COM32R error’), use MakePartImage.cmd to re-make the .imgPTN file (not MPI_FAT32 or MPI_NTFS) and choose a different version of syslinux – e.g. recent versions of linux may use Syslinux Version 6. MakePartImage should also successfully convert most ISOs directly to a working, bootable MBR partition image (e.g. android_x86, bitdefender (some versions only!), Fedora 17/18/19/20, dsl, PMagic, Sabayon, Lubutu, Ubuntu, Zorin, korora, etc.). MakePartImage attempts to convert the parameters in the config files and install syslinux for you. Normally, you just need to accept the defaults.
If it does not boot to the syslinux menu then you may need to add an extra grub4dos entry to the bottom of menu.lst file inside the image. As an example of a menu (although Fedora 20 converts perfectly OK directly from an ISO file)…
1. Boot from the E2B drive and switch to the Fedora.imgPTN image by selecting it in the menu (this can be done using a VBox+DavidB’s utility (recommended!), on a real system or using the RMPrepUSB – QEMU button or VBox alone and then unplugging and reconnecting the USB drive to cause Windows to see that the partition has change)
2. Quit the VM (or reboot to Windows if you used a real system) and connect the E2B drive to a Wiindows system. You should see the contents of the Fedora files (e.g. \EFI)
3. Edit Menu.lst and add a BIOS boot option – note that you should use LABEL not CDLABEL and the Volume label will always be EASY2BOOT unless you have changed it – e.g.
title Fedora\n Boot to Fedora in MBR mode
kernel /isolinux/vmlinuz0 root=live:LABEL=EASY2BOOT rootfstype=auto ro rd.live.image quiet  rhgb rd.luks=0 rd.md=0 rd.dm
initrd /isolinux/initrd0.img
If you have used Live-USB Creator to make the files, change the isolinux folder entries in the above example to syslinux. You will normally need a \syslinux folder and \syslinux\syslinux.cfg
Some menu systems use UUID (e.g. for persistence) – look at the .cfg and .conf files for any mention of UUID and change the value to match that of the image. When you use the ‘Boot from this drive in MBR mode’ menu option, it will tell you what the UUID is -e.g. UUID=E68A-1902.
For persistence – If there is a \LiveOS\overlay-LIVE-xxxx-xxxx file, change the name of the file so that LIVE matches the volume label and xxxx-xxxx matches the UUID (as shown at the top of the CSM menu).
What does MakePartImage.cmd do?
The image file made by MakePartImage is a sector-by-sector copy of a whole partition starting at the Partition Boot Record.MakePartImage can use either a folder, whole drive or ISO file as the payload source.If you have a working USB Flash drive that contains a single partition, MakePartImage will make an image of it, but you can resize it (e.g. If an 32GB USB Flash drive contained 2GB of files on a 32GB partition, you can make a 2GB .imgPTN file from it, instead of having to make an image of all 32GB). MakePartImage…
- Creates a virtual ram drive with a ‘backing file’ of the size and name that you specified, using ImDisk
- Formats the new virtual ram drive (as NTFS or FAT32)
- Copies the source files to the ram drive (if a file is specified then it invokes 7Zip to extract the files from it)
- Copies over some grub4dos files required for the CSM Menu
- If a \syslinux folder is detected, then syslinux is installed to the PBR so that the image will boot to syslinux in BIOS mode. Also it will copy the isolinux folder over and rename isolinux.cfg to syslinux.cfg.
- Sets a Volume Label of ‘EASY2BOOT’ for the ram drive. This can be changed by the user before dismounting the ram drive.
- Warns the user about UUID= and LABEL= strings in .cfg, .conf and .lst files (useful for linux ISOs as you may need to edit these files before dismounting the image) it will then proceed to automatically convert any parameters in syslinux cfg files for use on a USB drive (see section above).
- Dismounts the ram drive and saves the contents to the .imgPTN backing file and launches an Explorer window to display the image file that was created.
Grub4dos and the menu.lst file that is added to the image, allows you to restore the original E2B MBR. Without this, the drive would always be seen as a single partition containing only the files in the .imgPTN image file. If a menu.lst file already existed in the source, it will ask you if you wish to combine them and you can edit the menu.lst file in the mounted ram drive before you dismount it and save the image. The image files can be remounted using ImDisk at any time and edited and saved by unmounting them. Alternatively, you can boot to E2B and select the .imgPTN file to switch disk images. Then you can edit the files on the USB drive. The changes will directly alter the .imgPTN file contents. When an E2B USB drive is in the CSM mode, you must not use a partition manager to move or re-size the partition as this will probably destroy many or all files on the E2B drive!
Please note: Once you ‘switch-in’ a .imgPTN file, it will replace the E2B partition. To restore the original E2B, MBR-boot and select CSM Menu 0, or run \e2b\SWITCH_E2B.exe – Restore E2B Partition(s) under Windows.
How to use two partition images
E2B will recognise any valid E2B file that starts with the file extension .imgPTN (not case sensitive). If a second file exists in the same folder which has the same file name but no extension, then E2B will also change the MBR partition table so that the 3rd entry points to that file:
\_ISO\LINUX\fred.imgPTN
\_ISO\LINUX\fred
fred.imgPTN >> ptn #1 (must contain E2B MPI files)
fred. >> ptn #3
The partition image #3 can contain any filesystem (NTFS, ext3, etc. or even be unformatted). It could be used as a persistence or swap area.
You can also use the extra partition to install a full linux OS into (e.g. KALI).
Note: SWITCH_E2B.exe will also switch-in both partition images (if present).
You can also place the auxiliary file on the 2nd partition (E2B v1.B0+).
Ptn1: \_ISO\LINUX\fred.imgPTN
Ptn2: \_ISO\fred
If UEFI-booting, the .imgPTN file must precede the other file, otherwise a UEFI BIOS will not ‘see’ the disk as ‘valid’.
By placing the second file on the second partition, it will always be in the correct order.
SWITCH_E2B.exe will attempt to re-order the two files if they are in the wrong order for UEFI-booting.
Note that for UEFI-booting, the partitions on the E2B USB disk must be in ascending order (Partition 2 must start after Partition 1, Partition 3 must start after Partition 2. This is not an issue if you use .imgPTN as a file extension because the existing partition 3 will be removed, however, if you use an extension of .imgPTN23 and have a second image file, then the second image file must be located on Partition 3 of the E2B USB drive, e.g.
Ptn1: \_ISO\MAINMENU\xxxx.imgPTN23
Ptn2: agFM\Ventoy boot partition
Ptn3: xxxx image file (or \_ISO\MAINMENU\xxxx)
All image files must be contiguous.
X4 (E2B v1.B0)
You can specify a second partition image using an X4 suffix – e.g. fred.imgPTNX4doris.
This will cause the file to be loaded as partition 1 and the file ‘doris’ to be loaded as partition 4.
The file doris is searched for in this order:
\_ISO on partitions 2 or 3, the same file as the .imgPTN file, in the \_ISO folder on partition 1.
.imgptnREP3 files
Files with a .imgptnREP3 file extension should be on the third Primary partition of the E2B USB drive. When selected, it will replace the existing Partition 3 with the contents of the file.
For instance, you could have a WindowsToGo.imgptnREP3 file, switch it in, and then secure-boot to Partition 3. Or you could have a Ubuntu.imgptnREP3 which contains an Ubuntu OS. Or you could have a UbuntuPersistence.imgptnREP3 which can be used as a persistence partition. Or you could have a NTFS_EFI.imgptnREP3 where the file contains a copy of the Rufus Partition 2 which contains an NTFS EFI driver, e.g.
Partition 1 – NTFS – Windows VHD file + BOOTX64.EFI + BCD + boot.sdi
Partition 2 – FAT32 – agFM
Partition 3 – FAT – Rufus NTFS EFI signed driver
If you Secure boot to Partition 3, it will load the \EFI\BOOT\BOOTX64.EFI file on partition 1 and boot to the Windows VHD.
agFM can be used to browse to any .imgptnREP3 on Partition 3.
If you want to also be able to select a .imgptnREP3 file from the E2B menu system, you must first make a .mnu file for it and place it in the \_ISO\MAINMENU folder – see “\_ISO\docs\Sample mnu files\E2B Menus\PTN3_IMGPTNREP3_MENU.mnu” for an example menu.
SWITCH_E2B.exe can also switch in .imgptnREP3 files.
Note: If the .imgptnREP3 file is on Partition 1 instead of Partition 3, then when the file is switched into Partition 3, the partitions will be not be in ascending start position order – although this is not a problem for legacy BIOSes, this will cause a UEFI BIOS to completely ignore the USB drive (invalid partitions). This means you will not be able to UEFI-boot to ANY partition on the E2B USB drive!