Table of Contents
Useful things to know about UEFI
How do I UEFI-boot from E2B?
With E2B v2 + agFM, you can UEFI-boot to the agFM grub-based menu system on the 2nd partition and then select a payload file.
- Insert E2B USB drive into USB port
- Switch on the system
- Press repeatedly the BIOS Boot Selection key (e.g. F8, or F10 or F12 – depends on BIOS)
Do NOT set the first boot device as the E2B drive or change the BIOS boot order) - Select the EFI or UEFI boot option for the USB drive

From the agFM menu, if ‘Ventoy for Easy2Boot‘ has been added, you can also launch the Ventoy menu system.
A signed UEFI64 Secure Boot ‘shim’ has been added to the agFM files on Partition 2. If Secure Boot is enabled on your system, you should still be able to UEFI64-boot, however the DBx BIOS blacklist may contain an entry to specifically block the ‘shim’. In this case you can do ONE of these things:
1. Disable Secure Boot
2. Go into your BIOS settings and clear the DBx blacklist database
3. Convert your secure-boot ISO (payload) to a .imgPTN file and switch-in the .imgPTN file
E2B and agFM also supports .imgPTN Partition Image files. So to UEFI-boot, you can instead convert the ISO (or payload source files) into a .imgPTN file using the MPI Tool Kit. You then add the .imgPTN file to your E2B USB drive – the original .ISO file is not required to be on the E2B drive. You can then boot to the E2B or agFM menu and select the .imgPTN file or use the _ISO\SWITCH_E2B.exe utility to select the .imgPTN file (see here).
This will remove the E2B partition #1 and replace it with a FAT32 partition (which contains the contents of the .imgPTN file).
You can then both MBR-boot or UEFI-boot (including Secure Boot) from the new partition on the USB drive.
You can boot to linux, Windows and other payload types via UEFI, in this way.
How can I have a multiboot USB drive that will boot to UEFI and MBR mode?
The easiest and most versatile way to UEFI-boot is to add a second FAT32 partition containing the agFM boot files. You are prompted to add agFM when you make a new E2B USB drive.
An alternative is to switch-in a .imgPTN partition image file. This allows you to directly UEFI-boot (even Secure Boot) from the E2B drive.
You can select a .imgPTN file from the menu system or use SWITCH_E2B.exe under Windows or WinPE to select any image from the hundreds of .imgPTN files that can be copied to your E2B USB drive.
Gotchas
- A FAT partition is required for UEFI booting (some systems can also UEFI-boot from an NTFS partition, but many cannot).
- Some systems will not MBR-boot (i.e. Legacy\CSM boot to E2B) from the USB drive if any EFI boot file is present on the USB drive (on a FAT partition) – the only option presented by the BIOS will be a UEFI-boot option. A workaround is to rename or delete the \EFI folder to prevent it from UEFI-booting.
- When you Secure UEFI-boot, only signed ‘secure’ EFI files can be loaded and (apart from Windows) there are not many of these available.
Some implementations (e.g. E2B REFIND images and E2B grub2 menu system) allow you to boot to unsigned files (or you can use MOK manager to ‘whitelist’ unsigned boot files, but this makes changes to the system BIOS’s NVRAM which can be difficult to remove\change at a later date). agFM uses a signed Kaspersky shim which allows us to Secure Boot but then disable Secure Boot so that we can load an unsigned grub2 version and then boot to insecure/unsigned payloads.
FAT32 or NTFS for UEFI booting?
The UEFI specification says that a UEFI BIOS must be able to load the EFI boot file from a FAT partition (either an MBR partition or a GPT partition).
You do not need an GPT partition to UEFI-boot. UEFI can boot from both Legacy\MBR and GPT partitions.
For this reason, ext2/3/4, exFAT and NTFS volumes are not usually used as UEFI boot partitions because, unless the UEFI BIOS supports that filesystem, it won’t be able to ‘see’ any files.
So it is best to place the .EFI boot files on a simple FAT16 or FAT32 partition on a USB drive or the FAT32 EFI partition of a USB GPT-partitioned drive.
Some UEFI BIOSes also include an NTFS filesystem UEFI driver as well as a FAT filesystem driver – this means that they can also load the EFI boot file from an NTFS partition. However, there is no guarantee that your BIOS will contain an NTFS UEFI driver, so we must use a FAT12/FAT16/FAT32 volume for best compatibility across all systems.
Bugs!
There are four Primary partition table entry ‘slots’ available in an MBR partition table – no mention is made in the (loosely written) specification on how to determine if they are FAT-based or if the BIOS should search each one for a valid .EFI boot file or in what order they should be searched or if the four Primary partitions must be in ascending order or if the partitions can overlap each other or what to do if there is more than one valid partition with valid boot files!
The UEFI specification does not mention which MBR partition to boot from (just that it does not need to be marked as ‘active’=bootable in the partition table).
This then leaves it up to the BIOS writers to decide how to enumerate FAT partitions when looking for EFI boot files, so of course, we end up with a complete compatibility mess!
- Some BIOSes only look at the first FAT partition for EFI boot files and then give up!
- Some BIOSes list any partition in the UEFI boot menu (even if they are not FAT-based).
- Some BIOSes list any USB drive that is FAT-based in the UEFI boot menu (even if it does not contain a suitable EFI boot file – e.g. no BOOTX64.EFI).
- Some BIOSes will always UEFI-boot (if a valid EFI boot file is present), even if you tell them to MBR-boot!
- Some BIOSes will not boot from a Primary partition if it starts at a lower sector position than the previous partition entry.
- Some BIOSes will look for a \EFI\BOOT\GRUBX64.EFI file and list that as a boot option (e.g. Linpus lite UEFI) and completely omit an entry for the standard default boot file at \EFI\BOOT\BOOTX64.EFI!
The writers of the UEFI specification missed a golden opportunity to collaborate with BIOS writers to accurately define both Legacy and UEFI boot processes from MBR- and GPT-partitioned drives! The specification does however seem to allow nested MBR partitions (Section 13.3.2) and so implies that all Primary and nested (=Logical?) partitions should be searched for all FAT partitions and list all valid partitions as UEFI-bootable entries. i.e. The UEFI developers expanded on the MBR specification but failed to standardise the MBR boot specification!
MBR and PBR
MBR = Master Boot Record – first 512 byte sector on an MBR-partitioned disk.
PBR = Partition Boot Record (also known as VBR = Volume Boot Record, i.e. VBR == PBR) – first 512 byte sector of a partition. A floppy disk does not have a MBR, the first sector of a floppy disk is the PBR.
Tip: To see the bytes in the first sector of your USB drive, use the Disk Info button on RMPrepUSB and enter 0 as the sector value. To see the PBR sector, enter P1.
A 512-byte MBR usually contains a 64-byte Partition Table starting at byte 1BE (hex). This can contain up to 4 Primary partition entries (16 bytes each entry). Each 16-byte partition table entry contains this information:
- Active Flag (the BIOS will boot to this partition if bit 7 set – typically 80h)
- Partition Type – gives a hint as to what filesystem is contained in the partition – e.g. 0C or 0B = FAT32, 07=exFAT or NTFS.
- Partition Start – the disk sector where the partition starts and where the PBR can be found (in CHS format)
- Partition End – the last disk sector of the paritition (in CHS format, only used if <137GB)
- Partition Start (LBA) – the disk sector where the partition starts and the PBR can be found (<2TB)
- Partition Size – number of sectors in the partition (<2TB)
The PBR typically contains BIOS Boot Parameters (BPB) which contains data about the filesystem in the partition and more boot code which will boot the operating system that is on that partition. Typically, the boot code expands into many of the sectors that follow the PBR sector and there may be a second copy of the PBR.
The UEFI specification states that the MBR partitions must not overlap each other.
For more details on the MBR and PBR see here.

IBM-compatible BIOS and UEFI systems
There are two types of Intel x86 CPU computer PC systems, those systems with ‘MBR\IBM\Legacy BIOS’ firmware and those with ‘UEFI’ firmware. Firmware is the non-volatile code in a PC which is first executed when you turn it on – it is typically used to select and load boot code from sectors on a boot disk. It also provides basic display and keyboard input support functions.
The older ‘BIOS’ type of system cannot access files on a disk, it has to load code from sectors contained within the MBR and PBR and so must boot from drives with MBR-type partitions or floppy drives containing a PBR. The newer UEFI-type of system firmware (BIOS) can directly access files on FAT partitions (not NTFS or exFAT or ext2/3/4, etc.). The UEFI specification says that booting from a FAT filesystem must be supported. Other filesystems may or may not be supported by the UEFI BIOS (optional).
Most UEFI BIOSes usually also contain extra code called a ‘Compatibility Support Module’ (CSM) in it’s firmware. This is an extra ‘block’ of firmware code which allows a UEFI system to boot in MBR mode using a BIOS code module that boots in the same way as the old BIOS firmware does (this is often called CSM-mode). MBR-mode, CSM-Mode and BIOS-mode are therefore equivalent but are completely different from UEFI-mode.
New Windows 8/10 systems shipped by an OEM manufacturer will all be UEFI systems and they will boot in UEFI-mode and the internal hard disk will contain GPT partitions. To boot from an external USB drive in MBR\CSM mode, you will need to disable Secure Boot and enable CSM-mode (which may be called ‘Legacy’ mode in some Setup menus). You may also need to disable ‘Fast Boot’.
A few UEFI-based systems can also boot from .EFI boot files on NTFS partitions (e.g. Asus Z87 mainboard) – this is not typical of all systems however.
How does BIOS\MBR booting work?
Hers is a typical boot sequence for a BIOS-based MBR\CSM system:
- Switch on system
- Firmware (BIOS) code inside the system executes
- First sector (MBR) of each disk is read (order depends on how user has configured BIOS)
- If the sector is a valid bootable sector, the sector is read into memory and executed by the CPU
Note: Some (bad) BIOSes will not run step 4 unless one of the partitions in the MBR is marked as Active. From this point onwards, the BIOS has no control of booting. Normally the code in the MBR will do the following…
- Look at the four partition table entries in the MBR
- If one is marked as Active, load the data contents of first sector of the active partition (PBR) into memory and execute the code
i.e. the code in a ‘standard’ MBR looks for a partition entry in the MBR which is marked as ‘Active/bootable’ and then loads the code from the first sector of that partition (the PBR).
- The boot sequence for Windows 7 (MBR mode) is: Power on – MBR – PBR – bootmgr
- The boot sequence to boot to grub4dos (installed to PBR, not MBR) is: Power on – MBR – PBR – grldr
- The boot sequence to boot to grub4dos (installed to MBR) is: Power on – MBR – grldr
- The boot sequence to boot to syslinux (installed to PBR) is: Power on – MBR – PBR – ldlinux.sys
- The boot sequence to boot to FreeDos (installed to PBR) is: Power on – MBR – PBR – kernel.sys
- The boot sequence to boot to MS-Dos (installed to PBR) is: Power on – MBR – PBR – io.sys
The code in the PBR is usually responsible for booting from a file within the partition (e.g. ntldr or bootmgr). This code typically finds and loads more code, which is then able to understand the filesystem used in the paritition and thus access any of the files on the disk. Note: Some ‘bad’ BIOSes use a different sequence (which is often incompatible and can cause boot issues!)
- Switch on system
- Firmware code inside the system executes
- First sector of each disk is read (order depends on how user has configured BIOS)
- If the sector is a valid bootable sector and contains a partition marked as Active, read the first sector of the Active partition (PBR) into memory and execute the code. Note that the code in the MBR is skipped completely!
When booting from a USB drive, the BIOS will assign the USB drive as the first drive (BIOS drive 0 = 80h) and the first internal hard disk will be assigned as the second drive (BIOS drive 1 = 81h). Typically, the boot drive will always have a BIOS designation of 80h – drive 0 (only if MBR\BIOS – not UEFI).
Note: Floppy drives are given a BIOS ID number of 0-3, ‘hard disks’ from 80h-9fh and CD\DVDs A0h-FFh (but only if you boot from them).
Most modern systems will treat a USB drive (Removable-type or Fixed disk type) as a ‘hard disk’ and thus give it an ID number of 80h when it boots from it.
E2B will often swap over drive 0 (the E2B USB drive = 80h) with drive 1 (the first internal hard disk = 81h) before it boots to a payload – this is so that the operating system that you boot to does not see the E2B USB drive as the system boot drive – otherwise if you are installing an OS, the installer might write the boot files onto the E2B USB drive instead of the internal hard disk! E2B file extensions ending in ’01’ will make this 0<>1 disk number ID swap for you.
Boot chain:
BIOS (PCAT) -> BootMgr { BootMgr stub -> embedded BootMgr.exe } -> WinLoad.exe -> Windows
64-bit (U)EFI -> bootx64.efi -> BootMgFw.efi -> BootMgr.efi -> WinLoad.efi -> Windows
How does UEFI booting work?
UEFI systems boot in this sequence (if in UEFI boot mode):
- Switch on system
- Check non-volatile memory to see what boot device and boot file has been defined by the user or a previous OS as the first boot device
- Check for a valid filesystem in each partition (FAT12/FAT16/FAT32 or GPT EFI)
- Look for the designated boot file (default = \EFI\boot\bootxxxxx.efi where xxxxx depends on the CPU architecture – see below)
- Load the boot file into memory and execute the code
For a 64-bit x86 UEFI system, the default EFI boot file is \EFI\boot\bootx64.efi
For a 32-bit x86 UEFI system, the default EFI boot file is \EFI\boot\bootia32.efi
A UEFI system either has 32-bit UEFI firmware or 64-bit UEFI firmware – it cannot have both.
A few systems may have UEFI firmware which can access NTFS partitions, however this is not required by the UEFI standard specification and is rare.
Most UEFI-capable Operating Systems can tell the UEFI BIOS which boot file to load in future – for instance, Windows 8 can specify that the UEFI firmware should load the \EFI\microsoft\boot\bootmgr.efi file instead of the default \EFI\boot\bootx64.efi file. Thus if we have installed both Ubuntu and Windows 8 to the system, the UEFI may allow the user to choose to boot to either of these via the UEFI boot menu, because each OS has added a boot option into the UEFI non-volatile RAM storage area. In a typical UEFI setup menu, you can view these boot options and delete or clear the entries if you wish.
If no valid boot files are specified in the UEFI non-volatile RAM storage area, then the default boot file will be used (e.g. \EFI\boot\bootx64.efi for an Intel x86 64-bit UEFI system).
Beware: Just because a system has a 64-bit CPU, does not mean it has 64-bit UEFI firmware! Some systems with 64-bit CPUs have 32-bit UEFI firmware and will only UEFI-boot to a 32-bit OS (they look for the EFI boot file \EFI\boot\bootia32.efi).
A 64-bit UEFI system cannot boot from 32-bit UEFI boot files. 64-bit UEFI code is not compatible with 32-bit UEFI code because the CPU is in a different mode.
Note: The file \bootmgr.efi is used by UEFI systems to boot from a CD/DVD (el Torito specification), it is not used for USB/hard disk booting.
Boot chain:
BIOS (PCAT): bootmgr { BootMgr stub -> embedded BootMgr.exe } -> WinLoader.exe -> Windows
64-bit (U)EFI: bootx64.efi or BootMgFw.efi -> WinLoader.efi -> Windows
How to boot E2B from a UEFI-only system (e.g. Surface Pro 3, Asus T100, T200)
Some systems do not have a Legacy\MBR\CSM option in their firmware (i.e. they have no IBM-compatible ‘BIOS’).
This means that you cannot boot to the E2B Menu System from them because E2B uses grub4dos which only boots on MBR\CSM BIOS systems.
Before you start, make sure you have updated the firmware (BIOS) to the latest version.
If you want to boot from a payload file on your E2B USB drive using one of these UEFI-only systems:
1. There are two types of UEFI Intel x86 firmware, 32-bit or 64-bit. We need to know what type the target system has. Check what OS was originally shipped on the system. If it was a Windows 64-bit OS, then you have 64-bit UEFI firmware. If it was shipped with a 32-bit Windows OS, then you have 32-bit UEFI firmware. Note that the CPU inside the target system may be 64-bit, but the UEFI firmware may be 32-bit! Systems with limited internal storage tend to have 32-bit UEFI firmware because 32-bit OS’s require less disk space than 64-bit OS’s.
2. Once you know what type of UEFI firmware you have, you can select a compatible payload that is UEFI-bootable and supports the same UEFI type. For example, if your system originally came with Windows 8 32-bit, then you can use Windows 8/8.1/10 or linux 32-bit payloads but not 64-bit Windows/linux payloads.
For your first test, I suggest you use a CloneZilla ISO because this contains both 32-bit and 64-bit UEFI boot files and so either type of firmware should boot from CloneZilla.
Note that many payloads do not support UEFI-booting at all (e.g. Hirens Boot CD)! Look for a \EFI\boot\bootx64.efi or \EFI\boot\bootia32.efi boot file inside the ISO – these are the 64-bit and 32-bit EFI boot files and at least one MUST be present if it supports Intel x86 UEFI-booting.
Before continuing, try just booting to the Partition #2 of an E2B v2 USB drive which has the agFM files on the second partition. If it boots to the agFM menu system, then you can simply copy over the CloneZilla ISO to the \_ISO\LINUX folder on Partition #1 and select it in the agFM menu system (or Ventoy menu system).
If the agFM menu system does not boot…
3. Convert the payload file (e.g. Clonezilla.ISO) to a .imgPTN file by dragging and dropping the file onto the MPI_FAT32 Desktop shortcut of your Windows system. You will need to install the E2B MPI Tool Kit first. It is often better to rename the file to have a .imgPTN23 file extension.
4. Copy the .imgPTN23 or .imgPTN file to your E2B USB drive (e.g. copy it to the \_ISO\MAINMENU folder) and make it contiguous (run \MAKE_THIS_DRIVE_CONTIGUOUS.cmd).
5. Run \_ISO\SWITCH_E2B.exe, select the USB drive and double-click on the .imgPTN file – this will ‘swap-in’ the new .imgPTN file as a new FAT32 partition (the old E2B partitions will be replaced).
Alternatively, you can run the \QEMU_MENU_TEST (run as admin).cmd script and boot to the E2B USB drive using QEMU and then select the .imgPTN file from the menu to get to the E2B CSM Menu).
For the most flexible solution, I recommend creating a separate FAT32 USB flash drive containing WinPE. You can then boot to WinPE from any system (BIOS or UEFI) – run Switch_E2B.exe and ‘switch’ to any .imgPTN file on your E2B USB drive. See my blog post for more details.
6. Now connect the USB drive to your target UEFI system and boot from it (you may need to disable Secure Boot and Fast Boot in the firmware settings first, because not all OS payloads are signed for secure booting).
Restoring the E2B drive
Once you have finished, connect the E2B USB drive to a Windows (or WinPE) system and run the \e2b\SWITCH_E2B.exe utility and click on the ‘Restore E2B Partitions’ button to restore the original E2B partition.
Alternatively, you can boot it on an MBR\CSM system and choose menu #0 in the CSM Menu to restore the E2B partition.
Instructions for Surface 3 USB booting (video here)
What is CSM?
CSM = Compatibilty Support Module (a block of BIOS code added to the UEFI firmware which emulates the older-type MBR BIOS) – basically, it is a complete IBM PC-compatible BIOS!
Modern PCs have UEFI firmware (aka UEFI BIOSes) rather than the old IBM-compatible BIOSes.
Older BIOSes boot by running the code in the Master Boot Record (first sector) of the disk and they use Interrupt 13h calls to access the disk. The CPU is in Real Mode and not Long Mode or Protected Mode. The BIOS can only run code that was written to run in Real Mode.
Modern UEFI firmware can directly load and run code from a file (e.g. \EFI\BOOT\BOOTx64.EFI) from a partition on a disk – no BIOS Interrupt call mechanism is available. UEFI firmware is written in 64-bit or 32-bit Long Mode (depending on what UEFI firmware and CPU is present) – any code that it ‘boots’ to must be written to run in Long Mode. Therefore you cannot directly run old Real Mode code (such as DOS or grub4dos or Windows 98) when UEFI-booting.
CSM is a mode that you can enable on a UEFI system that will boot in the same way that the older BIOSes boot, thus allowing you to boot from disks which have been prepared with an MBR and that contain boot code which use Interrupt 13h for disk access and runs the CPU in Real Mode. CSM basically adds an IBM-compatible BIOS firmware module, so that your system will boot in the same way as the ‘old’ type of IBM-compatible systems.
About 32-bit and 64-bit UEFI and CSM\MBR booting
For Intel x86 CPU architecture systems there are two types of UEFI firmware, 32-bit and 64-bit.
64-bit CPUs can run 8-bit, 16-bit, 32-bit and 64-bit code, however UEFI firmware contained in a system typically only supports a sub-set of these modes – either 32-bit or 64-bit.
- If a system contains a 32-bit CPU, then the UEFI firmware will only be capable of booting 32-bit UEFI OSs – typically it will start to boot from the \EFI\boot\bootia32.efi file. The system may also support CSM booting which is the equivalent to MBR booting on older systems.
- If a system contains a 64-bit CPU, then the UEFI firmware will usually be capable of booting 64-bit UEFI OSs – typically it will start to boot, by default, from the \EFI\boot\bootx64.efi file. The system may also support CSM booting which is the equivalent to MBR booting on older systems. However, some UEFI systems that have a 64-bit CPU may contain 32-bit UEFI firmware (e.g. some Asus T100 Tablets – because a 32-bit OS takes up less disk space than a 64-bit OS) – so just because the CPU is 64-bit capable, it does not necessarily mean that the UEFI firmware is 64-bit.
Although a 64-bit system could (in theory) support both 32-bit and 64-bit UEFI-booting, it would need to contain almost twice as much firmware code. Because each mode would require separate UEFI modules’, this would double the manufacturer’s firmware development and testing process and double the expense. So, in practice, UEFI-enabled systems containing a 64-bit x86 CPU, usually boot 64-bit UEFI OS’s via a bootx64.efi file – if however the UEFI firmware is a 32-bit version, it will only boot from a \EFI\boot\bootia32.efi boot file by default and run in 32-bit Long Mode. UEFI systems may or may not contain support for CSM booting. This is the old ‘legacy’ mode which is compatible with (most) older versions of linux and Windows (e.g. Windows XP). As CSM mode is not mandatory, not all UEFI systems support CSM booting. The UEFI specification states that it must be capable of loading an .EFI boot file from a FAT\FAT16\FAT32 volume. A few PCs are also capable of UEFI-booting from NTFS partitions, but this is an ‘enhancement’ and not typical.
Boot chain:
BIOS (PCAT) -> BootMgr { BootMgr stub -> embedded BootMgr.exe } -> WinLoad.exe -> Windows
64-bit (U)EFI -> bootx64.efi -> BootMgFw.efi -> BootMgr.efi -> WinLoad.efi -> Windows32-bit (U)EFI -> bootia32.efi -> BootMgFw.efi -> BootMgr.efi -> WinLoad.efi -> Windows
Do I have to use GPT if I want to boot via UEFI?
This is a common misconception!
GPT is a disk partitioning scheme that allows you to have partitions greater than 2TB.
UEFI is a new type of firmware (BIOS) that allows the computer to boot from a file or a selection of files on a FAT-formatted partition on a disk (an MBR disk or a GPT disk). It also allows you to add pre-boot drivers so that you can extend it’s function (e.g. add NTFS or HFS drivers or mouse or network drivers). It also provides a Secure Boot mechanism so that only signed ‘boot code’ will be executed – thus preventing viruses or booting from different unsecure media.
So the two things are completely different!
The EFI Intel specification includes details of the GPT partitioning scheme because one of the main objectives of EFI was to support drives larger than 2TB and this is not possible using the old MBR partitioning scheme.
The reason that you see GPT and UEFI used together is that Microsoft Windows Setup.exe will insist on using a GPT partitioned disk as its boot disk, when you try to install Windows after booting the Windows Setup Installer via UEFI. So people often think that GPT and UEFI must be used together. The fact is that UEFI systems just need a FAT partition – the EFI partition on a GPT disk will be FAT formatted and will contain the .efi boot file(s) but you can UEFI–boot from a single FAT-formatted MBR-style (non-GPT) partition as long as the OS that you are loading supports it. If you boot Windows 7/8/10 or later Windows OS’s in the old MBR\CSM mode however, GPT partitions are not supported and Windows won’t like it.
Windows 7/8/10 Installers
Boot in MBR mode – Windows uses MBR partitions and does not like or understand installing to GPT partitions
Note: If a GPT partition exists on the hard disk, Windows Setup will refuse to install Windows to it even if you delete all visible partitions. You must use Diskpart – select disk 0 – clean – convert MBR to remove the GPT partitions and then you can install Windows and create MBR partitions.Boot in UEFI mode – Windows uses GPT partitioning and will not want to install to an MBR partition
This is a restriction imposed by Microsoft (Setup.exe) in order to simplify the installation of Windows. It is technically possible to UEFI-boot to Windows on a MBR-partitioned disk.
It is also perfectly possible to boot Windows PE and Windows To Go via UEFI from an old-style MBR FAT partition (with an NTFS partition also present).
Note: Many Intel Mac systems do not contain a BIOS-mode\CSM USB driver and so can only boot from USB drives in UEFI-mode. Some people have reported that some systems will only UEFI-boot from a GPT disk (e.g. some VAIOs?). If this is true, then those systems are not fully UEFI compliant!
It is possible to MBR-boot to a GPT disk containing Windows 8/10 – but definitely not recommended!
Is the term ‘UEFI’ actually a ‘BIOS’?
UEFI and BIOS are both types of firmware. Many people believe that the two are completely different and you should never say ‘UEFI BIOS’. However, Asus UEFI firmware actually displays it’s Setup Menu as ‘UEFI BIOS’.
To my mind, BIOS stands for ‘Basic Input/Output System’ and it is firmware that allows basic input (i.e. keyboard input) and basic output (i.e. characters displayed on a screen, disk I/O, etc.), So a modern smart phone or the old Altair 8800 both contain BIOSes. IBM also used the term ‘BIOS’ to describe it’s firmware in the IBM PC and so many people think BIOS = IBM PC BIOS. The IBM BIOS used software interrupts as a means of accessing the keyboard, display and disks (e.g. Interrupt 13h was used for disk read/writes). I prefer to call the old type of PC firmware an ‘IBM-compatible BIOS‘ and the new type of firmware a ‘UEFI BIOS‘ because UEFI firmware is still a type of ‘Basic Input/Output System’.
On this site however, I try to avoid using the term ‘UEFI BIOS’, as some people think that the two abbreviations are mutually exclusive.
Note that many UEFI firmware implementations also include the old IBM-compatible BIOS type of firmware – this extra ‘bolt-on’ code is called the Compatibility Support Module or CSM. In CSM-mode, the UEFI firmware will behave just like a real-mode IBM PC-compatible BIOS and boot from normal MBR partitions to run real mode code contained in the first sector of the boot disk using software interrupts (e.g. Int 13h). The CSM code is, in essence, a virtually complete IBM PC-compatible BIOS!
In UEFI-mode, the CPU will run in ‘long mode’ and try to boot from a FAT partition containing an .efi boot file containing code written to run in ‘long mode’.
- 32-bit UEFI-mode runs the CPU in 32-bit long mode and so can only execute boot code that is written to work in this mode. Software interrupts (e.g. Int 13h) cannot be used – 64-bit long mode code cannot be used.
- 64-bit UEFI-mode runs the CPU in 64-bit long mode and so can only execute boot code that is written to work in this mode. Software interrupts (e.g. Int 13h) cannot be used – 32-bit long mode code cannot be used.
- MBR BIOSes or UEFI systems in CSM-mode run in real mode on both 32-bit and 64-bit CPUs and can only execute real mode code. In this mode, CPU software Interrupts can be used (e.g. Int 13h is used to read or write sectors to a disk)
It is not normally possible for UEFI-mode to run MBR\CSM boot code (unless a completely new ‘BIOS’ is loaded – e.g. you can MBR-boot and load Clover which is in effect a whole new UEFI ‘firmware’ that can then boot to and run the long mode type of code that is found in .efi boot files). Most linux kernels do not depend on BIOS interrupts and are capable of switching the CPU to a different mode – this means that it is often possible to UEFI- or MBR-boot to a boot loader such as grub2 and then load and run the linux kernel.
Why doesn’t my old Hirens ISO (HBCD) boot on my UEFI system even though I converted it to a .imgPTN file?
TL:DR – because old ISOs don’t contain UEFI boot files and the code uses the old BIOS Interrupt calls not the new UEFI API calls!
E2B does not add UEFI-boot files, the MakePartImage utility only uses the UEFI boot files that are already present in the payload itself.
So, you can only UEFI-boot a payload if the payload itself contains UEFI boot files. You cannot (easily) ‘convert’ a BIOS-bootable payload to a UEFI-bootable payload; older OS’s like DOS and XP can never boot via UEFI because they rely on BIOS calls even when fully loaded and running. Some linux OS’s and Windows OS’s can boot both via BIOS and UEFI, but these OS’s have been specifically written to include two different boot methods and once the kernel is loaded, the OS uses it’s own drivers to access the disks, etc.
If the payload source does not already contain a \EFI\boot\bootx64.efi or bootia32.efi file, then it will not support Intel x86 UEFI-booting (however, it might be possible to load a UEFI boot loader such as grub2 and then load the OS – see the agFM menu system for more details).
With the old type of BIOS, operating systems such as DOS, Windows 95/98/XP/2003, etc. would load the operating system using BIOS calls. For instance, these OS’s can read sectors from a boot disk into memory using BIOS Int 13h calls. The CPU is in ‘Real Mode’ and not in Protected Mode when booting via the BIOS. Using BIOS calls, the OS boot code can load the ‘kernel’ and drivers into memory and then, once the kernel code is running, the drive sectors can be accessed using the OS disk drivers rather than using BIOS calls.
So the boot code (and in many cases the OS ‘kernel’ code), actually depends on BIOS calls.
With a system that boots via UEFI, there are no BIOS calls available at all! Further still, the CPU is not even in Real Mode (UEFI uses Long Mode), so that the boot code must be written to use UEFI API calls to access the boot disk sectors (and files) and the code must be written to run in Long Mode. A further complication is that there are two sorts of UEFI Long Mode used, 32-bit or 64-bit – so 64-bit Windows 8 (for instance) cannot be booted from a 32-bit UEFI system and vice versa.
In the case of older payloads such as Hirens, it typically contains Windows XP, DOS and older linux payloads. DOS and Windows XP use BIOS calls, therefore there is no way that you can boot and run DOS or Windows XP from a UEFI system (unless you boot it in CSM\MBR\BIOS mode). To boot linux payloads, the linux boot loader must be written to support UEFI (i.e. not use BIOS calls) or switch the CPU into a different mode. Most (all?) Hirens versions do not contain linux distros that support UEFI booting.
Note: Many Linux distros contain kernels that do not depend on either BIOS or UEFI calls. It is possible to UEFI64-boot to say grub2 and then use grub2 to load into memory and then run the Linux kernel file which was written for a 32-bit or 64-bit Intel x86 CPU even – if that distro does not support UEFI.
MBR partitions and UEFI boot behaviour
The UEFI specification is not very explicit about how the firmware Setup and GUI interface should behave.
In order to boot via UEFI from a USB drive, the system needs to be configured to either boot from the USB device as the first boot device (not recommended) or you must press a special key (e.g. F8) at an early stage to get a pop-up boot selection menu (aka BIOS Boot Selection menu or BBS menu).
This menu will list the bootable devices available to the system.
Many UEFI systems have their own ‘rules’ for listing UEFI devices in the BBS menu for normally partitioned MBR disks:
- May display one UEFI entry for each MBR partition (even if the partition is NTFS and does not contain a valid \EFI\Boot\bootxxxx.efi file) – e.g. Asus Z87
- The BBS pop-up list does not display the disk+partition number, so you don’t know which entry boots to which partition!
- If any of the MBR partition table start values are out-of-order then you may not get any UEFI boot options listed for that drive (see Examples 1 and 2) – e.g. Asus Z87, Dell Venue 11, HP PC (Asus T100 will boot from any partition if it contains EFI boot files!)
Example 1: No UEFI boot option is displayed (ptns out of order)
TABLE SLOT 1: NTFS  Start=8,194,236
TABLE SLOT 2: FAT32 Start=2048
TABLE SLOT 3: empty
TABLE SLOT 4: empty

Example 2: No UEFI boot option is displayed (2nd and 3rd ptns not in order)
TABLE SLOT 1: FAT32 Start=2048
TABLE SLOT 2: NTFS  Start=8,194,236
TABLE SLOT 3: NTFS Start=4,098,048
TABLE SLOT 4: empty

Example 3: Three UEFI boot options displayed (even if partitions have no files)
TABLE SLOT 1: FAT32 Start=2048
TABLE SLOT 2: NTFS Start=4,098,048
TABLE SLOT 3: NTFS  Start=8,194,236
TABLE SLOT 4: empty
If you are using .imgPTN files, and you are not seeing any UEFI boot option(s) for the E2B USB drive, check that the partitions are not out of order.
You can use the MOVE_IMGPTN cmd script to check and re-order them. SWITCH_E2B.exe will also attempt to re-order the partitions.
EFI boot files can prevent MBR-booting!
Some UEFI systems will not offer an MBR boot option to the user if there is an EFI boot file on a FAT32 partition. These systems only offer a UEFI boot option to the user.
This means that if you have a FAT32 E2B USB drive containing EFI boot files on these systems, you won’t be able to MBR-boot.
This behaviour means that these system will not be able to MBR\CSM-boot from a FAT32 .imgPTN file to the CSM menu, if it contains an EFI boot file. If you have an E2B+agFM USB drive, you may find extra menu entries which will rename the \EFI folder so that UEFI-booting is disabled and the BIOS may then give you a Legacy Boot option.

Can I boot some linux ISOs that do not officially support UEFI-booting?
Yes! It is possible by creating a special .cfg or .grubfm grub2 menu file which the agFM menu system will load.
For instance the AntiVirusLiveCD ISO does not UEFI-boot, but the sample menu file “\e2b\Sample agFM menu files\ANTIVIRUS\AntiVirusLiveCD.cfg” can be used to allow us to UEFI-boot – see the article here.
How do I Secure Boot using E2B?
Newer computers, made since around 2008 include UEFI BIOS (Unified Extensible Firmware Interface). One of the new features of UEFI is ‘Secure Boot’ which does not allow loading of drivers, boot files or operating systems that do not have a valid digital signature. This stops malicious software and unauthorized operating systems from being loaded. All Windows 8/10 ‘logo certified’ OEM computers are required to ship with Microsoft Secure Boot enabled, but most computer manufacturers allow secure boot to be disabled by allowing the user to change the BIOS settings.
Note: To enable secure boot to work on non-Windows OS’s, enable the “Allow Microsoft 3rd Party UEFI CA” option in the BIOS setup. e.g. Lenova 2022+, etc.
Some modern 64-bit versions of Ubuntu, Fedora, CloneZilla (Ubuntu AMD 64-bit version only) and MemTest86 support Secure Boot.
Typically, most linux Secure Boot distros only support 64-bit UEFI Secure boot (not 32-bit UEFI Secure Boot).
Modern Windows OS’s support both 32-bit and/or 64-bit Secure Boot and they contain signed boot files (\EFI\BOOT\*.EFI).
You can only boot using Secure Boot if the EFI boot files and drivers have been correctly signed or if you can ‘validate’ the boot file manually (e.g. by booting to a Shim and using a MOK Manager to register the EFI boot file on the particular UEFI-system that you are booting from).
To get EFI boot files signed by a trusted authority for Secure Booting costs quite a few $1000, so only large organisations tend to have OS’s which support Secure Boot.
For a guide on how Secure Booting works, see here.
Add a payload to E2B using a .imgPTN file
If the OS has secure-boot signed EFI boot files(s), you can usually Secure Boot from them by converting them to .imgPTN files (FAT32 format) and adding the .imgPTN file to your E2B USB drive. Then MBR\CSM boot and switch to the .imgPTN file or use SWITCH_E2B.exe to switch to the .imgPTN file. Then you can Secure Boot boot from the E2B USB drive on a UEFI system.
Note: To enable secure boot to work on non-Windows OS’s, enable the “Allow Microsoft 3rd Party UEFI CA” option in the BIOS setup. e.g. Lenova 2022+, etc.
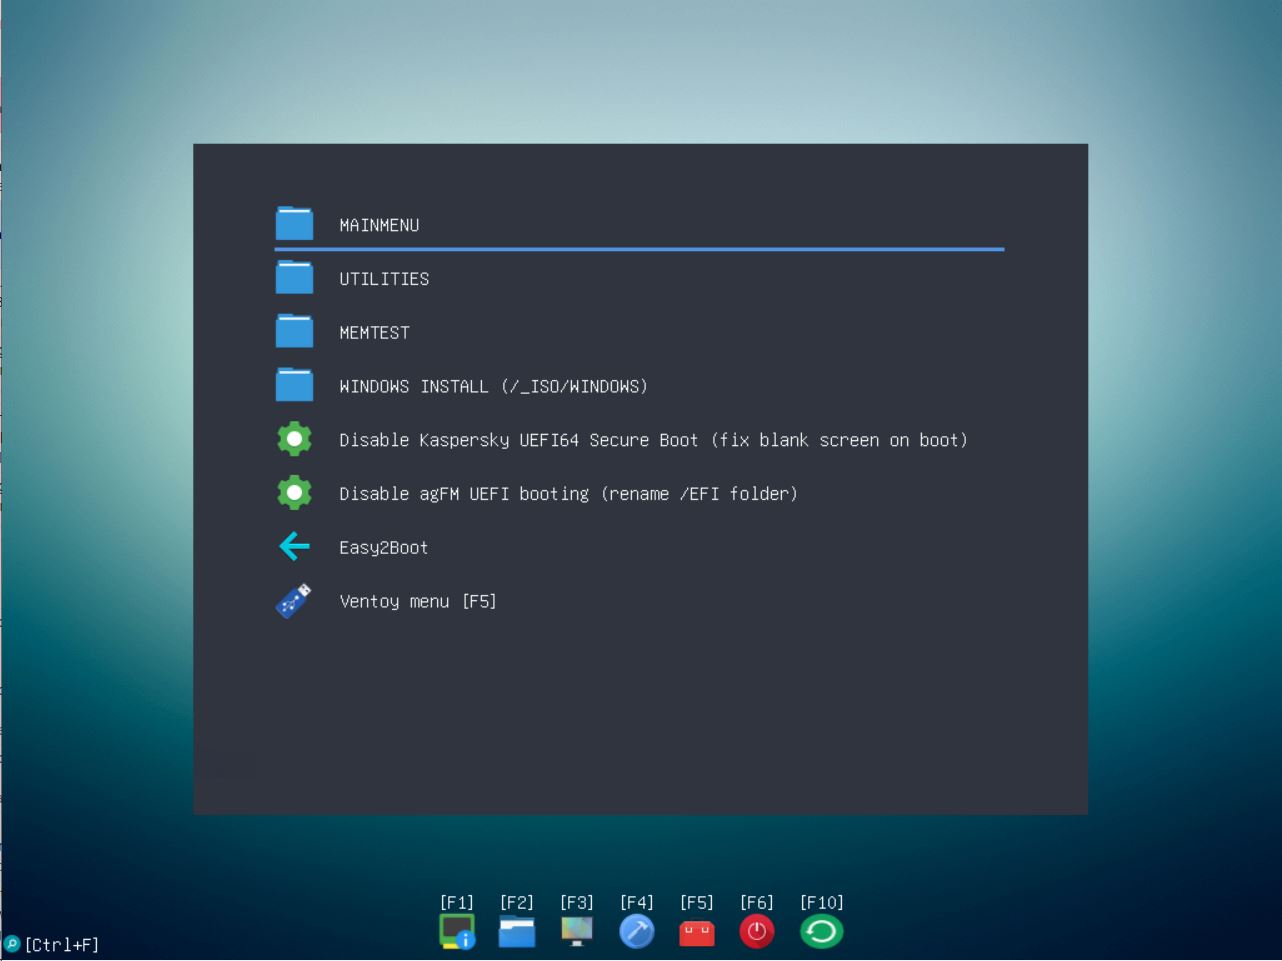
The agFM grub2 menu system
E2B also allows you to use the agFM a1ive grub2 menu system which is capable of MBR\UEFI32\UEFI64 and UEFI64 Secure booting (but not on all systems).
The agFM files are on the 2nd FAT32 partition, so you must UEFI-boot to Partition #2.
This uses the signed Kaspersky EFI boot shim which has a security vulnerability, so we can Secure UEFI64-boot to it and then disable Secure Boot to allow us to run an unsigned version of agFM and boot to both signed and unsigned payloads.
Note that the Kaspersky shim EFI signature key may have been added to your BIOS firmware’s DBx blacklist (e.g. by a Windows 10 KBxxxxxxx update). In that case, you must disable Secure Boot in your BIOS settings because it will refuse to load the Kaspersky EFI boot file or you can clear usually the DBx list by using a BIOS Setup option.
———
Why do I need to disable the BIOS Fast Boot option?
The BIOS\Firmware ‘Fast Boot’ option, if enabled, prevents the BIOS from testing or checking for certain devices such as USB storage devices on switch-on or on a reset.
Some BIOSes allow you to enable ‘General’, ‘USB’ and ‘Video’ fast boot optimisations separately.
The exact function depends upon how the BIOS developers have written the code, but usually you must not enable Fast Boot for USB, because then the BIOS will not check for the presence of any external bootable USB devices that may be connected.
Fast Boot = Disabled (for detection of USB boot devices)
Fast Boot is not only connected with the BIOS UEFI boot options, it applies to both CSM\BIOS\Legacy mode and UEFI-mode.
———
Why don’t I get an E2B menu when I try to UEFI-boot to an E2B USB drive?
The answer is simple – the E2B menu system is based on grub4dos and does not support UEFI booting. You will need to add agFM if you want to directly UEFI-boot to a UEFI menu system.
E2B (legacy) only supports UEFI payloads by ‘switching-in’ a .imgPTN partition image file so that you have a new FAT32 partition on your E2B drive.
You can however add a 2nd FAT32 partition to the E2B drive which contains agFM (grub2-based menu system).
Note: Some system BIOSes have a very annoying bug – if a UEFI boot file is present on the USB drive, then that BIOS will not allow you to MBR\Legacy boot from the USB drive! This means that if you wanted to boot to the E2B menu in Legacy\MBR\CSM mode and run any of the 100’s of ISOs on it – you can’t! The BIOS will only let you UEFI-boot.
As well as the E2B+2nd FAT32 agFM partition scheme, some other multiboot solutions use a FAT32 partition (UEFI boots from FAT partitions) and they contain both MBR and UEFI boot files and so these solutions will also hit this BIOS bug issue with certain systems:
All of these will be susceptible to the ‘No MBR boot option’ BIOS bug mentioned above. You can temporarily disable UEFI-booting using the appropriate agFM (or E2B) menu entry:
Why can’t I boot/see my internal hard disk when I MBR\Legacy boot?
Some 2018 or later BIOSes are ‘UEFI-only’.
There may be an option to enable CSM in the BIOS settings, however this only allows you to MBR-boot from external devices.
The UEFI BIOS may not allow you to boot in Legacy mode from an internal drive.
This means you may not be able to ‘see’ any internal drives if you MBR-boot and try to install an OS to the internal drive, OR it may allow you to install an OS to the internal drive, but when you try to MBR-boot from the internal drive it will fail to find any drive!
You must install an OS that will UEFI-boot. To do this, either UEFI-boot from the E2B USB drive (using a .imgPTN file) or MBR-boot and run WinNTSetup and ensure you install Windows to a GPT disk and enable UEFI-booting so that it will UEFI-boot to Windows from the internal hard disk.
Tip: Some modern BIOSes also require you to select AHCI mode rather than RAID 0 mode before you can access the internal SATA drives.
If your system has a internal NVMe drive, ensure you have updated to the latest BIOS version.