Table of Contents
WInPE ISOs (WinBuilder, Medicat, Gandalf, etc.)
Tip1: To add shortcuts onto the Desktop of any WinPE OS to run your own portable apps each time it boots, change the WinPE wallpaper, autorun apps, add drivers and registry entries, etc. see here. The WinPE ISO does not need to be edited.
Tip2: Try ‘Ventoy for Easy2Boot‘ – it uses a different method for WinPE which may be more successful than E2B or agFM.
XP WinPE ISOs
For ISOs based on Windows XP, try a file extension of .isofira or .isomemF01. You can also try the .isowinvh and .isoHW file extensions.
For SATA\RAID\SCSI hard disk access, try .isoDPMS (E2B v1.A7+).
Tip: If QRUN.g4b suggests an alternate file extension, enter I for ‘Isoask’ and try one of the options listed above.
WinPE (Vista/7/8/10) non-WinBuilder-based ISOs
Try the .isoWinvh or .isoHW file extension. For some PE ISOs you can also try .ISOPE or .ISOPE01, but these may need a Removable E2B USB flash drive or E2B HDD+WinHelper flash drive.
Alternatively, convert the ISO to a FAT32 .imgPTN file (works for all types of USB drive).
Note: You can make .imgPTN
partition image files from each ISO file, however the contents of the E2B partition will not be accessible once booted to WinPE, but, if you use the .imgPTNLBAa23 file extension, then partition 2 of a E2B USB hard disk will be accessible from WinPE.
Tip: Use a file extension of .imgPTN23 so that partition 2 is not deleted. You can then UEFI-boot to agFM on partition 2 and Restore the original E2B partition.
Medicat
Medicat ISOs are large hybrid ISOs which boot to isolinux and grub and contain linux and Windows-based ISOs.
Some versions of Medicat are .ISO files but more modern ones are .IMG files or .ZIP files and are intended to be directly written to a fresh USB drive. The image contains Ventoy and has multiple partitions. These types of files cannot be directly added to an E2B USB drive.
Blog article for Medicat 21.12.
Medicat .ZIP files
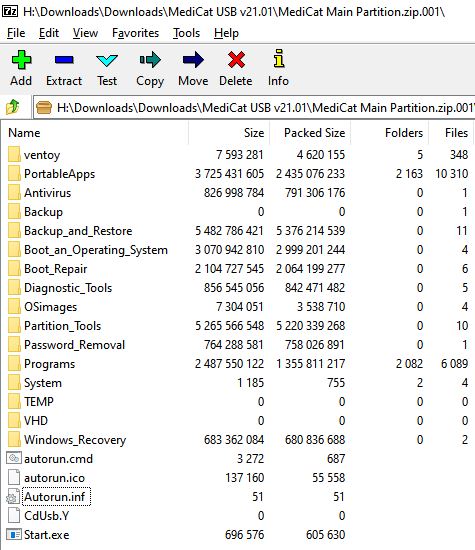
Medicat v21 is in the form of zip files for use with 7Zip and Ventoy. You are supposed to extract the contents to the first partition of a previously-made Ventoy USB disk.
Instead, you can just copy all the files (except \autorun.inf and \autorun.ico) to the root of your E2B first NTFS partition and only use Ventoy to boot to Medicat. This will add lots of folders to the root however and you may overwrite the contents of your \ventoy folder which will affect your existing Ventoy theme and menu settings (if you have any). It may also interfere with any other WinPE ISOs you may add.
Remember to disable your AntiVirus first (and check that it does not ‘quarantine’ any files on the USB drive once you have completed the copy and re-enabled your AV).
Then simply boot to Ventoy from the E2B USB drive.
Note that copying the Medicat files will also add the \ventoy folder to the first E2B NTFS partition which includes a ventoy.json file. This will change the Ventoy theme and also change the menu entry names. You may find it educational to look at the ventoy.json to see what it does because a few ISO may require special settings.
I found that quite a few of the menu entries had problems UEFI-booting on my Lenovo IdeaPad – maybe you will have better luck…
The alternative would be to selectively pick only the ISO or WIM files that you want, and add them into the existing E2B menu folders. This means you don’t need to boot to Ventoy.
In most cases you do not need to add any of the other files (some may require the ventoy.json if anything ‘special’ needs to be done to run the ISO – so you may need that too).
Blog article here and a batch file to automate the file copy here.
Medicat Mini Windows
To add the only Medicat WinPE, we need the file: \Boot_an_Operating_System\[UEFI]_Mini_Windows_10.iso or \Live_Operating_Systems\Mini_Windows\Mini_Windows_10.wim on later versions.
Copy it to the \_ISO\WINPE folder (for instance). You will also need to copy the following files and folders to the root of the E2B NTFS partition #1 as they are required by Medicat Mini Windows 10 too (the Mini_Windows_10.iso only contains boot files and the boot.wim file):
\Start.exe
\CdUsb.Y
\autorun.cmd (optional)
\PortableApps
\Programs
\System (optional)
To save a key press or two in E2B and agFM, you can rename the extension from .iso to .isodef (but it prevents Ventoy from seeing it).
Issues?
- Use a real system for testing not a Virtual Machine such as VBox/VMWare – they do not always work correctly. Ventoy has problems with some payloads if testing using VirtualBox+VMUB but on a real system it works OK.
- AntiVirus – MalwareBytes: UEFI64 does not seem to boot using Ventoy. Boots OK using agFM menu system and choosing .isowin or .isomap options however.
- Some other Windows ISOs also seem to have problems. Try .isomap option in agFM. For Lockpick.wim and E2B legacy try Lockpick_.wimboot.wim and E2B v2.16.
- If you have intermittent problems when booting large ISOs, etc. then try a USB 2 port or connect a USB 2 extension cable to the E2B USB drive so that only USB 2 speeds are used instead of USB 3 speeds.
- If you are using a USB 3 SSD device and experience problems, try using a USB Flash drive or USB spinning Hard Drive instead – I have seen some issues when booting some Linux distros (e.g. Slax) from a USB SSD (the USB drive is not detected by the kernel and fdisk -l does not list the USB drive)!
- To boot using agFM, you may require > 4GB of RAM in the system.
Medicat ISOs (old versions)
You can try just the .iso file extension for non-Windows booting but it may not boot on some versions (end filename with q.iso if you don’t want to see suggestions, or else add a .txt file).
MiniWindows PE will give errors and there will be missing applications in the Start Menu. Medicat is designed and intended to be run from a USB drive and NOT a CD\DVD.
For full use of Windows OS’s with PortableApp updates, etc., convert to a FAT32 .imgPTN file using the MPI_FAT32 Desktop shortcut. See Blog article here for details.
Medicat 18.10 – UEFI64-booting only works for MiniWin10PE, so I suggest you use the Medicat USB Naked – (9GB) – use as .ISO for MBR-booting to Win10PE and tools\apps. and\or… MiniWindows10 x64 or MiniWindows10 x64 NAKED for UEFI-booting – Win10PE with (8.6GB) or without (2GB) portable apps – convert to .imgPTN using MPI_FAT32 shortcut and add extra 1.5GB for portable apps and other storage. Avoid spaces in the .iso filename.
Medicat USB ‘full’ 2018 (17GB) – Try as .iso for non-Windows MBR booting, or for Windows and UEFI64 use a FAT32 .imgPTN file by using MakePartImage.cmd – MPI_FAT32 shortcut (latest version). Use the CSM menu ‘bootmgr’ menu for Win10PE booting. Use the CSM menu ‘Alternate boot (syslinux.bin)’ boot menu entry to boot to the Medicat utilities menu. Set the default boot entry to the Syslinux boot entry. As the .imgPTN file needs to be made contiguous, you will need plenty of contiguous free space available on the USB drive. Also 4GB or more of system RAM are required to run WinPE and the browsers, etc.. To get parted magic to work, edit the “\pmagic\boot\syslinux\syslinux.cfg” file and change DEFAULT menu.c32 to DEFAULT /menu.c32 or just type [TAB] at the boot: prompt and then run an option – e.g. normal32
Tip: When making an .imgPTN file, you may wish to increase the image size that is suggested by MakePartmage so that you can add your own portable applications afterwards. Alternatively, if your E2B drive has a large second partition, use the .imgPTN23 file extension so that the 2nd partition will not be removed when you switch-in the new image.
Medicat file extension – _.isomap64.iso and use [.isomap] agFM option (keep extension as .iso or else apps won’t appear in start menu) – or use just .iso if you want full start menu.
WinBuilder ISOs (Gandalf, ChrisR PEs, Bob.Omb’s, etc.)
Please update to E2B v1.90 or later.
E2B will automatically update the .INI files in the root of the E2B drive if a WinBuilder ISO is detected.
Most WinBuilder-based ISOs (ChrisR PEs, Bob Omb’s WinPE, etc.) will work if you:
1. Keep the file extension as .ISO
2. Ensure the filename contains no spaces.
3. Add a .txt file of the same name if you want the menu entry to contain spaces.
Tip: If you don’t want the Auto-suggestion prompt, ensure the last letter of the filename ends in ‘Q’ or ‘q’, e.g. “WinPE10_q.iso”.
If the file is not contiguous and still boots OK, use the NCQ suffix to also suppress the ‘not contiguous’ messages, e.g. “WinPE10_ncq.iso” or you can also use WinPE10_.isoNCQ.iso and the menu entry will be displayed as ‘WinPE10’.
Note: Gandalf and Bob.Omb’s WinPE10 builds require systems to have at least 2GB of RAM and many apps require writeable media (Gandalf says you cannot run it from a DVD), so it is best to convert the ISO to a .imgPTN file for full functionality of all apps, etc.
Add Desktop shortcuts, change wallpaper, auto-run apps on WinBuilder WinPEs
If the WinBuilder WinPE has been built with the correct module, you can add Desktop shortcuts which point to your own portable apps on the E2B drive, change the wallpaper, auto-run programs and registry tweaks on startup and add drivers, all without modifying the ISO at all! See here for details of PEStartup.
PEStartup should work for any WinPE, e.g. Medicat Mini Windows 10, HBCD WinPE, etc.
About WinBuilder ISOs
Most WinBuilder-based ISOs will load the ISO file as drive Y: when the Desktop loads. To do this, WinPE needs to be told where the ISO file is, so they usually look for a .INI file in the root of a drive which contains the location of the ISO file. This .ini file (e.g. \Win7PESE.ini) is usually written together with the .iso file in the WinBuilder ISO build folder by the WinBuilder make scripts when the ISO is first created. WinBuilder ISOs boot like this…
- ISO boots to WinPE
- Internal script looks for a specific .ini file using MountPEMedia.exe + MountPEMedia.ini – e.g. \WIN10PESE.ini (or drive with \CdUsb.Y file)
- Win10PESE.ini file contains path of where to find the ISO file
- Internal script loads the ISO file as virtual CD drive Y: (usually needs a .iso file extension and no spaces in name to work)
- Desktop icons + applications will now run correctly from Y:
Hint: A tell-tale sign that identifies a WinBuilder ISO is that it will usually contain a \CdUsb.Y file in the root of the ISO.
Boot WinBuilder ISOs without messages
IMPORTANT: WinBuilder ISO file names must contain no spaces.
The ISO may not be loaded as Y: if the filename contains spaces!
The file name must end with a .iso file extension or else it may not be loaded as the virtual CD Y: drive correctly.
Do not use .isodefault or .isodef or .iso64 or any other file extension as it may not work – you can use a .mnu file however (see below).See this page for how to suppress the E2B auto-suggestion text.Q for ‘Quiet’ – The easiest way to suppress messages is to simply ensure that the ISO filename ends in q or Q – e.g. WinPE10_q.iso or WinPE10Q.iso (E2B v1.93+) or add a .txt file. Alternatively use a .mnu file: # .MNU file for WinBuilder ISOs – Check if CPU is 64-bit and boot without E2B messagesiftitle [checkrange 2,3 is64bit] Win10PESE_x64.ISO\n Boot silently and quicklyset redir=> nulcall /%grub%/QRUN.g4b $HOME$/Win10PESE_x64.ISOboot
How to tell if it has worked correctly
Many WinBuilder PE’s will display a yellow warning triangle with an exclamation mark icon on the Desktop if it fails to load all the desktop icons (see screenshot below). If you double-click on the yellow triangle Desktop icon, and search the text file that is loaded, look for an ExternalIniFileName= entry (e.g. WIN10PESE.ini). This is the specific name of the .ini file that WinPE is looking for.
You must check to see if you have a Y: virtual CD drive present in Explorer (even if you do not get a Yellow warning triangle).

The yellow triangle icon indicates that some programs/features failed to load due to no .ini file being found.
For example, if you have a WinBuilder PE .ISO file from a Win7SE project build, the X:\Windows\system32\mountpemedia.ini file will specify an external INI file name of \Win7PESE.ini, so we need a file in the root of the E2B drive called Win7PESE.ini with the path and filename of the ISO you are using –
Example \Win7PESE.ini
[IsoInfo]
IsoName=\_ISO\MAINMENU\Win7PE_x86.ISO
The filename of the .ini file used by the WinBulder PE ISO may vary depending on what PE build you are using. The filename must not contain spaces and must end with .iso (do not use .isodefault or any other file extension). However, this will only work as long as you have just one WinBuilder PE ISO of each type (e.g. Win7PESE) on your E2B drive because, for example, you can only have one Win7PESE.ini file and thus only boot to one WinBuilder Win7PESE type of ISO file. See below for how to have multiple WinBuilder ISOs.
How to find the correct name of the .ini file for each ISO
Boot as a .ISO file and then double-click the yellow Desktop icon (see screenshot above) to find the ExternalIniFileName= entry.
Most WinBuilder PE builds have the file X:\Windows\system32\mountpemedia.ini built into the boot.wim file when WinBuilder makes the image. You can look at this file once the WinBuilder PE has booted, to see what it contains (see below). This file tells WinPE what the name and location of the PE ISO is, so that it can load it as drive Y:. However, this file also specifies an external INI file which WinPE will also look for. It is this external INI file that we need to provide on the E2B USB drive, but it must be of the same name that is specified by the mountpemedia.ini file – so check the X:\Windows\system32\mountpemedia.ini file if PE fails to load all Desktop icons.
Example X:\Windows\system32\mountpemedia.ini file showing where the external INI filename is specified.[Settings]
ProjectName=Win7PESE
MountDrive=Y:
SearchFlagFile=Yes
FlagFileName=CdUSB.Y
SearchExternalIniFile=Yes
ExternalIniFileName=Win7PESE.ini <<<<<< name of ini file used by WinBuilder ISO
DesktopWarningLabel=Win7PESE Warning
[IsoInfo]
IsoName=Win7PE_x86.ISO
[OnError]Line1=CdUSB.Y or ISO NOT found !
The X:\Windows\system32\mountpemedia.ini file specifies an ISO file – in this case the WinBuilder PE ISO will look for \Win7PE_x86.ISO and so it will not find it. However, it also specifies the name of an external INI file which it expects to find at \Win7PESE.ini. We therefore need to ensure that this file is present on the root of the E2B USB drive and that it contains the true location of our ISO file.
Tip: If the WinPE ISO prompts you to ‘Press ENTER to boot from CD\DVD’, you can permanently fix this by changing the file extension to .isoBF (BF=’Boot fix’) – then boot to the ISO – then quit and rename the ISO file back to it’s original file extension. This will patch the ISO file.
E2B with Multiple WinBuilder ISOs (Removable and Fixed-disk drives)
E2B v1.90+ will automatically detect if a .ISO file contains WinBuilder and will modify the \Win7PESE.ini, \Win8PESE.ini and \Win10PESE.ini files in the root of the E2B drive. The .ISO file should then be correctly loaded as Y:.
This works for some versions of MediCat, Gandalf PEs, WinPEYol, BobOmb’s WinPE and most other WinBuilder ISOs that use these .INI files.
If you change the file extension from .iso, it may not work (see above)!
Using a .mnu file for non-standard .ini files (E2B v1.90+)
If your WinBuilder ISO does not use any of the .INI files already present in E2B, you must create a blank .INI file in the root of the E2B drive and use a .mnu file. Place the .iso and .mnu file in a 3rd-level folder (e.g. \_ISO\WINPE\MNU) so that only the .mnu file appears in the E2B menu.
WinBuilder_ISO.mnu
# WinBuilder sample .mnu file - example for Gandalf x86 64-bit WinPE 2016-11 version (requires E2B v1.90 or later)
# click on the Desktop Yellow Warning Triangle to find .ini file name for each WinBuilder ISO
# ISO filename must not contain spaces or it won't be loaded as Y: virtual CD!!!
# You must create the \WIN10PESE.ini file in root of E2B drive and fill it with 1000 characters of random junk

title Gandalf PE 64-bit WinBuilder ISO\n Boot a WinBuilder ISO
set ISOFN=Gandalfx64WindowsPE.iso
set IniName=WIN10PESE.ini

if not exist $HOME$/%ISOFN% echo ERROR: $HOME$/%ISOFN% NOT FOUND! && pause
if exist     $HOME$/%ISOFN% call /%grub%/QRUN.g4b force.isoWB $HOME$/%ISOFN%
boot
Note: Some Gandalf apps require writeable media – so use a .imgPTN file for full functionality.
Using a .isoWB and WB folder (old, more complicated method!)
Blog post tutorial for Gandalf Redstone x64 here.
If you have several ISOs that have been created by the same WinBuilder project (for instance you have Win10PESE_x86 and Win10PESE_x64), you can use the .isoWB file extension for each ISO as described below (E2B v1.30 and later):
1. Copy the .INI file used by your WinBuilder ISO (or make one) to the root of the E2B USB drive – this file is usually found in the same folder as the ISO when made by WinBuilder. e.g. \Win7PESE.ini. The contents of the file are not important, but the file name is critical and must not be changed – it must be the same name that is looked for by the WinBuilder ISO.
2. Add extra spaces to the .ini file using NotePad to make a larger file (e.g. by adding 100 spaces to the end of it).
The .INI file MUST be at least as big as the .WB file that you are going to create.
3. Copy your WinBuilder PE .ISO file to the desired menu folder (e.g. \_ISO\MAINMENU or \_ISO\WINPE) – do NOT uses any spaces in the filename.
Use an ISO filename of less than 20 characters with no spaces – e.g. Gandalf_WinPE_x64.isoWB is 17 characters.
4. Rename the ISO file extension to .isoWB (e.g. \_ISO\MAINMENU\WBPE.isoWB)
5. Make a subfolder called WB (e.g. \_ISO\MAINMENU\WB) – the sub-folder MUST be named WB – this cannot be changed.
6. Create a text file in the WB folder with the same name as the .isoWB file but with a .WB file extension – e.g. \_ISO\MAINMENU\WB\WBPE.WB)
The contents of the .WB file should contain two lines (the text in red should be changed to match the name of the .INI file used by your WinBuilder ISO (the one you made in the root of the E2B drive in Step 1), make sure you keep the case of the word IniName the same, don’t use ININAME or ininame – only IniName will work!):
!BAT
set IniName=Win7PESE.ini
7. (optional) Create a .txt file for the .isoWB file so that the menu entry is not just displayed as the filename, e.g.
title My WinPE ISO\n Boot the ISO using Easy2Boot
Example File Structure for ChrisR’s Win10PESE project (must use a WB sub-folder)
\Win10PESE.ini <– must be over 1KB (any contents inside – it is overwritten by E2B)
\_ISO\WINPE\Win10PESE_x86.isoWB <– WinBuilder PE ISO renamed to .isoWB
\_ISO\WINPE\WB\Win10PESE_x86.WB <– text file containing the name of the INI file used by the PE ISO (see step 6 above). Filename must match the .ISO filename.
For another example using WinPE-Yol.iso – see my blog article here.
Use a .mnu file for multiple WinBuilder ISOs (older method – even more complicated!)
If you prefer, you can instead use the .mnu file in the \_ISO\docs\Sample mnu files\WinBuilder_PE_Multiple_ISOs folder (v1.30 and later) for each WinBuilder PE ISO file.
Details are inside the ReadMe.txt file.
Note: The .WB file goes in the same folder as the .iso file when using a .mnu file.
Please note, if using pre-v.1.71 E2B versions, the INI file needs to be about 1000 bytes or larger if your E2B USB drive is an NTFS volume.
An alternative way to boot WinBuilder or WinPE ISOs
Note: For this method, all the WinBulder .ISO files need to be in the root of the E2B drive. They must not be renamed.
No INI file is required.
1. Ensure there is no \Win7PESE.ini file (or whatever is used by the PE ISO) or \CdUSB.y file in the root of any drive. Delete them if they exist
2. Copy your WinPE ISO file to the root of you E2B drive – e.g. U:\ – do NOT rename the ISO file
3. Copy the WinBuilder_ISO.mnu file to an E2B menu folder (e.g. U:\_ISO\MAINMENU\MNU)
4. Rename and edit the .mnu file (any name xxxxxxx.mnu will work!) to contain the correct ISO name of your WinBuilder PE ISO. Delete the menu entry that is not required from the example below
WinBuilderPE_ISO.mnu
title WinBuilder ISO \n Use for most WinBuilder PE ISOs
set ISO=Win7PE_x86.iso
/%grub%/qrun.g4b force.iso01 /%ISO%
boot

title WinBuilder ISO + Load ISO as new drive letter \n Use for WinBuilder PE ISOs\n which don't auto-load the ISO as Y:
set ISO=Win7PE_x86.iso
/%grub%/qrun.g4b force.isope01 /%ISO%
boot
Repeat these steps for each WinBuilder ISO. Note that the second menu requires an E2B USB Flash drive (or an E2B USB HDD+USB Flash ‘Helper’ drive).
If you are using WinFE (see here for how to make a WinFE ISO), in order to get PStart to work correctly, you will need to Mount the E2B USB drive using the WinFE Write Protect Tool that will automatically run on startup (it can be mounted as ReadOnly or Read\Write).
If you want the ISOs to be located in \_ISO\MAINMENU\MNU then you will need to specify the path in the WinBuilder – Finals – Create ISO parameters before you click on the Play arrow/
The ISO (WinFESS.ISO in this case) must be placed in the \_ISO\MAINMENU\MNUThe path in the .mnu file must also be changed.
For ‘vanilla’ PE ISOs which don’t use Y:
(Removable drives)
E2B recognises a special file extension of .isoPE and .isoPE01. These can be used for WinPE v2 (Vista), v3 (Win7) and v4 (Win8/10) based .iso files.
If you use the .isoPE file extension AND the E2B boot drive is a Removable USB Flash drive (or you have an E2B ‘Helper’ USB flash drive connected) then, when wpeinit runs to initialise the network when the WinPE ISO boots, the WinPE ISO file will be mounted as a virtual DVD drive and given the letter Y: by default. This means that for WinPE (e.g. WinBuilder) projects, you can boot directly from a .isoPE file and the auxilliary files which the WinPE environment expects to find on the Y: DVD drive, will be present on the Y: drive. Thus the PStart menu items, etc. should work as if it had booted from a DVD.
If you wish to have the ISO load as a different drive letter, then you need to make a new file with the same filename as the ISO but with a .cmd file extension (in the same folder as the .isoPE file).
e.g. \_ISO\MAINMENU\PE3x86.cmd if the iso was at \_ISO\MAINMENU\PE3x86.isoPE01
The .cmd file should contain a line similar to the one below:
set ISOLETTER=S:
In this way, you do not need to remember what drive letter each different ISO uses, once you have made the .cmd files for each of your WinPE ISO files.
Note: E2B v1.91+ supports the use of ISOLETTER=B: which can be used if you must have a \sources folder on the E2B USB drive but want Setup to find the ISO file’s Sources folder on drive B: first.
Run your own .cmd file
If you require a .cmd file to run some operations after the ISO has been mounted but before PE has fully loaded (e.g. to copy files, etc.), you can define a POSTCMD variable, e.g. if the ISO was called \_ISO\WINPE\Winpe\123.iso, then here are 4 different examples of what could be in your 123.cmd file:
set ISOLETTER=S:
REM run \_ISO\WINPE\Winpe\123_Custom.cmd after the ISO file has been loaded as a virtual drive
set POSTCMD= %~pn0_Custom.cmd

set ISOLETTER=S:
REM run \_ISO\WINPE\Winpe\xyz.cmd after the ISO file has been loaded as a virtual drive
set POSTCMD= %~p0xyz.cmd

set ISOLETTER=S:
REM Run a cmd file from the E2B USB drive after the ISO file has been loaded as a virtual drive
set POSTCMD=%USBDRIVE%\xxx\yyy\zzz.cmd

set ISOLETTER=S:
REM Run a cmd file from the ISO after the ISO file has been loaded as a virtual drive
set POSTCMD=S:\xxx\yyy\zzz.cmd
For WinBuilder PE ISOs, you can force it to load the Desktop icons by having a .cmd file on the E2B drive containing the correct commands – e.g.
Shortcuts.exe -f %SystemDrive%\Windows\System32\Win7PE.cfg
PinTool.exe -debug %SystemDrive%\Windows\System32\Win7PE.cfg
The .isoPE01 file extension has the same affect as the .isoPE extension, except that it swaps over the USB boot drive 0 with drive 1 (the internal HDD) before booting to the ISO (BIOS swap only). This may be useful for running WinPE ISOs that normally contain recovery software which expects HD0 to be the ‘system’ HDD.
Example .cmd file to replace an existing CD-ROM drive letter with that of the ISO
123.cmd
=====
@echo off
for /f “skip=1 delims=” %%i in (‘wmic cdrom get drive’) do set letter=%%i && goto :end
:end
set ISOLETTER=%letter%:Thanks to (NF) for this example.
Note: If you also add a .txt file for each ISO, then you can change the menu text displayed for each file.
Example WinPE menu for E2B+agFM

See eBook #4 for details.