Table of Contents
CSM Menu changes
MakePartImage.cmd creates the .imgPTN file and it will create and modify the CSM menu slightly (e.g. add a title to the top of the menu).
The menu system in E2B is not used at all in a .imgPTN file. The E2B menu and the CSM menu are completely independent of each other.
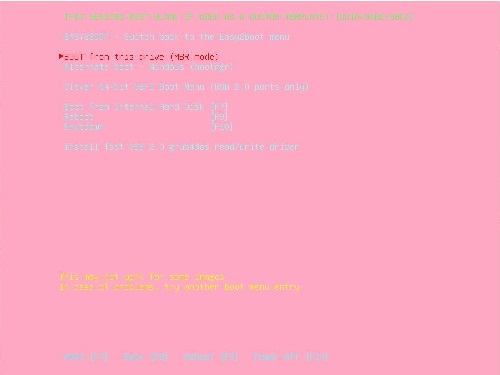
In the CSM menu, a default background image is used (the one with the large letters C S M on the right of the menu), as well as other default settings such as resolution (800×600), colours, keyboard language (USA), menu language (English), default menu entry, menu entry timeout, menu password, etc.
You can change these by creating a MyCSM.cfg file.
The user CSM Menu configuration file is called \MyCSM.cfg (if present) and is equivalent to \_ISO\MyE2B.cfg in the E2B menu system (but does not support as many features).
You can use the E2B_Editor to design a CSM menu (with certain limitations – see below).
Note that any changes you make to the E2B menu system (e.g. \_ISO\MyE2B.cfg or STRINGS.txt) will NOT affect the CSM menu.
DO NOT CHANGE OR DELETE any of the MakePartImage toolkit files, however you can ADD files, such as a MyCSM.cfg configuration file and wallpaper bmp or jpg’s into the CUSTOM folder.
You can, of course, directly edit any pre-made partition image files, either by mounting the .imgPTN file using ImDisk or by switching to the partition image on an E2B USB drive by using a real system (or QEMU or VBox or SWITCH_E2B.exe) and then access the files directly in Windows Explorer.
The .\CUSTOM folder
To change MakePartImage (MPI) so that it always uses your own custom CSM menu whenever you make a new .imgPTN file, you must add files to the CUSTOM folder in MPI.
You should never change any other folder. If you later add a new version of the MPI Tool Kit, you can simply copy your CUSTOM folder into the new MPI folder.
When MakePartImage runs, the entire CUSTOM folder will be copied to the partition image when it is made and will overwrite any existing MPI files inside the .imgPTN image. See below for details.
For example, you can place a file (e.g. MyCSM.cfg) in the CUSTOM folder, and all new .imgPTN files that you create using MakePartImage.cmd will now contain that new file and this the default CSM menu will be changed. You could also add a .\CUSTOM\e2b\csm.jpg file and it will be used as the wallpaper.
The \menu.lst file (you should not need to change this file)
The .\csm\menu.lst file (\menu.lst on the USB drive) is used for the standard CSM menu. Most lines have comments, to tell you what they do.
WARNING: Do NOT change the long, single line in menu.lst:
##set PAYLOAD= ;; ######################################################
This long line in \menu.lst is automatically changed by MakePartImage and it will be replaced with the name of the payload file.
This means that you can edit a \menu.lst file, test it and then add it to the .\CUSTOM folder without needing to worry about the set PAYLOAD= line being wrong in the \menu.lst file.
Note that the \heading.g4b file (created each time) also sets the PAYLOAD variable and this file will override this line (MPI 0.089+).
Do NOT copy the \heading.g4b file to the .\CUSTOM folder or you will always get the same menu heading!
Never edit or replace the .\csm\menu.lst file. Instead use a .\CUSTOM\MyCSM.cfg file. If you need to modify the \menu.lst file for some reason, then add the new version to the .\CUSTOM folder (but you should not need to do this and I strongly suggest you do not touch it!).
Modifying the CSM Menu using the CUSTOM folder
To create new .imgPTN images using MakePartImage with modified contents, place your new or replacement files in the .\CUSTOM folder. The contents of the .\CUSTOM folder will be copied by MakePartImage to the root of the image after the payload\ISO has been extracted – any existing files will be overwritten with the files in the CUSTOM folder.
For example: You can place your own menu.lst or MyCSM.cfg file in the .\CUSTOM folder and it will be used by MPI. If you place your own 800×600 bitmap file at .\CUSTOM\e2b\CSM.bmp.gz it will overwrite the default background wallpaper (the file does not need to be a compressed .gz file and it can be a JPEG file instead of a .bmp file, but it must be named CSM.bmp.gz).
NOTE: MPI v0.085 and later will load \e2b\csm.bmp or \e2b\csm.jpg automatically, if they are present.
You can add any other files or folders you like under the CUSTOM folder and they will be copied to each new image that you make using MakePartImage.
A typical change is to add a .jpg file and a .\CUSTOM\MyCSM.cfg file which will change the wallpaper, colours, menu position, etc.
The CUSTOM folder already contains some sample .cfg files. You can rename one of these to MyCSM.cfg and see what it does.
The menu language and keyboard type can also be changed using the MyCSM.cfg file (see below).
MyCSM.cfg – Changing the menu and wallpaper
MPI Tool Kit will use a \MyCSM.cfg file which can be created using the E2B_Editor.exe utility.
The \Sample_MyCSM.cfg (included in the image) is an example of a MyCSM.cfg configuration file.
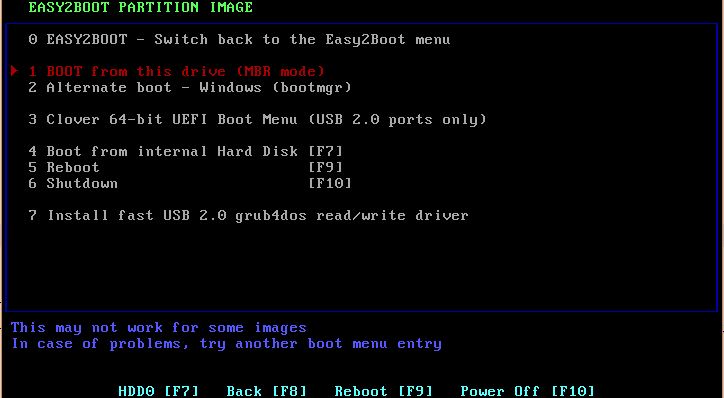
Above menu shows Sample_MyCSM.cfg used as \MyCSM.cfg.
Design you own CSM Menu
1. Copy the \_ISO\E2B_Editor.exe file to your Windows Desktop (or run it from an E2B USB drive)
2. Make a .imgPTN file (any ISO will do) and switch to it (using SWITCH_E2B.exe or boot to E2B and select the .imgPTN file) – the E2B USB drive should now contain a \e2b folder
3. Place your background wallpaper in \e2b folder on the USB drive (in CSM mode) – 24-bit colour .bmp or .bmp.gz or .jpg (800×600 recommended, or 1024×768)
4. Rename \Sample_MyCSM.cfg to \MyCSM.cfg on the E2B USB drive (in CSM mode)
5. Run the E2B_Editor.exe, select the \MyCSM.cfg file on the E2B USB drive when prompted
6. Select the bitmap or jpeg file you placed in the \e2b folder (ignore any warnings about it being a non-ISO/non-USB folder and any language\keyboard warnings)
7. Use the E2B_Editor GUI to configure your menu – Tip: place XXXX in the HEADING field so you can see where the heading will be placed
8. Boot to the image to test it (you can use RMPrepUSB – F11)
9. Make sure the HEADING field in E2B_Editor is completely empty (THIS IS IMPORTANT!)
Now re-save the \MyCSM.cfg file and check that the HEADING value is blank:
set HEADING=
10. ADDING INTO MakePartImage so all new .imgPTN files will contain your new menu:
Now copy the \MyCSM.cfg file into the .\CUSTOM\ folder and copy the wallpaper .bmp/.jpg file into the .\CUSTOM\e2b folder in the MPI Toolkit download folder (you can delete the Sample_MyCSM.cfg file if you wish).
- The first line must be !BAT
- Do NOT copy the \menu.lst file (because the ‘set PAYLOAD= ;; #####’ line needs to be unmodified)!
- Make sure the HEADING value is empty in the MyCSM.cfg file, otherwise all your new .imgPTN files will all have the same heading!
- Do not copy the \heading.g4b file – this is created by MPI and sets and overrides the PAYLOAD variable (MPI 0.089+).
- Make sure that the wallpaper path in the MyCSM.cfg file is correct – e.g. set MYWBMP=/e2b/pink.jpg
Note: If a \MyCSM.cfg file exists, the menu messages about 32-bit and 64-bit EFI boot files at the bottom of the CSM menu can be suppressed (see below). Also, the Menu heading will be set to the Payload name (as set by MakePartImage when the .imgPTN file was made), i.e. there will be no ‘EASY2BOOT MAIN MENU xxx’ heading.
You can also change the grub4dos password and change the default menu entry and add a timeout using the MyCSM.cfg file, e.g. add these lines to the bottom of the MyCSM.cfg file:
# -- ADVANCED MENU
# All lines below here will be preserved by the MyE2B_Editor.
# set the default menu entry (0-99) - dask should be set to same number
default 4 && set dask=4
# set default timeout in seconds (-1 = no timer) - task should be set to same number
timeout 99 && set task=99
set pwd=fred
set NOEFITXT=1
set NOF7HDD=1
set NOF9R=1
set NOF10H=1
If you want to adjust the Menu Heading after the .imgPTN file has been created, then edit the ‘set HEADING=’ entry in the \MyCSM.cfg file inside the .imgPTN file,
e.g. set HEADING=My new menu (%VER%) %B64% %@DATE% %@TIME%
The HEADING parameter supports the variables %B64% %day% %month% %year% %@DATE% %@TIME% %VER% and %UUID%
Note that the \heading.g4b file (created by MPI inside the .imgPTN file) can be modified instead if you wish.
To have a full-length menu bar for the highlighted menu item (see below), add this line to either the \menu.lst file or the \MyCSM.cfg file:
# set full length highlight bar for selected menu item (--highlight-short or --highlight-full)
setmenu --highlight-full > nul
Note: If black is used for the highlight background colour (default) then the background bar will be transparent (invisible), e.g. highlight=yellow/black. If you really want a black bar, use a very dark grey instead – e.g. 000001. You can specify a background color as well as a highlight colour 0x00rrggbb00RRGGBB
e.g. for a blue background (where blue part bb=CC)
color highlight=0x000000CC00FF0000
You can centre the menu entries and remove the menu border in MyCSM.cfg (if using MPI v0.085+) using:
setmenu --middle-align
setmenu --auto-num-off
setmenu --triangle-off
setmenu --box l=0
If you do not want the EFI boot file text to be displayed under the menu, use set NOEFITXT=1 in the MyCSM.cfg file to suppress it.
Set a default menu entry, menu password and a timeout
In recent versions of MPI you can set the default menu entry and a timeout in the \MyCSM.cfg file, e.g.
!BAT
set pwd=fred
timeout 20 && set task=20
default 4 && set dask=4
Change the language of the CSM Menu
MPI 0.085 and later support a limited number of languages – the .\e2b\LANG folder holds the .txt files which are available (e.g. .\e2b\LANG\GERMAN.txt). You can use these language files by setting the LANG variable in .\CUSTOM\MyCSM.cfg file:
# This will cause the strings in \e2b\LANG\GERMAN.txt to be used instead of \e2b\LANG\ENG.txt
set LANG=GERMAN
When the .imgPTN file is made, the \MyCSM.cfg file must be in the root of the USB drive.
Use the Sample_MyCSM.cfg file as a template. You can make your own language translation by copying the ENG.txt file and renaming and modifying it – e.g. make a new file called .\CUSTOM\LANG\ENG1.txt and use set LANG=ENG1
Add a GFXBoot Menu file
Recent MPI Tool Kit versions (0.067+) after July 2016, will support a GFX menu. Ensure that your GFXMenu file is at .\CUSTOM\e2b\message (it must be named message with no file extension). It will automatically be used if it is present.
Later versions of MPI use a different menu file (e.g. GFX_menu_ENG.lst) instead of the \menu.lst file – if you want to change the GFX menu, add a copy of GFX_menu_ENG.lst to the .\CUSTOM\e2b\LANG folder and then edit that copy. The language translation files (e.g. ENG.txt) are NOT used when using a message file.
Example for GFX menu in German:
- Add .\CUSTOM\e2b\message file
- If the ‘GERMAN’ language is set (set LANG=GERMAN) in the MyCSM.cfg file, then the file \e2b\LANG\GFX_menu_GERMAN.lst will be used (if it is present).
The ‘default’ and ‘timeout’ settings will be valid for a GFXBoot menu, but the HEADING and other menu settings will not be displayed.
GFX Boot Menu Languages
To use a GFX menu, copy the GFX message file to the MakePartImage .\CUSTOM\e2b folder.
For non-English GFX Menus, you must copy GFX_menu_ENG.lst to the .\CUSTOM\e2b\LANG folder and edit it manually.
Then set the LANG variable – e.g. GFX_menu_GERMAN.lst is used if set LANG=GERMAN.
This file will only be used if the file \e2b\message also exists.
Language support in older MPI versions
The CSM menu does not support different languages in older versions.
To change the language, we must replace the English default menu.lst with a different file with translated menu entries.
1. Copy the .\csm\menu.lst file from the MPI Tool Pack folder, to the CUSTOM folder in the MPI Tool Pack.
Note: Do NOT use the \menu.lst file from an existing .imgPTN file because it will have been modified by MakePartImage.cmd. You must copy the menu.lst file from the .\csm folder.
2. Now edit the .\CUSTOM\menu.lst file and change the ‘title’ and ‘iftitle’ lines into your own language. For example:
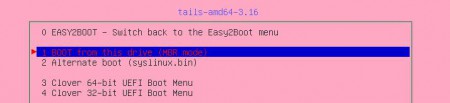
title EASY2BOOT - Switch back to the Easy2Boot menu\n Restore the Easy2Boot MBR.\n This will restore all the Easy2Boot partitions.
becomes…
title EASY2BOOT - Zurück zum Easy2Boot-Menü\n Easy2Boot MBR wiederherstellen.\n Das wird alle Easy2Boot Partitionen wiederherstellen.
Save the file in UTF-8 format using NotePad. Now, whenever you make a new .imgPTN file, the .\CUSTOM\menu.lst file will be used.
Keyboard
The CSM menu will assume that a standard US QWERTY keyboard is present.
If your keyboard is not a USA QWERTY keyboard, you may not be able to enter the menu password of ‘easy2boot’.
To use a different keyboard for all your new .imgPTN files:
1. If not already present in the .\csm\e2b folder, copy the \_ISO\e2b\grub\KBD_*.g4b files to the .\csm\e2b folder
2. Add a MyCSM.cfg file to the MPI .\CUSTOM folder to call the appropriate keyboard batch file, e.g.
 !BAT
#turn off errorchecking in case an older grub4dos version is being used
errorcheck off
call /e2b/KBD_AZERTY.g4b
errorcheck on
Now when you make a new .imgPTN file, the keyboard scan codes will be converted correctly.
Note:
You can instead use a setting in the MyCSM.cfg file:
set KBD=KBD_QWERTY_UK.g4b
in the MyCSM.cfg file (v0.096 and later versions only).
Menu Password
To remove the menu password so that you do not need to enter a password:
 !BAT
set pwd=
in the CUSTOM\MyCSM.cfg file (or set the password as required, e.g. set pwd=fred).
Add an animation

Example lines to add to \MyCSM.cfg file (change text in red as required):
set ANIMFD3=/e2b/CheetahAnimatedKick.ima
set last=62
# 1st param - use 0x90 for looping+transparent background, use 0x10 for opaque background
# 2nd param is delay (1\18th second), 3rd is last frame number, 4th is x pos, 5th is y pos (in pixels), 6th is path to first frame
set ANIMATE=0x10=3=%last%=590=400 (fd3)/E2B/CheetahAnimatedKick_frame_0001.BMP
# load IMA as fd3
map --mem %ANIMFD3% (fd3) > nul
map --hook > nul
# play sequence now
splashimage --animated=%ANIMATE%
# remove params
set ANIMATE= ;; set last= ;; set ANIMFD3=
Using a 1024×768 menu
The default menu expects an 800×600 display but you can set the mode to 1024×768 using set GMODE=1024 in the MyCSM.cfg file.
Note that the menu width and height will be changed.
Modern systems which support UEFI-booting will support 1024x768x24 graphics mode. However, some older systems (e.g. netbooks) may only support 800x600x24. In this case, you can create an alternate configuration file, e.g. MyCSM800.cfg, and use the following 2 lines at the top of your \MyCSM.cfg file:
debug 1 ;; vbeprobe > (md)0x220+5 ;; debug 0
cat --locate="1024 x 768" (md)0x220+5 > nul || /MyCSM800.cfg && goto :EOF
If the system does not support 1024x768x24 then the MyCSM800.cfg file will be used instead of the settings in MyCSM.cfg.
Updating the MPI Tool Pack
By using the CUSTOM folder, your changes can be kept when you update the MPI Tool Pack to a newer version – just copy your CUSTOM folder to the new CUSTOM folder in the new MPI download.
UEFI Information
To suppress the EFI boot file info lines use:
set NOEFITXT=1
To add your own EFI boot file lines under the menu, add the following 5 lines to your \MyCSM.cfg file…
set E=
# To adjust position, change P:XXXX in lines below
if exist /EFI/boot/bootia32.efi   set E=%E%echo -n -e    -P:3331 \\x24[0103]INFORMATION: x86 32-bit UEFI boot file \\\\EFI\\\\boot\\\\bootia32.efi present
if exist /EFI/boot/bootx64.efi    set E=%E% \necho -n -e -P:3431 \\x24[0103]INFORMATION: x86 64-bit UEFI boot file \\\\EFI\\\\boot\\\\bootx64.efi  present
ls /EFI > nul || set E=\necho -n -e -P:3331 \\x24[0103]INFORMATION: No \\\\EFI folder present (cannot UEFI boot)
Note that the 32-bit message will be displayed on line 33 and the 64-bit message is displayed on line 34 in this example.
To display a single \ character, you must use \\\\.
To display any more text on the CSM menu, add another line similar to:
set E=%E%\necho -n -e -P:3731 \\x24[0103]Here is my text
- [0103] defines the colour (see \_ISO\Sample_MyE2B.cfg for explanation of colours – e.g. [0103] = 0 no blink, 1=bright, 0=black\transparent background, 3=cyan). You can also use 0xRRGGBB instead of the 4-digit colour codes (e.g. [0xFF0000] for red).
- -P:RRCC defines the Row and Column position where the text will start – e.g. 3331 = line 33 down and 31 characters across.
- \n throws a new line.
Testing the changes
If you have existing .imgPTN files, instead of making new images, you can mount the .imgPTN file using ImDisk (right-click on the file) – then make your changes, e.g. you can replace the menu.lst and CSM.bmp.gz files, etc. and then dismount the virtual drive to save the changes.
An easier alternative is to switch E2B to that image (CSM mode) using SWITCH_E2B.exe or by MBR-booting and selecting the .imgPTN file – then you can directly edit the files on the USB drive under Windows or Linux.
Note: Your menu.lst file must contain certain phrases which are recognised by E2B and SWITCH_E2B. These phrases are in the ‘Easy2Boot switch’ menu code. If these code phrases are not in the menu.lst file, E2B will refuse to load the partition image (because there will be no way to switch back to E2B from the CSM Menu!).
MakePartImage.cmd will replace the string ‘##set PAYLOAD= ;; ‘ in the menu.lst with the name\title of the payload and remove the ## characters. To change the payload title, use a \MyCSM.cfg file and set the HEADING parameter.
Tip: When a new version of MPI is downloaded, compare the .\csm\menu.lst file with your .\CUSTOM\menu.lst file to see if anything has changed!
Text-Mode Menu (English characters only)
Some system may have a problem displaying BIOS-mode 800×600 graphics or may be slow to display a menu. You can use a text-mode menu by adding a special \MyCSM.cfg file.
A very minimal \MyCSM.cfg file contains:
!BAT
set GMODE=3
set GFX=NONE
set MYWBMP=
The file Sample_CSM_TextMode.cfg file should already be present in the .imgPTN image if you also want to have a heading and footer and change the colours, etc. You can add a MyCSM.cfg file to the .\CUSTOM folder of the MPI Tool Pack folder so that it is always included in any new .imgPTN file that you make.
Sample_MyCSM_TextMode.cfg
!BAT

# THIS IS FOR TEXT MODE CSM MENU
# USE IN CASE GRAPHICS MODE IS NOT SUPPORTED
# USE ENGLISH - ONLY BIOS CHARACTERS DISPLAYED AS NOT IN GRAPHICS MODE

# COLOURS - USE ABCD or 0xhh only - 32/64-bit RGB colours (e.g. 0xRRGGBB such as 0xFF0033) do not work in text mode
# Use only ABCD (see below) or 0xhh (0xbackground-text) - e.g. 0x7e = grey background, yellow text
# ----- ABCD HEADING COLOUR -------
# HCOLOUR sets the colour of the HEADING text
# HCOLOUR=ABCD specifies the text colour  [BLINK|BRIGHT_F|BACKGROUND|FOREGROUND]
# A=0-1  1=BLINK text (does not work under VM or in graphics mode) - i.e. only works if GFX=none is used.
# B=0-1  1=BRIGHT_F sets bright value for foreground text
# C=0-7   =BACKGROUND colour - transparent if graphics mode so has no effect!
# D=0-7   =FOREGROUND menu text colour
# Colours parameters are: 0=black/grey 1=blue, 2=green, 3=cyan, 4=red, 5=pink, 6=yellow/brown, 7=grey/white.
# e.g. 0133 is non-blinking bright cyan text (on a dark cyan background if not in graphics mode) - if a wallpaper is used (graphics mode) it becomes _1_3 = bright-cyan, because background value is ignored.

set GMODE=3
set GFX=NONE
set MYWBMP=

# --------- HIGHLIGHT AND STANDARD COLOURS ------------
# For a highlighted menu entry with a background bar, use 'color highlight=FG/BG'  (FG=Foreground colour, BG=Background colour)
# Valid colours are black, blue, green, cyan, red, magenta, brown, light-gray, dark-gray, light-blue, light-green, light-cyan, light-red, light-magenta, yellow and white.
# 0xhh colours can also be used - e.g. color normal=0x0e
# --------------------------------------------

color highlight=red/black
color normal=light-gray/black
color helptext=light-blue/black
color border=blue/black

#HEADING - position must be first line 00xx, text, colour
set HEADPOS=0001
#leave set to PAYLOAD so that you can use this file in the CUSTOM folder of the MPT Tool Pack
set HEADING=%PAYLOAD%
#green = 2  1=bright  102=bright green on black bgnd
set HCOLOUR=0102

#FOOTER - position, colour and text 24 is last line, set to 35 if no help text wanted
set HBTM=2413
# 0103=cyan on black
set FCOLOUR=0103
set HELPTEXT=HDD0 [F7]     Reboot [F9]   Power Off [F10]

# Turn off menu numbers (blank or 0)
#set AUTONUM=0
# Don't ask for menu password (or can set password)
set pwd=

#MENU BOX and position cannot be changed
#CENTREHD does not work for text mode

#write HEADING and FOOTER HELP text
write (md)0x220+2 !BAT\necho -n -e -P:0000 $[0001] \x20                                                             \x20\necho -n -e -P:%HEADPOS% $[%HCOLOUR%]%CHPAD% %HEADING%\necho -e -n -P:%HBTM% $[%FCOLOUR%]%HELPTEXT%\n\0 > nul
initscript (md)0x220+2

# set the default menu entry (0-99) - dask should be set to same number
### default 4 && set dask=4
# set default timeout in seconds (-1 = no timer) - task should be set to same number
### timeout 99 && set task=99

# no F7 menu
###set NOF7HDD=1
# no F9 reboot menu
###set NOF9R=1
# no F10 Halt menu
###set NOF10H=1
# no set default menu entry
###set DEFMENU=0
# no Load USB driver menu entry
###set USBOPT=0
For more details, also see the E2B_Editor page. STAMPs, redir and redirp, etc. are not supported in the CSM Menu system, but you can add the grub4dos commands into the MyCSM.cfg file (e.g. to add a STAMP or write text to the menu or beep the speaker of play a tune).