Table of Contents
Configure the E2B menu system
\_ISO\MyE2B.cfg is the user configuration file
Here is a typical MyE2B.cfg file after making an E2B USB flash drive (lines beginning with # are comments lines and are ignored – the file MUST begin with !BAT):
!BAT
# See _ISO\Sample_MyE2B.cfg for many more settings
if "%LANG%"=="" set LANG=ENG
set KBD=KBD_QWERTY_UK.g4b
# ---- ADVANCED MENU SETTINGS -----
set EXTOFF=1
# This drive is the removable type - so don't look for a WINHELPER USB Flash drive
set NOHELPER=1
set ANIMFD3=/_ISO/docs/Templates/Animate/E2B_GIF.ima
set ANIMATE=0x90=3=9=615=160 (fd3)/frame_0001.bmp
set STAMP1=0x80=570=23 /_ISO/e2b/grub/E2BPlate.bmp
setmenu --string=i5=74=0=0xffffff="date&time=yyyy-MM-dd  HH:mm:ss"
When you boot E2B, it first looks for a \_ISO\MyE2B.cfg user configuration file.
It then automatically adds into its menu, in alphabetical order, all .mnu files and payload files that are in the \_ISO\MAINMENU folder. It also enumerates .mnu files in all sub-folders under \_ISO\MAINMENU.
- \_ISO\MyE2B.cfg may have already been created for you when you made the E2B USB drive – if not you can create one by double-clicking “\_ISO\docs\Make_E2B_USB_Drive\Make_MyE2B.cfg.cmd”
- You can directly edit the \_ISO\MyE2B.cfg file using a text editor.
- Use the \_ISO\E2B_Editor.exe utility to modify your menu layout – it will modify the MyE2B.cfg file for you.
- \_ISO\Sample_MyE2B.cfg contains a complete list of all possible configuration settings to allow you to change the Main Menu heading, footer help text, menu position, size, colours, language, password and many other options (many settings can be changed!). Grub4dos only allows a maximum of 60 environment variables, E2B uses about 20 variables and requires about 20 more for it’s scripts, this leaves a maximum of 20 or so extra ‘set’ variables for you to use in the MyE2B.cfg file. If you experience random grub4dos error messages, remove some ‘set’ variables from your MyE2B.cfg file or delete it completely.
- To change the text of individual payload menu entries, simply rename the payload file (e.g. ‘ubuntu-14.04-desktop-amd64.iso’ can be renamed to ‘Ubuntu 14.04 64-bit Desktop.iso’).
Note: Spaces in filenames can cause problems – always test without spaces first and then change the file name once it is working correctly! - To change the menu text and help text below the menu for a specific payload, add a matching .txt file.
- The Menu entry order is determined by E2B which sorts the payload and .mnu filenames alphabetically – so just rename them to change their order in a menu. Tip: press the spacebar twice to pause file enumeration so you can see how E2B has ordered each item.
- To change the other menu sub-headings and E2B menu text – see ‘Changing the Language’.
- E2B also uses .mnu files to add new grub4dos menu entries into a menu – you can add more .mnu files, delete or rename them (but never edit an existing E2B .mnu file unless you first change its filename).
- You can create a new menu folder with its own entry in the Main menu by using E2B SUBMENU Maker.cmd.
- Double-click on \_ISO\PimpMyDrive.cmd to add some demo menu entries (.mnu files) for you to test out
- The date and time format can be changed or removed – see here.
IMPORTANT: Do not edit any of the original E2B files because if you later update the E2B drive with a newer version of E2B, you will lose all your changes. If you need to change one of the E2B files, rename it first, e.g. rename \_ISO\MAINMENU\ZZSubMenuAll.mnu to ZZSubMenuAll_NEW.mnu before you edit it.
The file \_ISO\MyE2B.cfg can be edited by you because it is not part of the E2B download and is not an ‘original’ E2B file since you created it when you first made the E2B USB drive – it will not be over-written when you update your E2B version.
Payload and .mnu files
E2B automatically adds payload files (.ISOs, .IMAs, .IMG, etc.) to the menu, only if they are at the 2nd folder level (i.e the \_ISO\xxxx level).
Payload files (and .mnu files) are listed in alphabetical order of their file names.
For automatic addition to a menu, a payload file must be in a menu folder.
Note that .mnu files will be found at all levels, even if they are nested below the 2nd folder level (nested sub-folders).
e.g.
\_ISO\LINUX\FRED\Ubuntu.iso <<< ignored – will not be added to the LINUX menu
\_ISO\LINUX\FRED\Ubuntu.mnu <<< will be added to the LINUX menu
\_ISO\LINUX\Clonezilla.iso <<< will be added to the LINUX menu
\_ISO\LINUX\Clonezilla_Persistent.mnu <<< will be added to the LINUX menu
Background wallpaper
- Do not use a wallpaper larger than 1024×768 (it can cause E2B to crash!) – use either 800×600 or 1024×768,
- 24/32-bit colour format should be used.
- I recommend you use 800×600 because not all systems can display 1024x768x24 colours.
- If using a .jpg file, it must not be in web ‘progressive’ format or else it won’t be displayed by E2B (even though it may be displayed by E2B_Editor.exe).
- .bmp or .jpg files can be used (not .png or other formats).
- If you have problems with any .jpg or .bmp, simply load it into Microsoft Paint and re-save it.
E2B_Editor (E2Bed)!

Use the E2Bed editor to design your own menu system (save the configuration as MyE2B.cfg).
1. Run \_ISO\E2B_Editor.exe (Windows only) and choose a .cfg file (e.g. \_ISO\MyE2B.cfg or select the Sample_MyE2B.cfg file).
2. Choose a 800×600 or 1024×768 (uncompressed) .bmp file or .jpg (if one was not already specified in the .cfg file) – the file MUST be under the \_ISO folder (or sub-folder) and it must be on the E2B USB drive.
3. Use the mouse to draw a rectangle for the menu area (any menu border, if configured, will be drawn around the outside of the menu text).
4. Change the colours, header and footer text and other settings as required.
5. Click on the red Save button to save the new settings (if you chose Sample_MyE2B.cfg then New_MyE2B.cfg or MyE2B.cfg will be saved).
Tip: You can just view the new settings in Notepad by answering ‘No’ to the ‘Save’ question. Note: When E2B boots, it will always load the user’s configuration file from \_ISO\MyE2B.cfg.
E2Bed does not display animations. The animation that is displayed is determined by the ANIMFD3 and ANIMATE settings in your MyE2B.cfg file.
Screen Size and Menu layout
The diagram below shows an 800×600 display mode (100 text characters x 37.5 lines, GMODE=800).
A 1024×768 display will be 128 characters x 48 lines (GMODE=1024).
If GFX=none is set, we will have 640×400 text mode 16-colour (VGA mode 3) of 80×25 lines (sometimes mode 18 which is 80×30)
E2B can automatically choose the best available resolution by adding code to your \_ISO\MyE2B.cfg file – see my blog post here. However, I suggest you stick to 800×600.
Note: Default menu size and position parameters assume a 800×600 display size. You may need to modify MyE2B.cfg if you change the display mode.
1024×768 – 128 x 48 lines
800×600 – 100 x 37 lines
GFX=NONE – 80 x 25 lines – note you must adjust noitems (max 17), tophelp (max 19), HBTM (max 24) and reduce length of the HELPTEXT string.
The menu variables with some example values are shown in the diagram below (case sensitive).


Note: The menu border is always drawn outside of the menu, e.g. if rstart=2 then the border vertical is in column 0 and an arrow pointer is in column 1. The menu text starts in column 2. Allow 1 line for the horizontal border lines. rstart=0, rstart=1 and rstart=2 are equivalent and will position the menu in the same place.
If GMODE=800 then we get 100 characters (0-99) across each row and 37 rows (0-36).
A default menu size is preset by E2B, and assumes a 800×600 screen resolution and the following parameters:
Default settings:
set HEADPOS=0000
set rstart=3
set menuw=64
set topstart=2
set noitems=24
set tophelp=26
set bdwidth=1
set HBTM=3502
You can change these in _ISO\MyE2B.cfg or use E2B_Editor.exe.
Tip: Copy the .mnu file “\_ISO\docs\Sample mnu files\E2B Menus\Adjust_E2B_Menu.mnu” to the \_ISO\MAINMENU folder and boot to the E2B Main Menu. You can now adjust these parameters and observe the effect on the menu instantly (v1.A0+).
The Main Menu Heading
Menu headings are positioned on the screen using HEADPOS+HPAD+HEADING (the heading text).
HEADPOS is a four digit number (row+column) – e.g. YYXX – 0103 is line 1, 3rd character across. HEADPOS is ignored if CENTREHD is used. HEADPOS is 0000 by default.
HPAD is a variable that contains a string of one or more spaces and it is automatically calculated by E2B from the rstart value. HPAD is used by E2B to shift all the menu headings to the right and contains a number of spaces (must start with space character \x20). You do not usually need to set HPAD.
You can override the internal HPAD value by setting it in MyE2B.cfg, e.g. set HPAD=\x20 \x20
The Main Menu heading text is set using HEADING in the MyE2B.cfg file. It can be offset by adding spaces – e.g. set HEADING=\x20 MY MAIN HEADING.
To remove the Main Menu heading use:
set HEADING=\x20
The headings of the sub-menus are determined by the language file (e.g. \_ISO\e2b\grub\ENG\strings.txt). You should NOT change the language files but instead create your own language folder (e.g. ENG_JIM).
CENTREHD
You can cause all menu headings to be auto-centred within the menu area by using set CENTREHD=1 in the \_ISO\MyE2B.cfg file (v1.65+).The central position is calculated by E2B from the menuw value that has been set in MyE2B.cfg (the default value is set in the E2B.cfg file = menuw = 64). You can skew the menu headings by using a value other than 1 for CENTREHD – e.g. set CENTREHD=65 will make E2B use 65 instead of the menuw value to calculate the centre of the menu. CENTREHD pads out the heading string with the correct number of spaces, i.e. HPAD + CENTREHD is used to shift the headings over to the right.
If you set CENTREHD in MyE2B.cfg, then HEADPOS (YYXX) will be set to YY00 by E2B v1.97+ (i.e. the X offset will be set to 00).
The X position of the heading is now determined by [HPAD] + the CENTREHD value.
Note: You can specify your own padding for HPAD in your \_ISO\MyE2B.cfg file – e.g. set HPAD=\x20 \x20.e.g.set HPAD=\x20\x20set CENTREHD=98
The menu headings may also have leading spaces – if you want to change this, copy the STRINGS.txt file to your own LANGuage folder and edit the headings that are in the STRINGS.txt file. See here for more details.
Note that HBTM (the bottom help text position) is an absolute position, it is not padded by HPAD and not centred even if CENTREHD is set.
Other changes (headings, menu position, colours, etc.)
You can make a new \_ISO\MyE2B.cfg file by using the E2B_Editor or by making a copy of the \_ISO\Sample_MyE2B.cfg file – see the MyE2B.cfg page for more details.
For each E2B menu language, E2B uses keyword lookup strings which begin with $$STR followed by 4 alphanumeric characters (e.g. $$STR1bhx). To change the existing E2B sub-menu headings or standard menu entries or change the language, please refer to the ‘Languages’ page here.
Highlighting and centering the menu entries
When a menu entry is selected, the ‘highlight’ text colour and background colour displayed can be controlled, e.g.
# yellow text FFFF00 + background will be 222222 (v. dark grey/black) for selected menu entry - 0x00rrggbb00RRGGBB
color highlight=0x0022222200FFFF00
If the background highlight colour value is 0 (black) then the background colour will be transparent.
If SHORT_HL is set, then the background selection bar will not extend across the whole menu (see below).
Menu entries can be aligned from the left (most languages are ‘LTR’ = left-to-right) or from right-to-left (‘RTL’, e.g. Arabic), or they can be centred within the menu area (v1.A0+). e.g. in your MyE2B.cfg file, add a setmenu command under the ADVANCED MENU CONFIGURATION section…
# --- ADVANCED MENU CONFIGURATION ----

# set a short bar for background of highlighted menu entry (E2B v1.A0+) requires grub4dos 0.4.6a 2018-07 or later
set SHORT_HL=1

# centre the menu entries inside the menu area (and centre help text under menu) - requires grub4dos 0.4.6a 2018-07 or later
setmenu --middle-align
See the \_ISO\Sample_MyE2B.cfg file for more details.
Sub-Menu heading positions
HEADPOS can be set in the MyE2B.cfg file. If CENTREHD is used, the HEADPOS xx value is set to 0 by E2B.
HPAD is usually automatically calculated by E2B from the rstart value set in MyE2B.cfg and so does not usually need to be set.e.g. If HEADPOS = 0200 (3rd line down) and rstart=4 (5th column across) then HPAD will be automatically set to ‘\x20\x20\x20’ (i.e. rstart = 3 spaces) – followed by the menu heading string (‘AntiVirus Menu’). HPAD can be set in the MyE2B.cfg file – e.g. set HPAD= \x20 \x20.
Sub-menu headings may start with leading spaces if you wish. If you look in the \_ISO\e2b\grub\ENG\STRINGS.txt language file you can see entries like:
$$STRm017=AntiVirus Menu
So if you want one Heading to start further to the right, you must add the spaces in the STRINGS.txt headings – e.g.
$$STRm017=\x20 AntiVirus Menu
You should make and change your own STRINGS.txt file (do NOT edit the original E2B files!). see ‘Changing the Language‘.
All Sub-Menu headings will be automatically centred if CENTREHD has been set in the MyE2B.cfg file.
Menu help text
The help text area directly below the menu requires 5 clear lines of space, because up to 5 lines of help text can be printed, starting at the ‘tophelp’ position, on the display.
Note: with more recent versions of grub4dos, only 4 lines are required, however I recommend you allow for 5 lines of help text below the menu for backwards compatibility reasons.
The older grub4dos 0.4.5c requires 5 free lines below the menu area – if a default menu entry is chosen by the user, they may see a ‘This highlighted entry will be booted automatically in x seconds’ message at position tophelp+5 if a default menu item is set. This text is part of grub4dos. Its position is the 5th line down from the menu help text start position (tophelp set in MyE2B.cfg file).
In all versions of grub4dos, you can define only a maximum of 4 lines of help text for each menu entry.
e.g. if the .mnu file was:
title TEST \n1\n2\n3\n4\n5\n6
pause
boot
The help text below the menu area would display:
1
2
3
4
So you always need to ensure that there a 4 clear lines directly below your menu and the HELPTEXT footer text should be below that area.
Note: grub4dos 0.4.6a (default) will display the timeout counter on the same menu entry line so only 4 lines of help text below the menu are required.
If you want to hide the menu entry title help text, set tophelp to a large value so it is positioned just off-screen (e.g. set tophelp=47) in the \_ISO\MyE2B.cfg file.
Set the line width and position of the menu entry help text
The menu help text under the menu area can be moved and the width can be adjusted using tophelp, hstart and hwidth.
Use hstart and hwidth
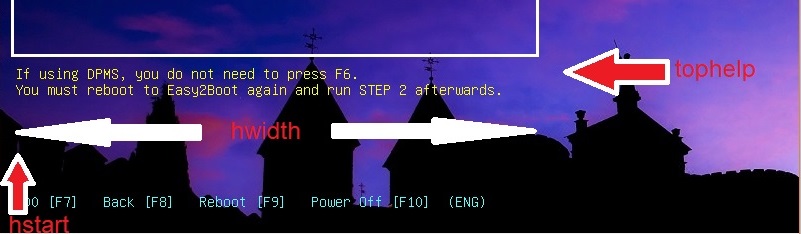
Using MyE2B.cfg, you can change the default position of the menu entry help text under the menu using:
tophelp – sets row at which to start help text (y offset)
hstart – sets column at which to start help text (x offset) (default = rstart-1), min = 1, 0 = use menu width and menu start
hwidth – sets the width of each help text line before it will wrap over (default = menuw+2), 0 = use whole screen width – 2 x hstart
# Example 1 – define exact position of help text
set tophelp=26
set hwidth=70
set hstart=6
# Example 2 – use whole screen width (minus 2 x hstart value) – so 3 spaces at start and 3 spaces at end
set hstart=3
set hwidth=0
# Example 3 – use menu default position and width
set hstart=0
Note: In My_E2B.cfg, hstart and hwidth should be defined below the ‘ADVANCED MENU SETTINGS’ area so that they are preserved if you use the E2B_Editor utility. In 800×600 mode, hstart+hwidth < 101, in 1024×768, hstart+hwidth<129.
Tip:You can draw a box around the help text using ‘setmenu –draw-box’. Note that you may have to draw a box one-character wider than the help text width to allow for an extra space that can occur at the end of a help text line. You may also need to adjust the vertical start position of the box downwards by one line.
Type help setmenu in the grub4DOS command prompt to see the required syntax.
Change how the filenames are listed in the menus
By default, payload files (e.g. ISO files, etc.) are listed in the E2B menus by their full filename but without their file extension (set EXTOFF=1).
To force E2B to list the filename+extension, use set EXTOFF= in the MyE2B.cfg file (clears the variable).
If you use set EXTOFF=1 in a \_ISO\MyE2B.cfg file (default) then only the filename will be displayed in the menus (without extension). The filename can be any name you like, E2B will look at the file extension to decide how to boot from it. e.g. a file named \_ISO\MAINMENU\Boot Ubuntu 14.04.iso will appear in the menu as ‘Boot Ubuntu 14.04’ unless EXTOFF is set to 1.
To change the text of a menu entry and add your own menu help text, make a .txt file of exactly the same name as the payload file:
e.g. for a payload ISO in \_ISO\MAINMENU\fred.iso, you can create a \_ISO\MAINMENU\fred.txt file containing the line…
title This is a menu for Fred\nThis is help text.\nThis is a 2nd line of help text.
and the ‘fred.iso’ menu entry will now appear as ‘This is a menu for Fred’ and the Help text at the bottom of the menu will also be changed. See here for more details.
To do this without having to use a file editor, copy the \_ISO\TXT_Maker.exe – or use \_ISO\docs\E2B Utilities\E2B TXT Maker.cmd file to your Windows Desktop. Then drag and drop the payload file (.e.g .iso file) and you will be prompted to enter the menu text and help text. A new .txt file will be made on the E2B drive in the same folder as your payload file. You can also define a hotkey for the menu entry.
Using .mnu files
If you use a .mnu file, you can also define the menu entry text and help text and also the grub4dos commands too.
.mnu files contain just grub4dos menu lines that you might find in a normal grub4dos menu.lst file. All .mnu file contents are automatically collated and added into the Easy2Boot menu each time you boot E2B. Save the file as UTF-8 format using Notepad if you want it to display special non-ASCII characters.
.mnu files are typically used for special cases and many example files can be found in the \_ISO\docs\Sample mnu Files folder. Instructions for users are inside each .mnu file (view/edit using Notepad).
Typically, .mnu files and their payload files are placed at the 3rd level (e.g. \_ISO\MAINMENU\MNU). You can use any folder name instead of MNU for the 3rd level folder and you can have many different 3rd level folders or many sub-folders below that. The folder names will be enumerated alphabetically and so this determines the order in which they appear in the menu.
Do not edit any of the original E2B .mnu files because if you later update the E2B drive with a newer version of E2B, you will lose all your changes!
If you need to change one of the E2B .mnu files, rename it first, e.g. rename \_ISO\MAINMENU\ZZSubMenuAll.mnu to ZZSubMenuAllXYZ.mnu before you edit it.
Note: The CSM menu is created by MakePartImage and is inside the .imgPTN image file, so the CSM menu is not affected by MyE2B.cfg or any file within E2B.
A YouTube Video about changing the E2B Menu background and using a MyE2B.cfg file is here.