Table of Contents
MOVE_IMGPTN
Move_IMGPTN is a Windows script which moves a file to a different position on Partition 1 of the E2B USB drive.
This is only required if you want to UEFI-boot because the partitions must be in ascending order or else the BIOS will not recognise the USB drive as being valid.
You can use two partition images files at the same time with E2B and agFM. The file with the extension .imgPTN* will replace partition 1 and the file with no file extension (but the same filename) will replace partition 3 or the E2B USB drive. I recommend that the file with the .imgPTN file extension is always placed on partition 1 and the auxiliary file with no file extension is always placed on partition 3 (and you can also use a .imgPTN23 file extension). That way there are no problems with the actual file start positions and no problems UEFI-booting. However, if both files are on partition 1 then the two files must be in a specific order and you must use a .imgPTN file extension for the first file (partition 2 must be removed).
Recommended arrangement when using of two partition images:
Ptn 1: \_ISO\LINUX\Ubuntu.imgPTN23
Ptn2: (agFM files)
Ptn3: \_ISO\LINUX\Ubuntu (or can be located at \ of Ptn3)
Ptn4: (unused)
If your E2B USB drive does not have three partitions, you should create a third Primary NTFS partition. You can use an extension of .imgPTN23 (ptn2 will remain) or .imgPTN (ptn2 will be deleted).
Note that if your E2B USB drive has three Primary partitions, some functionality such as Linux LiveCD ISO boot + persistence
If however, both of your images are on partition 1 of the E2B USB drive, the position of those two files on the drive is important if you want to UEFI-boot from the image.
- \_ISO\MAINMENU\Win81.imgPTN <– this file should be located on the E2B USB drive before the other file (Win81).
- \_ISO\MAINMENU\Win81
The MOVE_IMGPTN Windows script can be used to re-order a pair of contiguous partition images of the same name, i.e. one with a file extension and one without a file extension – e.g.
Note: SWITCH_E2B (v1.09+) will perform a similar function to MOVE_IMGPTN when a .imgPTN file is selected. You may need several attempts before the files are correctly positioned.
Typically, we use two partition images when we have >4GB files and want to UEFI-boot. We need a FAT32 partition for the UEFI-boot files, but we need an NTFS partition to store the large >4GB files. In another case, we may want Ubuntu kernel files on one partition and a swap partition for the other partition (or perhaps a data ext3 partition).
However, for many UEFI systems, if any of the MBR partition table start values are out-of-order (start position of partitions) then you may not get any UEFI boot options listed for that drive (see Examples 1 and 2) – e.g. Asus Z87
Examples of different MBR Partition Tables and the affect it has on BIOSes:
Example 1: No UEFI boot option is displayed by firmware - BAD
TABLE SLOT 1: FAT32 Start=8,194,236 (xxxx.imgPTN)
TABLE SLOT 2: NTFS  Start=4,234,556  (xxxx)
TABLE SLOT 3: empty
TABLE SLOT 4: empty

Example 2: No UEFI boot option is displayed by firmware - BAD
TABLE SLOT 1: NTFS  Start=8,194,236 (xxxx.imgPTN)
TABLE SLOT 2: FAT32 Start=4,234,556  (xxxx)
TABLE SLOT 3: empty
TABLE SLOT 4: empty

Example 3: UEFI boot option is displayed by firmware - OK
TABLE SLOT 1: NTFS  Start=4,234,556  (xxxx.imgPTN)
TABLE SLOT 2: empty
TABLE SLOT 3: FAT32 Start=8,194,236 (xxxx)
TABLE SLOT 4: empty
Tip: Use RMPrepUSB – Drive Info – 0 to view the MBR partition table of any drive.
For UEFI booting, the .imgPTN file (which is always in MBR PARTITION TABLE SLOT 1) needs to be positioned on the E2B disk before the file with no file extension (which always is in TABLE SLOT 3), otherwise the UEFI boot option may not be listed by the UEFI firmware.
The Windows cmd file script MOVE_IMGPTN.cmd will check the position of the two partition image files and attempt to move them if the .imgPTN is positioned on the E2B USB drive after the file that has no file extension.
How to set up MOVE_IMGPTN
Read and follow the instructions in the \_ISO\docs\E2B Utilities\MOVE_IMGPTN\ReadMe.txt file (E2B v1.77+)
You must make a shortcut that will run with administrator rights.
How to use MOVE_IMGPTN
The E2B USB drive should be in it’s normal E2B Menu mode so you can see the .imgPTN files.
1. Run \MAKE_THIS_DRIVE_CONTIGUOUS.cmd from the target E2B USB drive
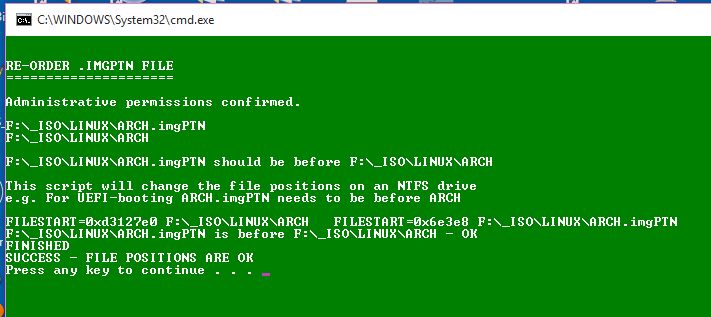
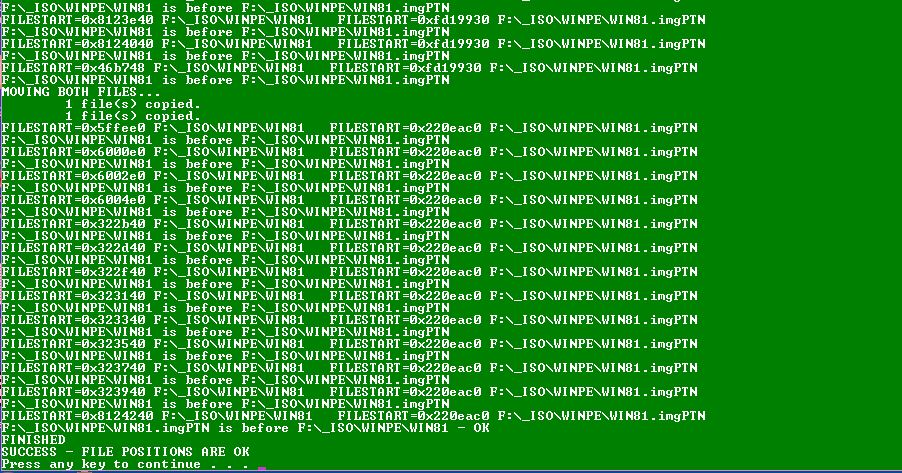
2.Drag-and-drop the xxxx.imgPTN file onto the MOVE_IMGPTN administrator shortcut and press [ENTER] if required. Look for a green=PASS screen on completion. The two files must be contiguous. If you are warned by MOVE_IMGPTN that they are not contiguous, then repeat steps 1 and 2 until MOVE_IMGPTN reports success.

The two files are already in the correct position

The files had to be re-copied until they were in the correct order.
If your USB drive is very full or very fragmented then install Piriform Defraggler and run Action – Advanced – Defrag Free Space on the USB drive, followed by \MAKE_THIS_DRIVE_CONTIGUOUS.cmd.