Table of Contents
Draw Lines and Boxes
Recent versions of grub4dos 0.4.6a support the ‘setmenu draw-box’ command.
setmenu –draw-box=%bINDEX%=%bx%=%by%=%bwidth%=%bheight%=%bpixels%=%bcolor%
Using this command you can draw up to 16 boxes, horizontal lines or vertical lines onto your menu.
- Note: standard text font characters are 16 pixels high by 8 pixels wide
- Start position=bx,by (units in pixels)
- For an 800×600 display, bx can be 0-799 and by can be 0-599
- For a 1024×768 display, bx can be 0-1023 and by can be 0-767
- To draw a box, define both bwidth and bheight (units in pixels)
- Set bwidth to 0 to draw a vertical line
- Set bheight to 0 to draw a horizontal line
- Max 16 lines+boxes (bINDEX 1-16), Max bpixels thickness is 255
- Use 16 pixels thick Horizontal lines to cover characters
- Use 8 pixels thick Vertical lines to cover characters
- Use 1-8 (max) pixels for boxes around text
- bcolor can use 0xRRGGBB values
- Avoid the menu area and do not exceed a display index number of 16
- To delete all draw-box commands from cache buffer use setmenu –draw-box=
Box and Line parameters
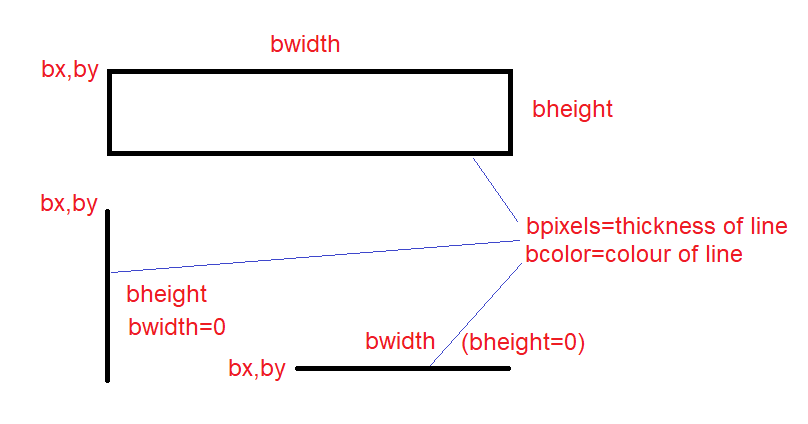
You can add setmenu –drawbox code lines to your \_ISO\MyE2B.cfg file…
Examples:
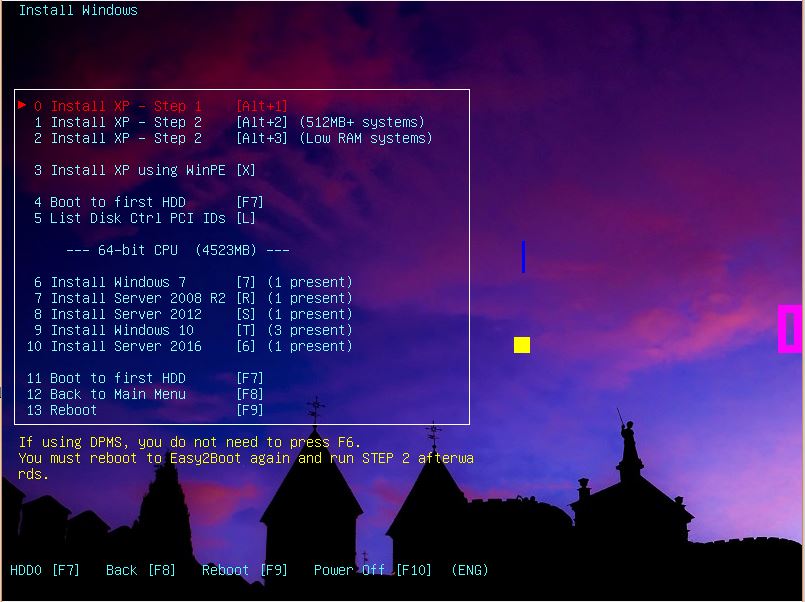
The –draw-box command is made more ‘user-friendly’ by temporarly defining meaningful names for each parameter…
Note: set /a can be used to set a parameter to a number using arithmetic operators.
Normal text characters are 8 pixels wide and 16 pixels high. Large font characters are 24 pixels high by 12 pixels wide.
# Draw a box at 97,19  3 characters across by 3 characters high, each line is 8 pixels wide, color is red+blue = magenta
set bINDEX=1 ;; set /a bx=97 * 8 ;; set /a by=19 * 16 ;; set /a bwidth=3 * 8 ;; set /a bheight=3 * 16 ;; set bpixels=08 ;; set bcolor=0xFF00FF
setmenu --draw-box=%bINDEX%=%bx%=%by%=%bwidth%=%bheight%=%bpixels%=%bcolor%
set bINDEX= ;; set bx= ;; set by= ;; set bwidth= ;; set bheight= ;; set bpixels= ;; set bcolor=

# Horizontal Yellow 16 pixel high line at 64,21  2 characters long
set bINDEX=2 ;; set /a bx=64 * 8 ;; set /a by=21 * 16 ;; set /a bwidth=2 * 8 ;; set bheight=00 ;; set bpixels=16 ;; set bcolor=0xFFFF00
setmenu --draw-box=%bINDEX%=%bx%=%by%=%bwidth%=%bheight%=%bpixels%=%bcolor%
set bINDEX= ;; set bx= ;; set by= ;; set bwidth= ;; set bheight= ;; set bpixels= ;; set bcolor=

# Vertical Blue 3 pixel wide line at 65,15  2 characters long
set bINDEX=3 ;; set /a bx=65 * 8 ;; set /a by=15 * 16 ;; set bwidth=00 ;; set /a bheight=2 * 16 ;; set bpixels=03 ;; set bcolor=0x0001FF
setmenu --draw-box=%bINDEX%=%bx%=%by%=%bwidth%=%bheight%=%bpixels%=%bcolor%
set bINDEX= ;; set bx= ;; set by= ;; set bwidth= ;; set bheight= ;; set bpixels= ;; set bcolor=
Note: set /a bx=65 * 8 will cause the result of the calculation to be displayed briefly on the screen, use set /a bx=65 * 8 > nul to prevent this. Alternatively, add the line debug off before any calculations are done (debug 1 will set it back to normal mode).
Moving and boxing the menu entry help text
The 4-line menu help text which is usually located underneath the menu can be re-positioned and boxed using the following lines in MyE2B.cfg:
# Standard character font is 16 pixels high by 8 pixels wide, 800x600 pixels display
# Start Help text at x,y (17,tophelp) for length 55
# Changing the 3 lines below will change position of help text and help box
set tophelp=27
set hstart=17
set hwidth=55
# Draw box around help text - units in pixels
set bINDEX=1 ;; set /a bx=%hstart% * 8 - 8 > nul ;; set /a by=%tophelp% * 16 + 4 > nul ;; set /a bwidth=%hwidth% * 8 + 14 > nul ;; set /a bheight=6 * 16 > nul ;; set bpixels=01 ;; set bcolor=0xFFFF00
setmenu --draw-box=%bINDEX%=%bx%=%by%=%bwidth%=%bheight%=%bpixels%=%bcolor%
# Write HELP to top of box
set /a sx=%hstart% > nul
set /a sy=%tophelp% - 1 > nul
setmenu --string=i0=%sx%=%sy%=0xFFFF00="HELP"
set bINDEX= ;; set bx= ;; set by= ;; set bwidth= ;; set bheight= ;; set bpixels= ;; set bcolor=
set sx= ;; set sy=
Ensure ‘standard’ background colour is black or ‘HELP’ will have the same background colour! – e.g. color standard=0x03. Note that bwidth is adjusted to exactly align with the right-hand menu border…
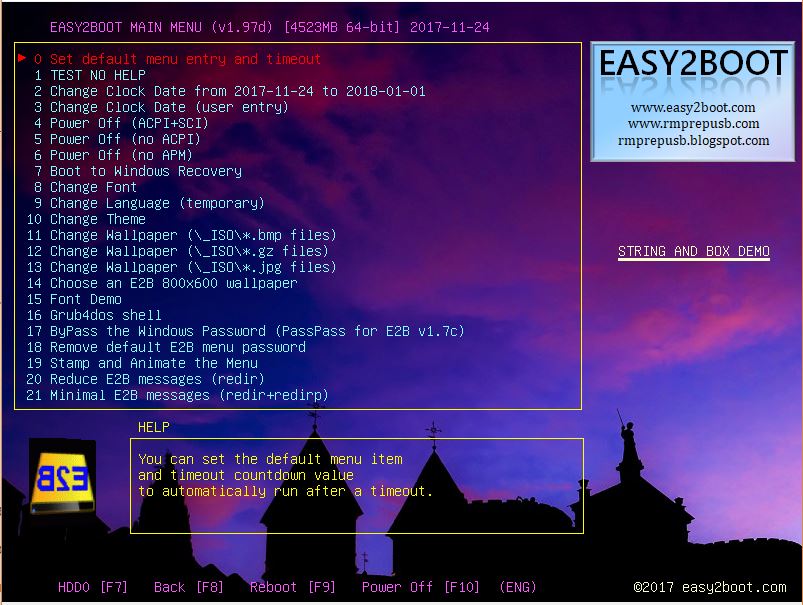
See BoxDemo.cfg file in \_ISO\docs\Templates folder for this configuration.
Deleting Lines\Boxes
Once a Line or Box command has been run, the command is cached (i.e. remembered) by grub4dos (maximum of 16 commands are stored). Any new menu (configfile) or background that is loaded will have the user-defined Lines and Boxes drawn on top of it. If you wish to remove one of the Lines\Boxes that you have previously defined, you can delete that command from the grub4dos cache buffer using just the bINDEX number or clear the cache completely, e.g.
# Delete bINDEX 3
setmenu --draw-box=3

# Delete all previous commands
setmenu --draw-box=
Instant boxes on grub4dos console screen
To draw any number of lines or boxes on the ‘terminal’ screen (not the menu screen) in the current ‘standard’ console text colour, you can use a built-in grub4dos function:
#rectangle  (x y w h border_width)
call Fn.77 180 180 100 100 2
#draw horizontal yellow line 4 pixels high
color standard=0xFFFF00
call Fn.77 580 380 200 4 4
This works on the current screen instantly when in graphics mode (but scrolling text may remove it).
You can use this in MyE2B.cfg or !!CONFIG\xx.mnu files to draw rectangles on the console screen before asking for user input.
Values are in pixels not lines. It can be called any number of times to draw multiple rectangles on the screen.
The command only affects the current display. If used in a .mnu file, you must ask for user input in order to see the rectangles before the menu is reloaded and the screen is cleared.
title Draw Box Instantly\n Draw concentric rectangles and prompt user for input
#draw horizontal yellow lines
color standard=0xFFFF00
clear
echo -e \n\n\n\n\n\n          HELLO\n\n\n\n\n\n\n\n\n
call Fn.77 0 0 200 200 4
call Fn.77 10 10 180 180 3
call Fn.77 20 20 160 160 2
call Fn.77 30 30 140 140 1
color standard=0x00FFFF
set /p ask=Is this pretty?
errorcheck off
boot
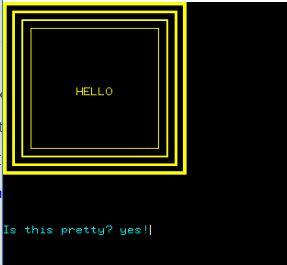
See Draw_Box_in_Console_Demo.mnu in \_ISO\docs\Sample mnu files\E2B Menus folder for a larger example.
Tip: To learn more about the mysterious Fn. function calls supported by grubdos, see here.
Write text
You can write text to the screen at any Line number and Column position using echo -P:LLCC, e.g.
echo -P:0609 DOLLY
echo -P:3001 This writes to line 30, extreme left of screen.
Write one line of text inside a box onto the menu
The code below writes a line of characters to the screen and surrounds the text in a border.
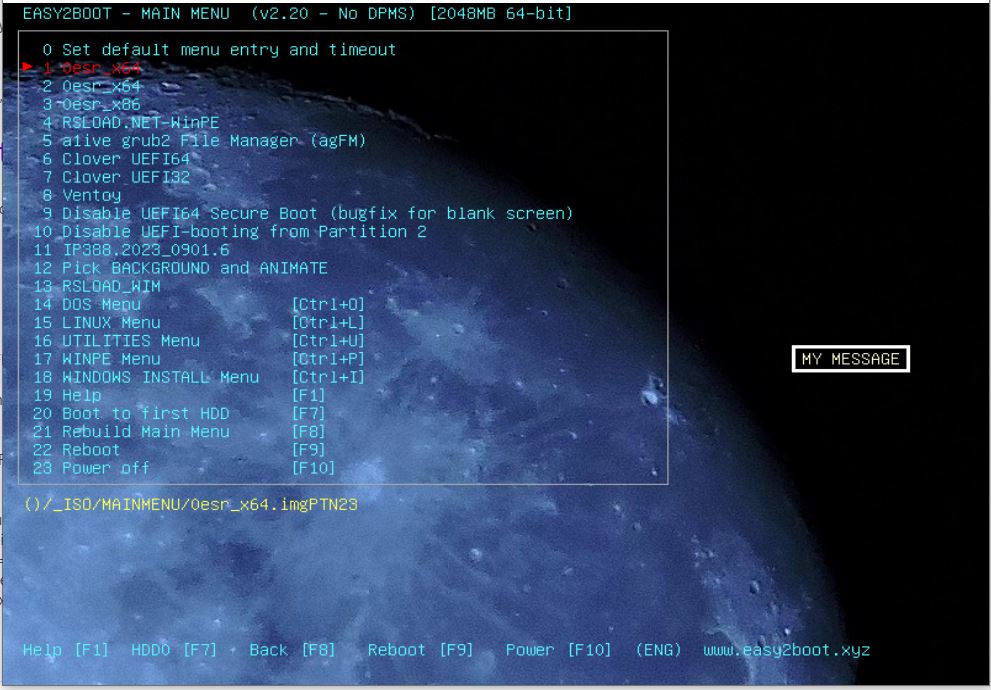
This example will add MY MESSAGE to all menus at coordinate x=81 (column 0-99) and y=19 (line 0-37) – assuming 800 x 600 graphics mode.
Place code in \_ISO\MyE2B.cfg file. You can change numbers in bold type as required.
# Write one line in a box on menu (units in character positions)
set x=81
set y=19
set txt=MY MESSAGE
set /a txtlen=%@retval% + 2
# color of text is yellow = 0xFFFFCC
setmenu --string=%x%=%y%=0xFFFFCC="%txt%"

# Draw BOX around string - assume only one line of text in message and bpixels border = 1-7 - one space before and after text
# bpixels 1-7 is border thickness
set bpixels=3
# bcolor is border color - white = FFFFFF, red = FF0000, green = 00FF00, blue = 0000FF
set bcolor=0xFFFFFF
set bINDEX=2 ;; set /a bx=%x% - 1 * 8 > nul ;; set /a by=%y% * 16 > nul ;; set /a bwidth=%txtlen% * 8 > nul ;; set bheight=16 > nul
set /a by=%by% - %bpixels% > nul
set /a bheight=%bheight% + %bpixels% + %bpixels% + 2 > nul
setmenu --draw-box=%bINDEX%=%bx%=%by%=%bwidth%=%bheight%=%bpixels%=%bcolor%
#clear variables as no longer needed
set x= ;; set y= ;; set txtlen= ;; set txt= ;; set bpixels= ;; set bcolor= ;; set bINDEX= ;; set by= ;; set bheight= ;; set bwidth= ;; set bx=
