Table of Contents
The SDI_CHOCO Process
SDI_CHOCO process is the name I have given to describe E2B’s fully automated install process.
Detailed instructions and step-by-step exercises can be found in the E2B eBook #2.
Introduction
Once you have set up the E2B USB drive for the SDI_CHOCO process, you will be able to pick any Windows 7, 8.1 or 10/11 install ISO and install Windows + drivers + applications + Windows Updates (Win 8.1/10/11 only) automatically. You do not need to alter the standard Microsoft ISO files, so you can just use any different version of an ISO (e.g. a new Win 10 version) and you won’t need to change anything else! Windows 11 is generally the same as Win10 for XML files and app installation.
1. Snappy Driver Installer (SDI)
2. Chocolately application installer (choco)
3. (optional) WSUS Windows Offline Updates (WSUS) (Win 8.1 and 10 only)
- SDI – This utility automatically finds and installs the correct drivers using pre-downloaded Driverpacks on the E2B USB drive.
- Chocolatey
Choco Online: Downloads the latest application packages from the internet each time and then installs them silently.
Choco Offline: Add offline choco packages to your E2B drive and install each one silently using a simple command.
(You can also install your own .exe/.msi packages and drivers, etc.) - WSUS – This utility will install the correct pre-downloaded Windows Updates without needing a network connection
The SDI_CHOCO files are all kept under the \_ISO\WINDOWS\installs folder…

Once you have set up SDI_CHOCO, you can automatically install default drivers and any applications you choose.
If you add WSUS Offline Updater to the E2B drive, it will also install Windows Updates (note: applying the updates can be very slow! Many people prefer to integrate the updates into the OS and make a new Install.wim file).
There is also provision to add your own drivers and applications too and have different configurations for different systems.
The *_SDI_CHOCO.XML files (included in SAMPLE XML FILES subfolders – copy them up one level to use them) for Windows 7/8/10 Installer ISO files can automatically install drivers and applications, e.g.
- NO KEY (choose a version to install) with SDI_CHOCO.xml – You will be requested to choose a Product Key (manual installation) – driver+apps+updates are automated.
- ZZDANGER_Auto_WipeDisk0_Win10HomeUK_with_SDI_CHOCO.xml – Automatically wipes hard disk 0, install Windows 10 Home with UK settings +drivers+apps+updates – completely hands-free!
You can make your own XML files without needing all the Microsoft bloatware SDK/ADK/WAIK, just use WAFG+XMLtoE2B – see here.
Snappy Driver Installer:
You can also run ‘Snappy’ directly from the E2B drive on any Windows system. This might be useful if you just want to update the drivers on an existing Windows system.
.TAG files
You can create these files (any size or content) in the CONFIGS\XXXX folder to control SDI_CHOCO (e.g. \_ISO\WINDOWS\INSTALLS\CONFIGS\SDI_CHOCO\):
- NoInternet.TAG – Internet connectivity will not be checked, msoobe will not be called to initialize WiFi n/w during Specialize (internet connectivity may or may not be available depending on Windows and what drivers are installed and if ethernet cable is connected).
- NoChoco.TAG – choco will not be downloaded from internet (but chocolatey package + various app packages can still be added Offline)
- NoSDI.TAG – The Snappy Driver Installer will not run (useful if you install your own drivers)
- NoWSUS.TAG – WSUS Offline Updater will not run
- OfflineChoco.TAG – \_ISO\WINDOWS\INSTALLS\CHOCBOX folder is copied to C:\DRIVERS\CHOCBOX and Chocolatey is installed directly from E2B drive – choco apps can still be downloaded online.
- NoBeep.TAG – do not beep the speaker (v1.93+)
- NoSpeak.TAG – don’t tell me what you are doing (v1.93+)
Notes
Because Chocolatey is installed onto the target system, the user can install more applications once the automated installation has completely finished, by simply typing (for example) ‘choco install skype‘ from an admin command prompt or type ‘choco list‘ to list all apps available or ‘clist note‘ to list all applications containing ‘note’.
For Windows 7, Chocolatey (if online) will automatically install .Net 4 – this takes quite a while (10-20 minutes).
OOBE = Out Of Box Experience: this is the set of Microsoft Windows User Setup dialogues used to configure the OS for the first time (Country, account name, password, WiFi, etc.).
Offline example
NoInternet.TAG + OfflineChoco.TAG = If you have added choco packages onto the E2B drive, then no internet connection is needed. Chocolatey will be installed + any application packages you specify. Chocolatey.nupkg is required.
Windows 10 1709 example
NoInternet.TAG
During the Specialize phase (e.g. SDI_CHOCO.cmd and MySpecialize.cmd), full network functionality may not be available.
Connect an Ethernet cable and add the NoInternet.tag file. Settings in the XML file can affect this behaviour.
Can also use OfflineChoco.tag if you have added packages for offline installation.
Windows 8.1 example
Use NoInternet.TAG + OfflineChoco.TAG. Chocolatey.nupkg is required.
Windows 7 example
Use NoInternet.TAG + OfflineChoco.TAG + NoWSUS.TAG. Use E2B v1.B9 or later. Chocolatey.nupkg is required.
For Windows 7 you must add the Offline package file for Microsoft .Net 4.5.2.
- Download and add \_ISO\WINDWS\installs\INSTALLCHOCO\NDP452-KB2901907-x86-x64-AllOS-ENU.exe
Or follow these instructions for fully updated Win7 ISO…
(instructions courtesy of Nathan):
- You must update the Win7 ISO first using 7UP. Download 7UPv50.zip or later. Also download UpdatePack7R2-20.2.21.exe from the first post
- Recommended download to help with choco install otherwise SDI_CHOCO script will look like its frozen while it downloads .net and installs it net-framework-48-for-windows-7
- Optional downloads not required but can help later vc runtimes Directx SmartFix
- Remember to download 32 or 64 bit versions where available to match your iso.
- Do not download the following as it causes issues with SDI and crashes computer. Not really needed as SDI will install any missing and update drivers anyway. 7UPDRIVERS.7z
- When you have everything set up your directory should look like this before you modify the ISO…

- Extract windows 7 iso.
- Now run as admin 7updaterv50.cmd – It will ask you a few questions, first where are windows7 install files located,
- Then it will ask about installing files to boot.wim say “yes” this is usb 3 sata and a few other drivers.
- Next asks you about which image to update (just do all of them its quite quick doing the other images)
- Next say yes to IE11
- Once is all finished use isocreate.cmd to make your new iso and place it on your e2b drive once completed.

Getting Started
Here are the steps you need to prepare the E2B drive for SDI, choco and WSUS:
Prepare your E2B USB drive for SDI_CHOCO
One example configuration set is already present in E2B. The config set is called SDI_CHOCO. You can copy this .cmd file and folder and rename it. In this way you can have multiple configurations sets for multiple versions of Windows, and automate the addition of different drivers, different apps, etc.
1. This feature works when using standard Microsoft Windows Installer ISO or .imgPTN files. It may work with some other ISOs (or may not!).
You need to have either:
- A large E2B USB drive + Windows Installer ISO files (recommended)
OR
- An E2B USB drive with Windows installer .imgPTN or .imgPTN23 files (see end of this page)
OR
- An E2B USB Hard Drive + Windows Installer ISO files + a small ‘Removable’ type USB ‘WinHelper’ Flash drive
If you are using a ‘Fixed Disk’ type of USB drive and E2B v1.A8 or later, you will need 2GB+ of RAM in the target system (No WinHelper drive required).
Note: If using a Virtual Machine, use E2B v1.A8+ and 2gb+ of RAM and take care not to wipe the USB drive if DRIVE 0 is specified in XML file!
Copy a suitable Windows 8.1 or 10 ISO file to the E2B \_ISO\WINDOWS\WIN8 or WIN10 folder, if not using .imgPTN files.
Note: There are internet connectivity bugs in some Windows 10 TH2 and Anniversary ISOs. Developer versions of Windows are not supported as some legacy Windows apps such as wmic.exe are often not included in Beta releases of Windows.
If you now try one of the SDI_CHOCO XML files, it will work, but it will not yet install any extra drivers or applications or updates…
2. (optional) If you want to install missing, newer or ‘better matched’ drivers, we must first download all the SDI Driverpacks (approx. 13GB) onto the E2B drive.
This can be done on any Windows computer.
- Double-click on a \_ISO\WINDOWS\INSTALLS\SNAPPY\SDI*.exe file to start the Snappy GUI (64-bit is faster)
- Accept the Windows Firewall prompt.
- Now click on (click here to start the download) , tick the Application and Indexes boxes and select all the Driverpacks you want.
- Download all the Driverpacks and latest SDI*.exe files (do NOT click on the green Install button!).
Or – if you wish, you can download the latest full SDI version with all drivers here and then copy the files to the E2B USB drive.

Once finished, I suggest you make a backup copy, in case you lose your E2B drive, to save having to download the driverpacks again.
Note: You should select for download the latest version of SDI (tick ‘application‘) and the latest Index. You can delete older versions of the SD??????.exe files and just leave the latest version (one 32-bit and one 64-bit) – SDI_CHOCO will always use the most recent .exe file that is in the folder.
The sdi.cfg file determines the Snappy settings. E2B uses a default sdi.cfg setting which installs drivers which are ‘Not installed’, ‘Newer’ or a ‘Better match’.
Note that some drivers can cause problems, so you may find it best to omit the ones that can be difficult to identify correctly – the Touchpad driver can often cause problems as often notebooks require a very specific version. You may also wish to omit any graphics drivers too. You can delete the driver .zip files if you have already downloaded them.
To change the settings, simply run the SDI executable and tick/untick the boxes. This will change the sdi.cfg file.
Note: Updating E2B will restore the default settings. You may wish to copy your sdi.cfg to Mysdi.cfg so that you have a copy which you will need to restore after updating the E2B version.


Note: Latest versions may have a ‘GNU GENERAL PUBLIC LICENCE’ EULA which requires you to click on the Accept button. Make sure you do this before starting an automated install. It only needs to be done once.
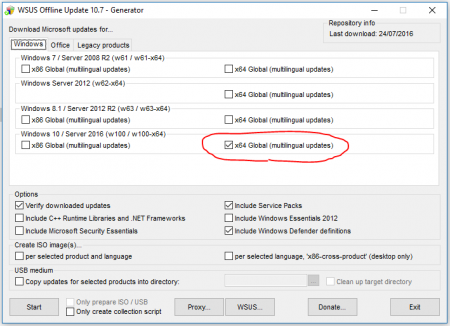
3. (optional) Add WSUS Offline Updates
Note: The WSUS Offline Updater is discontinued for Win7.
- Download and extract WSUS Offline Updater to your Windows hard disk (WARNING: do NOT use Windows to extract the files from the ZIP file because it is reported to use incorrect timestamps, instead is 7zip, WinRar or some other 3rd-party tool).
- Run the UpdateGenerator.exe application and tick the updates you require (see below).
- Download the updates (this may take some time)
- Now copy the whole wsusoffline folder to the E2B USB drive \_ISO\WINDOWS\INSTALLS folder so that \_ISO\WINDOWS\INSTALLS\wsusoffline now contains the UpdateGenerator.exe application and all other files and folders.

Note: You will need to ‘freshen’ the updates once a week to keep them up to date.
4. (optional) Finally, you may want to install some Applications:
Copy the \_ISO\WINDOWS\INSTALLS\CONFIGS\SDI_CHOCO\Sample_MyStartup.cmd file and rename it to:
\_ISO\WINDOWS\INSTALLS\CONFIGS\SDI_CHOCO\MyStartup.cmd
You can examine and change MyStartup.cmd if you wish to use choco commands to install applications.
Note that an internet connection is required for choco downloads unless you first download the choco packages (see ‘Install choco applications offline’ and below).
5. You must use an Unattend XML file that will run the SDI_CHOCO cmd file which ‘kicks off’ the whole thing and contains settings such as language, locale, Windows Edition, disk partitioning, username, computername, etc. You can create your own unattend XML file if you wish (see here).
Sample ‘SDI_CHOCO’ XML files are also provided with E2B.
The XML files must be in the same folder as the .ISO file.
Checklist
- Add MySpecialize.cmd (optional)
- Add MySetupcomplete.cmd (optional)
- Add MyStartup.cmd (used to install apps, etc. and tidy up)
- Create .TAG files if required
- ISO in correct \_ISO\WINDOWS\XXXXXX folder (standard released Microsoft Windows Install oem\retail\volume-licence ISO – not a modified ISO, not an MS development/beta ISO)
- XML file in same folder as ISO and has special entry to run SDI_CHOCO.cmd
- The configuration .cmd file name (e.g. \_ISO\WINDOWS\installs\CONFIGS\SDI_CHOCO.cmd) must be the same name as the folder underneath it (e.g. \_ISO\WINDOWS\installs\CONFIGS\SDI_CHOCO)
Do not edit any of the existing E2B files because they will be overwritten if you update your E2B drive with a newer version of E2B. You can rename them before you edit them. If you are editing any existing files for the SDI_CHOCO configuration then rename the .cmd file and folder (e.g. CONFIG1.cmd and \CONFIG1) and edit the XML file to call CONFIG1 instead of SDI_CHOC.cmd.
Installing Windows
- First connect an ethernet cable to the target system – internet access is required to install applications using choco (unless using offline choco packages).
Note: For Windows 10 you may be prompted to set up WiFi (specify a name and key) if no ethernet\internet is available. For offline Chocolatey, no internet is required. The WiFi wizard can be disabled using a setting in the XML file (true). - Boot to E2B (or UEFI-boot to agFM) and select Windows 7/8.1 or Windows 10/11 ISO as usual.
- Now choose one of the xxxxxxx_SDI_CHOCO.XML files – e.g. Windows 10 Home with SDI_CHOCO.xml (or a ‘choose a key’ with SDI_CHOCO and then choose a product Key).
Note: If you want to try one of the sample AutoWipe_xxxxxx_SDI_CHOCO.XML then these are fully automatic and will immediately wipe Hard Disk 0. Do not test it using Virtual Box if the USB drive is HDD0 or it will wipe the USB drive!
Tip: You can create a .mnu file which will run a specific ISO with a specific XML file.
Note that XML files which specify what partitions to create or use often only work in one mode – either Legacy mode or UEFI mode. Windows requires MBR partitions if you legacy boot to the ISO file, or it requires GPT partitions if you UEFI-boot to the ISO from E2B\agFM\Ventoy. If an XML wipes the disk and then creates partitions, they must be of the correct type (GPT partitions if you UEFI-boot from USB or MBR partitions if you legacy-boot from USB.
How SDI_CHOCO works
- The XML file contains a ‘Specialize’ pass section which causes the \_ISO\WINDOWS\INSTALLS\CONFIGS\SDI_CHOCO.cmd script on the E2B USB drive to run during the ‘Specialize’ phase.
- The SDI_CHOCO.cmd script copies files from the SDI_CHOCO folder (same name as cmd file) and adds two files to the target hard disk:
SetupComplete.cmd is copied to C:\Setup\Scripts\SetupComplete.cmd which should run automatically after Windows Setup has finished
but before a user account is created and before the first user logon.
Startup.cmd is copied to C:\Startup.cmd – this runs on first user logon.
As well as these two files, it also copies the entire contents of the SDI_CHOCO folder to C:\DRIVERS.
If wsusoffline is present, this folder is also copied to the C:\DRIVERS folder. - Next SDI_CHOCO.cmd runs the SDI driver install app. directly from the E2B USB drive and will install drivers.
- Next SDI_CHOCO.cmd checks it has internet access (if installing Windows 10 – please use the latest version of TH2 – the first version of TH2 had network bugs!)
- Next SDI_CHOCO.cmd will install Chocolatey (if required) and calls the MySpecialize.cmd script (if present)
- Next the system will reboot and complete the installation of Windows.
- Next it will run C:\Setup\Scripts\SetupComplete.cmd which will call the MySetupComplete.cmd script (if present)
- If autologon was enabled (or after you manually create a new user in Setup), the \Startup.cmd file will run and call the MyStartup.cmd script (if present).
You can create and edit the three controlling files MySpecialize.cmd, MySetupComplete.cmd and MyStartup.cmd – use the example Sample_Myxxxxxx.cmd files as templates.
Order of execution
- Pass=WinPE – Setup file copy phase – install boot code
- Reboot
- Pass=Specialize – SDI_CHOCO.cmd (contents of .\CONFIGS\SDI_CHOCO\* copied to C:\DRIVERS)
- Call C:\DRIVERS\MySpecialize.cmd (USB drive can be removed when complete)
- Reboot(s)
- Pass = OOBESystem – \%WINDIR%\Setup\Scripts\SetupComplete.cmd will call C:\DRIVERS\MySetupComplete.cmd
- OOBE (Out of Box Experience) starts, user account(s) created
- C:\DRIVERS\Startup.cmd (wsusoffline is run if present) then will call C:\DRIVERS\MyStartup.cmd to install apps, etc.
.tag files
These .tag files can be added for more control:
- \_ISO\WINDOWS\INSTALLS\CONFIGS\SDI_CHOCO\NoWSUS.tag – suppresses Windows offline updates
- \_ISO\WINDOWS\INSTALLS\CONFIGS\SDI_CHOCO\Nochoco.tag – suppresses choco installs
- \_ISO\WINDOWS\INSTALLS\CONFIGS\SDI_CHOCO\NoSDI.tag – suppresses the SDI driver installer
- \_ISO\WINDOWS\INSTALLS\CONFIGS\SDI_CHOCO\NoInternet.tag – does not auto-launch MSOOBE which allows user to connect to WiFi if no WAN available
- \_ISO\WINDOWS\INSTALLS\CHOCBOX\SDI_CHOCO\OfflineChoco.tag – folder is copied to C:\DRIVERS\CHOCBOX and Chocolatey is installed from E2B drive
- \_ISO\WINDOWS\INSTALLS\CHOCBOX\SDI_CHOCO\NoBeep.TAG – does not beep the speaker (v1.93+)
- \_ISO\WINDOWS\INSTALLS\CHOCBOX\SDI_CHOCO\NoSpeak.TAG – silent mode – don’t tell me what you are doing (v1.93+)
Sample_xxxx.tag files are present already, simply rename them if you want to use them (their contents is irrelevant – they can even be empty).
The \_ISO\WINDOWS\INSTALLS folder structure
- \_ISO\WINDOWS\installs – contains all SDI_CHOCO sub-folders
- \_ISO\WINDOWS\installs\APPS\CHROME – example folder for an offline application is included
- \_ISO\WINDOWS\installs\APPS\CHOCBOX – offline application packages for choco go here
- \_ISO\WINDOWS\installs\CONFIGS – contains main config set script that must be specified in the XML file and kicks off the whole thing. Also contains the sub-folder of the same name which is copied across to the target hard drive \DRIVERS folder. Multiple config sets can be stored here.
- \_ISO\WINDOWS\installs\CONFIGS\SDI_CHOCO – example config set for SDI_CHOCO.cmd – contains the SDI_CHOCO scripts and helper utilities – these are copied across to the target hard drive.
- \_ISO\WINDOWS\installs\DRIVERS – you can keep your bespoke drivers here and copy them to the target hard disk – use sub-folders.
- \_ISO\WINDOWS\installs\SNAPPY – contains the Snappy SDI files but you need to add all or some of the driverpacks first.
- \_ISO\WINDOWS\installs\wsusoffline – add WSUS files here if you want to install offline Windows Updates.
- \_ISO\WINDOWS\installs\INSTALLCHOCO – files used to install Chocolatey – used for offline install of Chocolatey.
Auto-activation (for Win8/10/11)
If the system had already been registered with Microsoft and activated, you can use the autoactivate.cmd script to automatically activate it again (requires internet access).
You must download the get_win8key.exe file and add it to the \_ISO\WINDOWS\INSTALLS\CONFIGS\SDI_CHOCO folder.
- :: Activate if get_win8key.exe has been added
- :: get_win8key.exe can be downloaded from github.com/christian-korneck/get_win8key#files
- :: Right-click – Properties – UnBlock after downloading the file
- :: Must be run as Admin
- if exist %systemdrive%\DRIVERS\get_win8key.exe call %systemdrive%\DRIVERS\autoactivate.cmd
The system BIOS\Firmware should already contain a Win8 or Win10/11 embedded OEM key.
Note: There can be two different Product Keys in an XML file. The first one in the windowsPE pass determines what Edition is installed (Core/Pro). This key can be a generic install-only key or a valid activation key. The second Product Key entry in an XML file (Specialize pass) determines what key is used for activation. If not present the first key will be used for activation or the OEM embedded key may be used.
How to install bespoke drivers (example for Lenovo)
In my experience, specialized products such as notebooks, tablets, netbooks, etc. require bespoke drivers.
They also require additional drivers which are not inluded in SDI, such as ACPI, touchpad and hotkey drivers.
I would highly recommend that you always use the correct manufacturers drivers for these products.
Lenovo provide Windows 10 downloads for the IdeaPad 300 notebook in the form of executables.
1. These must first be extracted as follows:
- Double-click the .exe file to run it
- Click Next\OK to extract the files to the C:\DRIVERS folder – I suggest you rename the folder name and remove any spaces.
- Do NOT proceed to install the drivers – untick the box and click Finish.

Do this for each of the drivers/applications.
2. Now copy all the sub-folders that are in C:\DRIVERS to \_ISO\WINDOWS\INSTALLS\DRIVERS\IDPAD300\W10_8_64
3. Now prepare a .cmd script that will install each driver \_ISO\WINDOWS\INSTALLS\DRIVERS\IDPAD300\W10_8_64\ID300_DRIV_INST.cmd
The difficult bit is in finding the correct switches to make the drivers install silently!
Here is an example folder file structure for Windows 8 and Windows 10 64-bit drivers for the IdeaPad 300:
\_ISO\WINDOWS\INSTALLS\DRIVERS\IDPAD300\W10_8_64\ID300_DRIV_INST.cmd
\_ISO\WINDOWS\INSTALLS\DRIVERS\IDPAD300\W10_8_64\CHIPSET
\_ISO\WINDOWS\INSTALLS\DRIVERS\IDPAD300\W10_8_64\VGA
etc.
Here is an example ID300_DRIV_INST.cmd file:
pushd "%~dp0"
dir
:: Possible switches -s or /SILENT /NORESTART or  /S /v/qn  or /qn /norestart  or -s -sms ???
start /wait dotnetfx35.exe /q /norestart
start /wait .\Power\POWER_ACPI_acpidriver.exe /SILENT /norestart
start /wait .\chipset\setupchipset.exe -s -norestart
start /wait .\IME\MEISetup.exe -s
start /wait .\RealtekLAN\setup.exe -s
reg add HKEY_LOCAL_MACHINE\SYSTEM\CurrentControlSet\services\iastora\Parameters\Device /v Controller0Phy1ANEnable /t REG_DWORD /d 0 /f
reg query HKEY_LOCAL_MACHINE\SYSTEM\CurrentControlSet\services\iastora\Parameters\Device /v Controller0Phy1ANEnable | find /i "0x0"
start /wait .\RealtekCardRdr\setup.exe -s
start /wait .\ConexantAudio\setup.exe -s
start /wait .\VGA\Setup.exe -s
timeout 5
start /wait .\camera\Alcor_2.44.50.23\setup -s
start /wait .\camera\Realtek_6.3.9600.11105_WHQL\setup -s
start /wait .\LenovoUtility\setup.exe /SILENT
start /wait .\LenovoOptimizer\pt_install_msi.exe /Q /SILENT
start /wait .\SysIntFoundation\SystemInterfaceFoundation.exe /SILENT /norestart
start /wait _Solution_centre_updates_lscsetup_x64_33003.exe /s /v/qn
start /wait .\TPAD\install.exe /S
:: tpad doesn't wait - so delay
timeout 20
echo Finished!
Note: The ‘reg add’ lines are taken from one of the IdeaPad ‘tweak’ driver downloads and were added into the .cmd file.
4. Now edit the MySpecialize.cmd file so that it copies the whole folder from the USB drive to the target hard disk and then run the ID300_DRIV_INST.cmd script.
This example allows us to remove the USB drive as soon as the drivers have been copied to C:\DRIVERS
MySpecialize.cmd
:: Environment variables that are already available:
:: %USB% is the USB drive - e.g. D:
:: %BIT% will either be X86 or AMD64
:: %WINVER% will be 7 or 8 or 10
:: %CONFIGDIR% will be %USB%\_ISO\WINDOWS\INSTALLS\CONFIGS\SDI_CHOCO
:: %log% will be the log file
:: %errlog% will be a log file to record errors
:: %systemdrive%\DRIVERS folder will hold all files that were in %USB%\_ISO\WINDOWS\INSTALLS\CONFIGS\SDI_CHOCO

:: Download and install some choco applications - it is best to install choco apps using Startup.cmd
:: Some choco apps installed at this stage of Setup may not register correctly

:: activate Windows if possible using BIOS OEM key
call C:\DRIVERS\autoactivate.cmd

if exist %systemdrive%\DRIVERS\NoChoco.TAG start /wait %systemdrive%\DRIVERS\nircmd speak text "WARNING: The file No Choco dot tag was found - choco installs will NOT work"

choco install 7zip.install -r -y >> %log%

:: Copy bespoke drivers for IdeaPad 300
xcopy /herky %USB%\_ISO\WINDOWS\INSTALLS\DRIVERS\IDPAD300\W8_10_64\*.* %systemdrive%\DRIVERS\IDPAD300\W8_10_64\

:: We can remove the USB drive now before we install the drivers
:: This script is now running directly from C:\DRIVERS - use 'exit' so it does not return to the USB drive cmd file
echo.
echo YOU CAN REMOVE THE E2B USB DRIVE IF [CAPS LOCK] OR [SCROLL LOCK] LED IS LIT...
echo.
start /wait %systemdrive%\DRIVERS\nircmd.exe speak text "You can remove the USB drive now"
:: Turn on CAPSLOCK to indicate safe to remove E2B
start /wait %systemdrive%\DRIVERS\nircmd sendkeypress capslock scroll
timeout 5

:: Now install drivers from the C: drive
echo %date% %time% Installing drivers >> %log%
call %systemdrive%\DRIVERS\IDPAD300\W8_10_64\ID300_DRIV_INST.cmd
start /wait %systemdrive%\DRIVERS\nircmd.exe speak text "Driver install completed"

:: Do NOT return back to the end of SDI_CHOCO.cmd because it is running from the USB drive which is now gone!
exit
You can install several choco packages using just one line:
choco install 7zip.install googlechrome sysinternals winmerge FoxitReader -r -y >> %log%
5. Create a \_ISO\WINDOWS\INSTALLS\CONFIGS\IDEAPAD300\NoSDI.tag file to prevent the Snappy SDI from installing the generic drivers. It can be an empty file.
Example assumes your config folder is IDEAPAD300.
See my blog for more details.
Also note: The MySpecialize.cmd file contains the following lines:
:: activate Windows if possible using BIOS OEM key
call C:\DRIVERS\autoactivate.cmd
:: Remove this line if you want to install bespoke drivers (example below)
goto :eof
:: Install bespoke driver
:: Copy bespoke drivers for IdeaPad 300
xcopy /herky %USB%\_ISO\WINDOWS\INSTALLS\DRIVERS\IDPAD300\W8_10_64\*.* %systemdrive%\DRIVERS\IDPAD300\W8_10_64\
:: We can remove the USB drive now before we install the drivers
...more here
The lines in red should be deleted (goto :eof means ‘go to the end of the file’ so any lines following it will never be executed) and you should change the ‘xcopy’ line below it as required for your drivers.
How to run other programs or cmd scripts
Example: You want to add a power profile script which you downloaded from https://windowsafg.com/power10.html
1. Copy the power.bat file to your main config folder, e.g. \_ISO\WINDOWS\INSTALLS\CONFIGS\SDI_CHOCO
2. Add the following line to one of your Myxxxxx.cmd scripts, e.g. \_ISO\WINDOWS\INSTALLS\CONFIGS\SDI_CHOCO\MyStartup.cmd
start /wait C:\DRIVERS\power.bat >> %log%
Note: The WAFG site contains links for a Feature Configurator, Power Plan and Services script utility at the bottom of each of the XML generator pages.
Capture drivers and re-apply them to a freshly installed system
You can use a DISM command to collect any current (.INF) drivers on a fully installed system.
You can then add those driver folders to a SDI_CHOCO configuration and add a line into your MySpecialize.cmd script to run a DISM command to install those drivers onto a similar system.
See here for more details about the DISM command.
How to install applications offline
Install your own packages
You can install applications by adding the packages to your E2B drive first.
You can download application install files from npackd.appspot.com. Choose the versions you want and copy them to the E2B USB drive’s \_ISO\WINDOWS\INSTALLS\APPS folder (use sub-folders for each one, e.g. one for Foxit Reader, one for NotePad++, one for AppX, one for APPy, etc.).
We need to ensure that the applications are copied to the C:\DRIVERS\APPS folder by adding xcopy lines to MySpecialize.cmd.
MyStartup.cmd will automatically run any .cmd file that it finds in the C:\DRIVERS\APPS folder, so copy over one or more .cmd files to %systemdrive%\DRIVERS\APPS by editing MySpecialize.cmd and they will be automatically run later.
Example below copies Foxit Reader application installer files and also a .cmd file which will install Foxit Reader using those files…
MySpecialize.cmd
Look for the :: ——– COPY BESPOKE APPS TO C:\DRIVERS\APPS ———— section in MySpecialize.cmd and add in some lines which will copy your app setup files…
For example::
:: Copy bespoke apps
xcopy /herky %USB%\_ISO\WINDOWS\INSTALLS\APPS\FOXIT\*.* %systemdrive%\DRIVERS\APPS\FOXIT\
:: now copy the .cmd file C:\DRIVERS\APPS folder so it will auto-run
xcopy %USB%\_ISO\WINDOWS\INSTALLS\APPS\FOXIT\Foxauto.cmd %systemdrive%\DRIVERS\APPS\
Foxauto.cmd would contain the line…
start /wait C:\DRIVERS\APPS\FOXIT\FoxitReader734_enu_Setup_Prom.exe /silent
Note that it expects the files to be in C:\DRIVERS\APPS\FOXIT (if %systemdrive% is C: which it usually is!).
MyStartup.cmd is only required to be changed if you do not copy any .cmd file to the C:\DRIVERS\APPS folder.
So if you did not copy any .cmd file to %systemdrive%\DRIVERS\APPS\ to install FoxIt, then you need to add the silent install command into MyStartUp.cmd – e.g.
start /wait C:\DRIVERS\APPS\FOXIT\FoxitReader734_enu_Setup_Prom.exe /silent
The advantage of installing apps directly, is that internet access is not required and you can disable choco (using NoChoco.tag). The installation is thus completely offline.
Note: StartUp.cmd already contains the lines:
:: ----- BESPOKE APP INSTALL ---
:: Install any apps we have added - run all .cmd files in DRIVERS\APPS folder...
FOR %%I IN (%systemdrive%\DRIVERS\APPS\*.cmd) DO CALL :loopbody %%I
This means that any *.cmd files that you copy to the C:\DRIVERS\APPS folder should automatically run. You can examine the .log files in C:\temp to see if it was called.
Any output from your cmd file will go into the log file which you can check later.
You may also wish to use NiNite to install applications. If you use the Pro version you can use the /Silent switch to install apps silently and /freeze for offline installs.
Silent Install switches
Most installation packages will accept parameters so that they will install automatically without requiring any user input (e.g. app.exe /s).
The parameters that you need to use can be found using Google or you can use the Universal Silent Switch Finder application (may be outdated) or search the ITNinja site for installation tips.
Install Choco applications offline
If you install choco (either online install using the standard SDI_CHOCO cmd script or an offline install of the choco package), then you can point choco at an offline choco package (e.g. choco install FoxitReader -source: C:\DRIVERS\CHOCBOX).
You can use the ChocolateStore/ChocBox utility to download and convert a choco package for offline installation and then add the offline packages into your SDI_CHOCO APPS folders.
In this way you have a choice of 1000’s or pre-made, self-installing applications.
For more details see here.
Adding configuration sets for different systems
Let us suppose you want to install Windows 10 to three different systems (say a Dell PC, a Lenovo notebook and an HP notebook).
Also, you want to install two different sets of software (say one for Software Development and one for general use).
This means you will need to create six different copies of the SDI_CHOCO folder and create six XML files.
Example: Dell_XPS27_Dev
1. Copy the \_ISO\WINDOWS\INSTALL\CONFIGS\SDI_CHOCO\SDI_CHOC.cmd file and rename it to Dell_XPS27_Dev.cmd
2. Copy the \_ISO\WINDOWS\INSTALL\CONFIGS\SDI_CHOCO folder and rename it to Dell_XPS27_Dev (folder is exactly the same name as the .cmd file)
3. (optional) If the name of the .cmd file matches the name of the folder exactly (e.g. CONFIGS\Dell_XPS27_Dev.cmd and CONFIGS\Dell_XPS27_Dev) then you do not need to edit the file (E2B v1.93+).
If the .cmd file name does not exactly match the configuration folder name then edit the \_ISO\WINDOWS\INSTALL\CONFIGS\Dell_XPS27_Dev.cmd file and change the line:
set CONFIGDIR=%USB%\_ISO\WINDOWS\INSTALLS\CONFIGS\%~n0
to
set CONFIGDIR=%USB%\_ISO\WINDOWS\INSTALLS\CONFIGS\Dell_XPS27_Dev
4. Make a new XML file for your system or find an existing SDI_CHOCO.xml file
Make sure it has a RunSynchronous section for the Specialize pass which runs your CONFIGS\xxxx.cmd file (look at one of the existing xxxxSDI_CHOCO.XML files for reference).
If your XML file does not have a Microsoft-Windows-Deployment component entry, simply paste one in directly under the line for both x86 and amd64 components.
Note: If there are already RunSynchronous entries, make sure you change the x Order number!

Make sure you change “SDI_CHOCO.cmd” to “Dell_XPS27_Dev.cmd” (four places).
Note: There is a maximum line length limitation for the <Path> line of 259 characters.
5. Now you can edit the My*.cmd files to install applications or drivers (use the Sample_Myxxxxx.cmd files as templates).
The config control files that you will need to edit/add for each configuration are *.TAG and My*.cmd.
Using SDI_CHOCO with .imgPTN files (for UEFI booting)
It is possible to use the same SDI_CHOCO installation process using a .imgPTN file, however it is more complicated to set up.
Note: New method for 2020 – for non-secure UEFI or Secure Boot (Other OS), try the a1ive grub2 File Manager. You can direct UEFI-boot and load a Windows Install ISO + XML file (will Secure Boot on many systems too). There is no need for .imgPTN files unless you need to Secure UEFI-boot on all systems (using Microsoft Secure Boot).
You will need the latest MPI Tool Kit which contains the \e2b\Stage1.cmd and \e2b\Stage2.cmd files.
IMPORTANT: Note that the XML file needs to be named \Unattend.XML if it does NOT contain a WindowsPE configuration pass, or \AutoUnattend.xml if it does contain a WindowsPE pass (more info here)..imgPTN files can be copied to any of the primary menu folders (e.g. \_ISO\MAINMENU or \_ISO\WINDOWS\WIN10 or \_ISO\WINDOWS\WIN8 or \_ISO\WIN, etc.) WARNING: If you use an XML file which automatically wipes the target hard disk, then as soon as you UEFI-boot from the .imgPTN file, Windows Setup will wipe the target hard disk WITHOUT ANY WARNING. For this reason, I suggest you name the .imgPTN something like DANGER_AUTOWIPE_Windows10x64_SDI_CHOCO.imgPTN to remind you!
REMEMBER: Never leave the E2B USB drive with the .imgPTN file ‘switched in’ – if you stick the USB drive into your office PC and boot from it, then it will immediately wipe your office PC hard disk!
I recommend that you use Chandra’s Split_WinISO tool to make the .imgPTN file and choose the Auto.cmd\Winpeshl.ini option so that when you UEFI-boot, it does not automatically wipe the system disk without prompting you – see here for more details.
Tip: For UEFI booting, use a file extension of .imgPTN23. This will allow you to UEFI-boot to the 2nd agFM partition and switch back in the E2B partition 1 after you have finished installing Windows (no need to use SWITCH_E2B.exe).
Removable E2B USB drive
If your E2B USB drive is a removable drive, the process is as follows:
1. Make your .imgPTN file from an ISO (e.g. Windows 10 Anniversary) – use the MPI_FAT32 shortcut if you want UEFI-booting to work
2. Switch to the .imgPTN image (e.g. using \_ISO\Switch_E2B.exe)
3. Ensure the \e2b\Stage1.cmd and \e2b\Stage2.cmd files are present
4. Copy the XML file as \Unattend.xml or \AutoUnattend.xml to the root of the partition (it should run \e2b\Stage1.cmd). An example XML file for an MBR (not UEFI) install which auto-formats drive 0 is included in the e2b folder; you can copy this and rename it as \AutoUnattend.xml to use with the ‘English’ USA ISO version of Win10. Note that the command to run Stage1.cmd must be in the ‘Specialize’ pass section.
5. (optional) Create a \e2b\MyConfig.cmd file and add a ‘set CONFIG=’ line as the name of your main configuration file – e.g. if you want it to run \_ISO\WINDOWS\INSTALLS\CONFIGS\IdeaPad300.cmd, then use:
set CONFIG=IdeaPad300.cmd
If you don’t create a MyConfig.cmd file, SDI_CHOCO.cmd will be used.
6. Ensure that RMPartUSB.exe and FindCSMandRestoreE2B.cmd are present in the \e2b folder. Ensure that \WINHELPER.USB does NOT exist.
Required files:
\Unattend.xml
\e2b\Stage1.cmd
\e2b\Stage2.cmd
\e2b\FindCSMandRestoreE2B.cmd
\e2b\RMPartUSB.exe
\e2b\MyConfig.cmd (optional)
IMPORTANT: Note that the XML file needs to be named \Unattend.XML if it does NOT contain a WindowsPE configuration pass, or \AutoUnattend.xml if it does contain a WindowsPE pass.
Fixed-disk E2B USB drive
If your E2B USB drive is a Fixed-disk drive (e.g. USB HDD), then you will need to mount the \sources\boot.wim file and add the same files into the root of the boot.wim image. For details on how to mount the boot.wim file see here.
WinNTSetup: If you use WinNTSetup.exe to install Windows, then you will not have to modify the boot.wim.
- Boot to WinPE (x86 or x64) from .imgPTN file
- Run \e2b\RestoreE2B_32_64.cmd to restore the E2B partition
- Run WinNTSetup.exe from E2B partition, partition target hard disk, select SDI_CHOCO XML file and click WinNTSetup Start button
See here for more details.
Note (MPI v0.068+): If you wish, you can instead connect a small Removable ‘WinHelper’ flash drive as well as the Fixed-disk E2B drive and place the XML file in the root of the .imgPTN partition. The file must be called \AutoUnattend.XML (or \Unattend.XML – see box above). It will be copied to the WinHelper USB drive when you boot to the CSM menu. The WinHelper flash drive must contain the 100K dummy XML files.If you are UEFI-booting, you must either boot to the CSM menu first (not in a VM), or ensure that you manually copy the \AutoUnattend.xml file to the WINHELPER flash drive just before you boot via UEFI. OR use an IODD 2531 and load a WinHelper .RMD file to emulate a Removable Helper drive.
Using this method, you do not need to edit the boot.wim file.
1. Make your .imgPTN file from an ISO (e.g. Windows 10 Anniversary) – use the MPI_FAT32 shortcut if you want UEFI-booting to work
2. Switch to the .imgPTN image (e.g. using \_ISO\Switch_E2B.exe)
3. Mount the correct boot.wim image – usually #2 (e.g. as C:\mount1)
4. Copy the e2b folder from the USB drive to the root of the image folder (e.g. C:\mount1\e2b\*)
5. Copy the XML file as \Unattend.xml to the root of the image folder (or \AutoUnattend.xml – see box). Note that the command to run Stage1.cmd must be in the ‘Specialize’ pass section.
6. (optional) Create a \e2b\MyConfig.cmd file and add a ‘set CONFIG=’ line as the name of your main configuration file – e.g. if you want it to run \_ISO\WINDOWS\INSTALLS\CONFIGS\IdeaPad300.cmd, then use:
set CONFIG=IdeaPad300.cmd
If you don’t create a MyConfig.cmd file, SDI_CHOCO.cmd will be used.
Required files (when boot.wim is mounted under Windows):
C:\mount1\Unattend.xml (or \AutoUnattend.xml)
C:\mount1\e2b\Stage1.cmd
C:\mount1\e2b\Stage2.cmd
C:\mount1\e2b\FindCSMandRestoreE2B.cmd
C:\mount1\e2b\RMPartUSB.exe
C:\mount1\e2b\MyConfig.cmd (optional)
Note: The Unattend.XML file must contain a Specialize RunSynchronous section that looks for and runs \e2b\Stage1.cmd and not the SDI_CHOCO.cmd file (see included example in the MPI .\csm\e2b folder).
IMPORTANT: Note that the XML file needs to be named \Unattend.XML if it does NOT contain a WindowsPE configuration pass, or \AutoUnattend.xml if it does contain a WindowsPE pass.
How it works
When the E2B drive boots, the original E2B partition is hidden. Windows can only see the .imgPTN partition.
- Stage1.cmd first copies Stage2.cmd and some other files to the target hard drive (C:\DRIVERS).
- It then runs Stage2.cmd.
- Stage2.cmd runs from the hard drive and calls FindCSMandRestoreE2B.cmd which switches back the E2B drive to ‘E2B Mode’ – this makes the E2B drive contents and the \_ISO\WINDOWS\INSTALLS folder accessible.
- Stage2.cmd then locates the E2B USB drive and calls the required configuration file – e.g. \_ISO\WINDOWS\INSTALLS\CONFIGS\SDI_CHOCO.cmd.
- From then on, the process is the same as if you installed from an ISO file.
Note that the next time you boot to E2B from the USB drive, it will be in ‘E2B Menu mode’ and not ‘CSM Menu mode’.
The Stage2.cmd file will look for a USB E2B drive which will only be found if the drive is detected as a USB drive. For this reason you cannot use a VM which configures the E2B USB drive as a hard disk instead of a USB drive (e.g. VirtualBox). Use VMWare and allocate the E2B USB drive as an attached USB drive and boot from it via UEFI.
The ‘no internet’ problem
The first release of Win10 TH2 did not correctly set up the network interface when it reached the Specialize phase during Windows Setup. Microsoft fixed this in later versions of TH2.
Windows 8.1 did not have this issue.
Microsoft have also repeated the same mistake(!) in the first release of the Anniversary version of Win10!
SDI_CHOCO attempts to get round this by running msoobe for ten seconds and then killing msoobe. This seems to fix the problem.
If there is still no internet connectivity and you are installing Win10, SDI_CHOCO will launch msoobe again which allows you to set up a WiFi connection (if it is not disabled in the XML file settings using true). Once you have set the WiFi SSID/password, use ALT-TAB to switch back to SDI_CHOCO and press ENTER to continue. SDI_CHOCO will then terminate msoobe.
If you only install apps using choco using MyStartup.cmd, you may be able to avoid this issue because the internet connection may be working by then!
Tip: Add the file NoInternet.TAG to the \_ISO\WINDOWS\INSTALLS\CONFIGS\SDI_CHOCO folder to stop SDI_CHOCO from checking for internet access and launching msoobe. You can add offline choco application packages.
Changing the ComputerName
The ComputerName can be pre-set in the XML file. However, you can change the ComputerName by using code in MyStartup.cmd. For instance, you could change the ComputerName to be the Serial Number of the system or perhaps a prefix+MAC address (e.g. NB-A9623F3A9BDB). There is sample code at the end of Sample_MyStartup.cmd which you can modify to change the ComputerName (E2B v1.A1+). You can also use a special .mnu file (e.g. WIN10_Prompt_for_UNAME_auto_serial_COMPNAME.mnu) to modify the XML file before the build begins (for installation from .ISO filesI). There are some sample .cfg files for use with agFM if you want similar pre-boot selection prompts for UEFI-booting.
The ComputerName must be different from any account name created and must not be ‘NONE’ (four letters).
Logging
Log files will be present in the C:\Temp folder. Some errors may be logged in separate *_ERRORS.log files.
C:\Temp\SDI_CHOCO.log
C:\Temp\setupcomplete.log
C:\Temp\startup.log
C:\Temp\SDI_CHOCO.cmd – a copy for reference only
If the main SDI_CHOCO.cmd file was run (or whatever config set was specifified in the XML file) the file C:\WINDOWS\DONE_SDI.tag will be present. If that file is not present, then the XML entry was not executed, so there was a problem in the XML file!
Tip: If some of the .log files seem to be missing some lines and start with text generated by lines of code that you have written, check for syntax bugs in your code where you have written > %log% instead of>> %log% !!!
Debugging and Troubleshooting
If there is no C:\TEMP folder after installation, then the SDI_CHOCO.cmd file (or whatever was specified in your XML file) did not run. C:\Windows\Panther\unattend.xml will contain a (modified) copy of the XML file that Setup used. Check it is the one you specified. Check the C:\Windows\Panther\UnattendGC\setupact.log file for a ‘[SETUPGC.EXE] Found RunSynchronous command:’ line. There should be a time jump where the .cmd file was executed just before the ‘[SETUPGC.EXE] Finished executing [cmd’ line.
In a .cmd file, lines beginning with REM or :: are ignored (comment lines).
If you place the command ‘echo on’ at the beginning of a file, it will allow you to see what happens in your MySpecialize.cmd and MyStartUp.cmd.
Use ‘pause’ to stop execution until you press ENTER to continue.
Also, remove any >> %log% text from your MySpecialize.cmd and MyStartUp.cmd files if you want to see any output from the commands.
For instance, if you have a line of code which does not seem to work, such as:
xcopy /herky %USB%\_ISO\WINDOWS\INSTALLS\DRIVERS\IDPAD300\W8_10_64\*.* %systemdrive%\DRIVERS\IDPAD300\W8_10_64\ > nul
and there are no files being copied to the C:\DRIVERS\IDPAD300\W8_10_64\ folder, change the lines to:
 echo on
 echo About to run xcopy
 pause
 xcopy /herky %USB%_ISO\WINDOWS\INSTALLS\DRIVERS\IDPAD300\W8_10_64*.* %systemdrive%\DRIVERS\IDPAD300\W8_10_64\
 echo xcopy has run
 pause
 echo off
and start an installation. You should find that when the script file is run, it will stop at ‘About to run xcopy’, then press ENTER and it should copy the files over using xcopy and then stop again with the message ‘xcopy has run’. This will allow you to see if the xcopy worked or reported an error. Finally, press ENTER again and the installation will continue.
When it is all working, you can remove the extra lines.
The script files, SDI_CHOCO.cmd and startup.cmd both start with the line ‘echo off’. This stops all the commands from being displayed in the console. If you wish, you can change ‘echo off’ to ‘echo on’ at the start of these files, so that you can see all the commands being executed. You can also place ‘pause’ lines anywhere you like in your Myxxxxx.cmd files, so you can pause the script and see what is going on.
If you are having trouble with choco installs, remove the >> %log% text and use pause and echo off, e.g.
MyStartup.cmd
:: configure choco to allow non-checksummed packages and not prompt user for 'Yes' (-y is not needed)
choco feature enable -n allowEmptyChecksums
choco feature enable -n allowGlobalConfirmation
choco install 7zip -y -r >> %log%
choco install jre8 -y -r >> %log%
can be changed to
echo on
:: configure choco to allow non-checksummed packages and not prompt user for 'Yes' (-y is not needed)
choco feature enable -n allowEmptyChecksums
choco feature enable -n allowGlobalConfirmation
choco install 7zip -y -r
choco install jre8 -y -r
pause
Remember that if you update E2B to a newer version, the original E2B files (e.g. SDI_CHOCO.cmd and StartUp.cmd, etc.) will be overwritten with the newer version but these files should not have been changed by you anyway. However, your Myxxxxxx.cmd files will not be overwritten when updating.
Update your Install.wim with the latest Windows Updates
WSUSOffline can add 20-200+ minutes to each install. It is much more efficient to add the Windows Updates to the Install.wim image first, before you run Windows Setup.
See here for one method using DISM (and here).
You can also run WSUSOffline afterwards if you wish using SDI_CHOCO so that you do not have to continually update your Install.wim file every week.
Text to Speech
Speech output is useful because you may not always be able to see the cmd shell window as each .cmd file is being executed. Note that the correct audio drivers (and a speaker/headphones) will be required.
SDI_CHOCO uses nircmd.exe to convert text to speech (check it exists in your CONFIGS folders – you may need to extract it first!).
If you want to keep track of what your batch files are doing, just place extra nircmd lines in your .cmd files.
start /wait %systemdrive%\DRIVERS\nircmd speak text "Now running xxx"
If you do not want any speech output at all, add the NoSpeak.tag file. Use NoBeep.tag to suppress the beeps.
Note: If you change the .\CONFIGS\SDI_CHOCO folder files, then an E2B update will replace/re-copy the standard E2B files again, so you should create and use your own CONFIGS folder, and not use the SDI_CHOCO files/folder.
nircmd is used for text-to-speech output, to control keyboard LEDs/status, kill tasks (e.g. OOBE) and to beep the speaker. It is unpacked from nircmd_self_extract_password_is_easy2boot.exe by the SDI_CHOCO.cmd file to avoid problems with antivirus detection software (v1.B0+).
Snappy Driver Installer issues
You may find that Snappy does not always install the correct drivers, e.g. touchpad, bluetooth and audio drivers.
You can simply omit\delete these from the \_ISO\WINDOWS\INSTALLS\SNAPPY\drivers folder so that they are not installed.
Tip: If you sometimes want different Snappy drivers to be installed for different configurations, you can modify your \_ISO\WINDOWS\INSTALLS\CONFIGS\xxxx.cmd file so that it deletes any unwanted drivers\DP_xxxxx.7z files after they have been copied to C:\DRIVERS but before Snappy is run.
For most notebooks, I would strongly advise that you always use the manufacturers drivers for that specific model.
The standard Snappy LAN, chipset, USB and Mass Storage drivers are usually safe to install on any system.
Often there are extra ACPI, hotkey and touchpad drivers which are not included in Snappy. These drivers are often very specific to each particular model of PC\notebook.
Also, special Registry patches are often available from the manufacturer which are required for proper operation of a notebook.
Installing Office
See the Offline sub-page here.
Useful tips
Tips on scripting and silent unattended installs of applications, etc. see here.
Disable Cortana speaking during OOBE
You can try adding this line to MySpecialize.cmd (untested).
reg add HKLM\SOFTWARE\Microsoft\Windows\CurrentVersion\OOBE /v DisableVoice /d 1 /t REG_DWORD /f
and add this line to re-enable the voice in MyStartup.cmd
reg delete HKLM\SOFTWARE\Microsoft\Windows\CurrentVersion\OOBE /v DisableVoice